Hi,
Yeah, seems you may need to start with BlurX and then go back and forth between GHS and NoiseX. Noise seems to come back after each stretch. I went out of control a bit on this one testing color saturation. I am going to collect more data. Deconvolution/BlurX is about taking pixel values and putting them where they belong. It is a zero sum game, in that the total brightness (integration of linear brightness over the image) of the image should not change - ie superposition rule. Not so for noise reduction and definitely not for stretching. So, deconvolution should be done first.
|
You cannot like this item. Reason: "ANONYMOUS".
You cannot remove your like from this item.
Editing a post is only allowed within 24 hours after creating it.
You cannot Like this post because the topic is closed.
Copy the URL below to share a direct link to this post.
This post cannot be edited using the classic forums editor.
To edit this post, please enable the "New forums experience" in your settings.
David Payne:
Hi,
Yeah, seems you may need to start with BlurX and then go back and forth between GHS and NoiseX. Noise seems to come back after each stretch. I went out of control a bit on this one testing color saturation. I am going to collect more data.
Deconvolution/BlurX is about taking pixel values and putting them where they belong. It is a zero sum game, in that the total brightness (integration of linear brightness over the image) of the image should not change - ie superposition rule. Not so for noise reduction and definitely not for stretching. So, deconvolution should be done first. Yep, Jerry stretching will usually increase your noise, you have to expect this, as you widen up again your distribution. Personally, I would not go back and forth with noiseX and GHS. Probably you will create artefacts by using noisX too often, like blurs or speckles, what you get when denoising is too strong. With every stretch you will increase the contrast in a potential artefact area and it’s not clear to me how this AI then is reacting. You can see this when you use the clone stamp fixing spots in the background . After using noiseX you might recognise a dark circle around your repair spot even if you saw before only a slight change in density. I would only do two times denoising one after bluX in linear stage to reduce the stretching and one ,finally , after stretch and the rest of processing to “iron” background flat. But try it, go for less denoising strength in each step and tell us the result, maybe an iterative approach has success. CS Markus
|
You cannot like this item. Reason: "ANONYMOUS".
You cannot remove your like from this item.
Editing a post is only allowed within 24 hours after creating it.
You cannot Like this post because the topic is closed.
Copy the URL below to share a direct link to this post.
This post cannot be edited using the classic forums editor.
To edit this post, please enable the "New forums experience" in your settings.
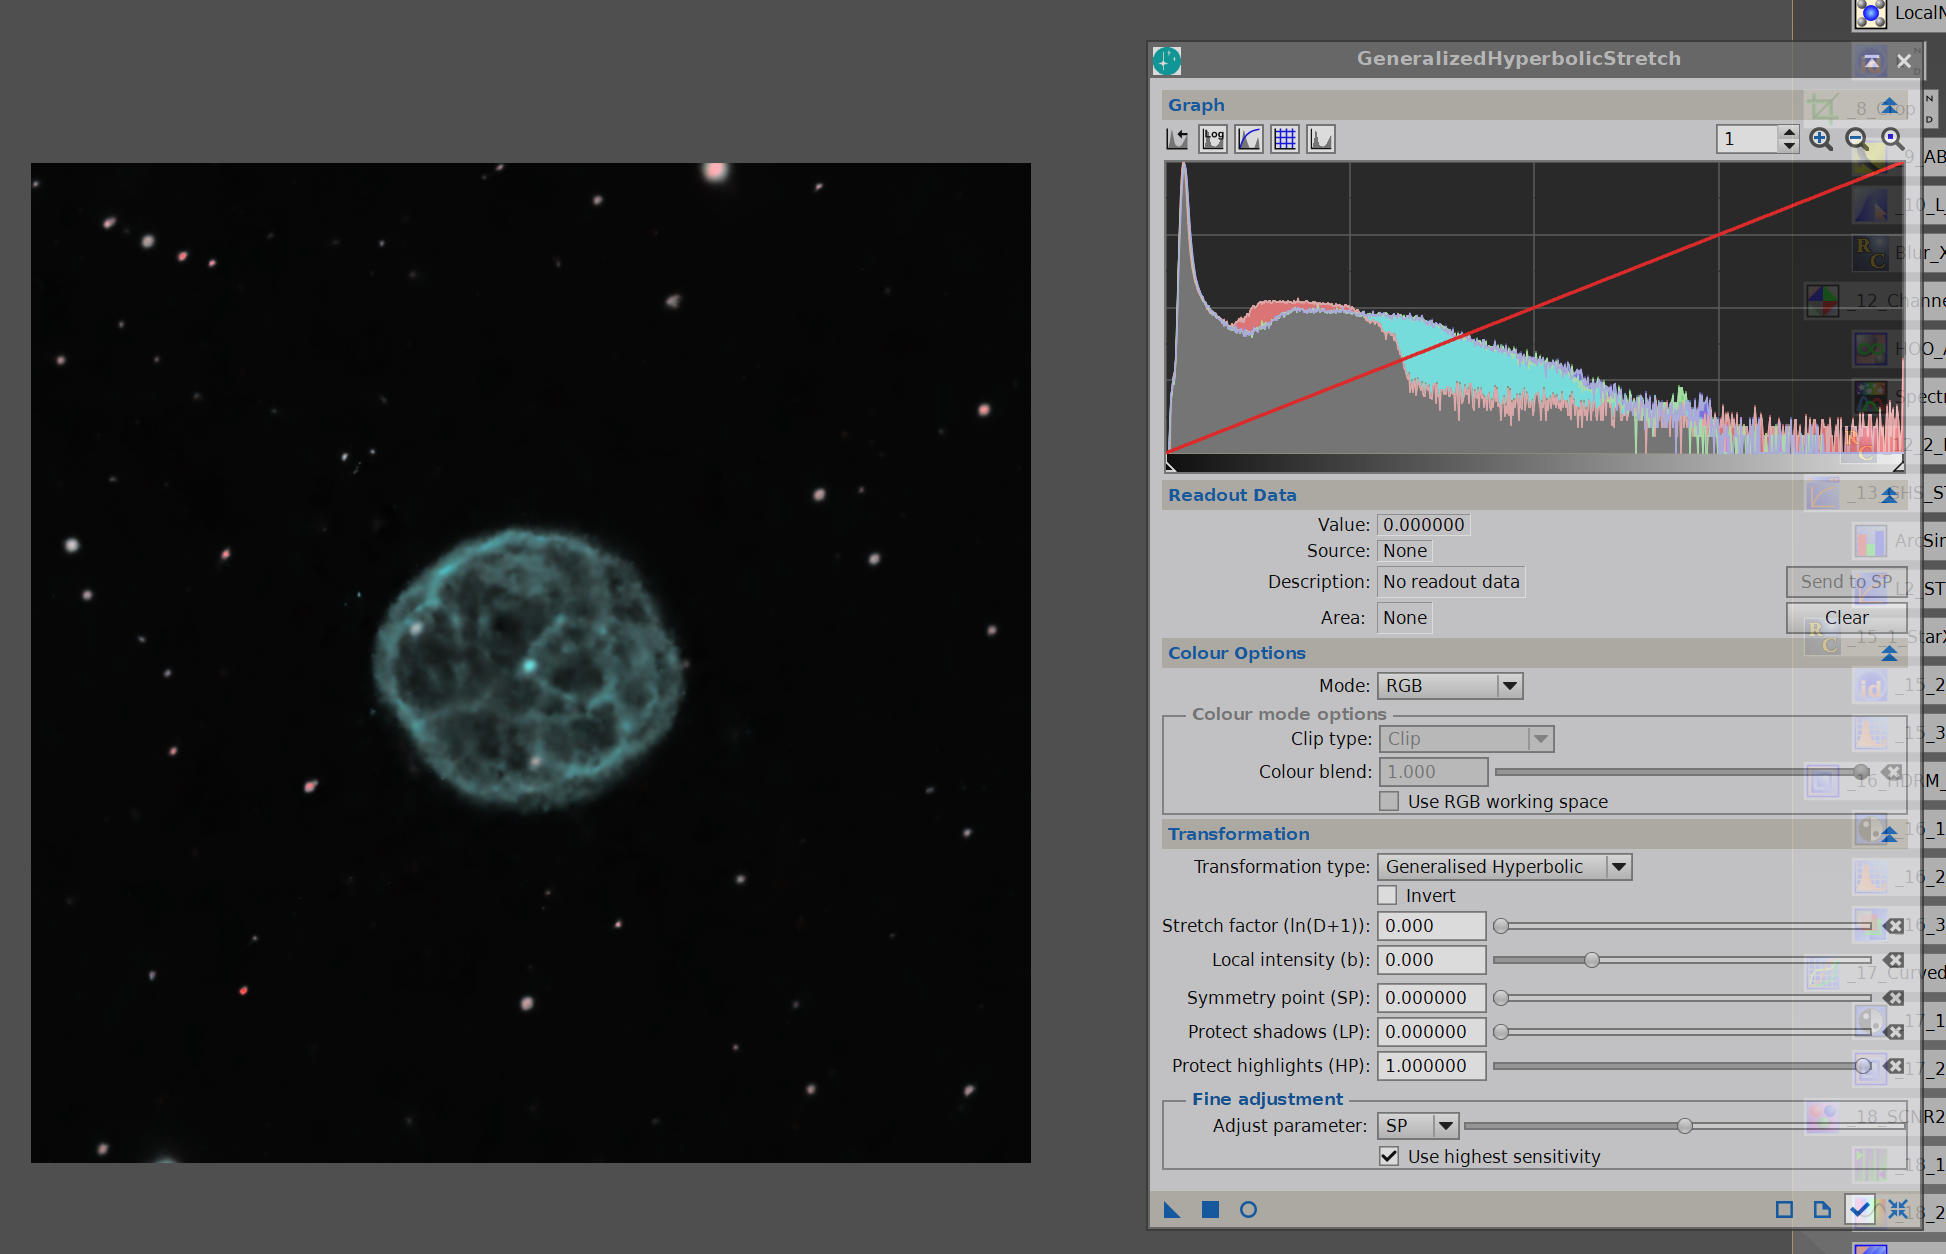
Well, this haw two denoisings and I think it is OK. Had to do the second one as there was a light salt and pepper to the image after the second stretch and after setting the black point. This is a very strong signal, so easier that my other targets that are more haze bound. At the end I tried Topaz Denoise and it is worse than NoiseX. This is a weird histogram with that bright teal nebula... the spaghetti in there is real not an artifact... on the original:  This has older versions: 
Abell 43 |
You cannot like this item. Reason: "ANONYMOUS".
You cannot remove your like from this item.
Editing a post is only allowed within 24 hours after creating it.
You cannot Like this post because the topic is closed.
Copy the URL below to share a direct link to this post.
This post cannot be edited using the classic forums editor.
To edit this post, please enable the "New forums experience" in your settings.
One more example of this iterative process. This used a composite L on the saturated RGB. There is mention of another version on the post that used a special light pollution reduction L filter from Chroma. 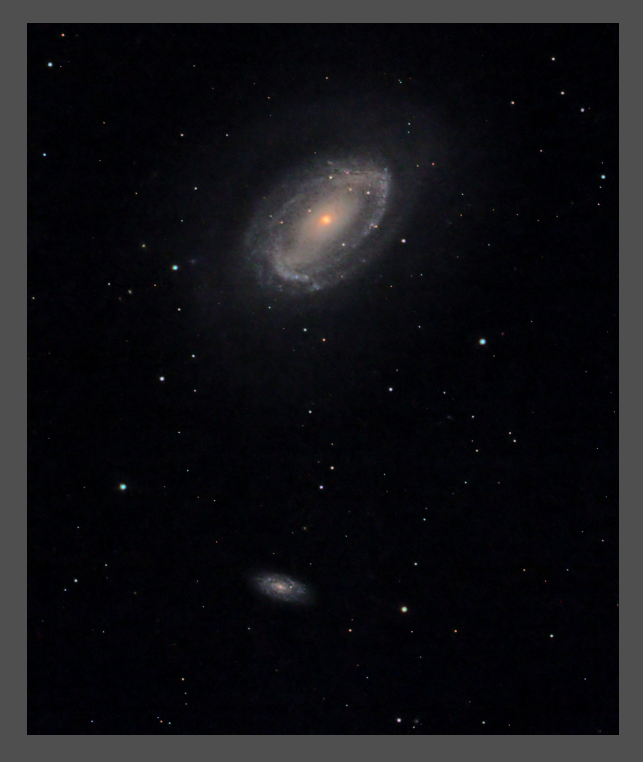 https://www.astrobin.com/a79uu8/E/ https://www.astrobin.com/a79uu8/E/ |
You cannot like this item. Reason: "ANONYMOUS".
You cannot remove your like from this item.
Editing a post is only allowed within 24 hours after creating it.
You cannot Like this post because the topic is closed.
Copy the URL below to share a direct link to this post.
This post cannot be edited using the classic forums editor.
To edit this post, please enable the "New forums experience" in your settings.
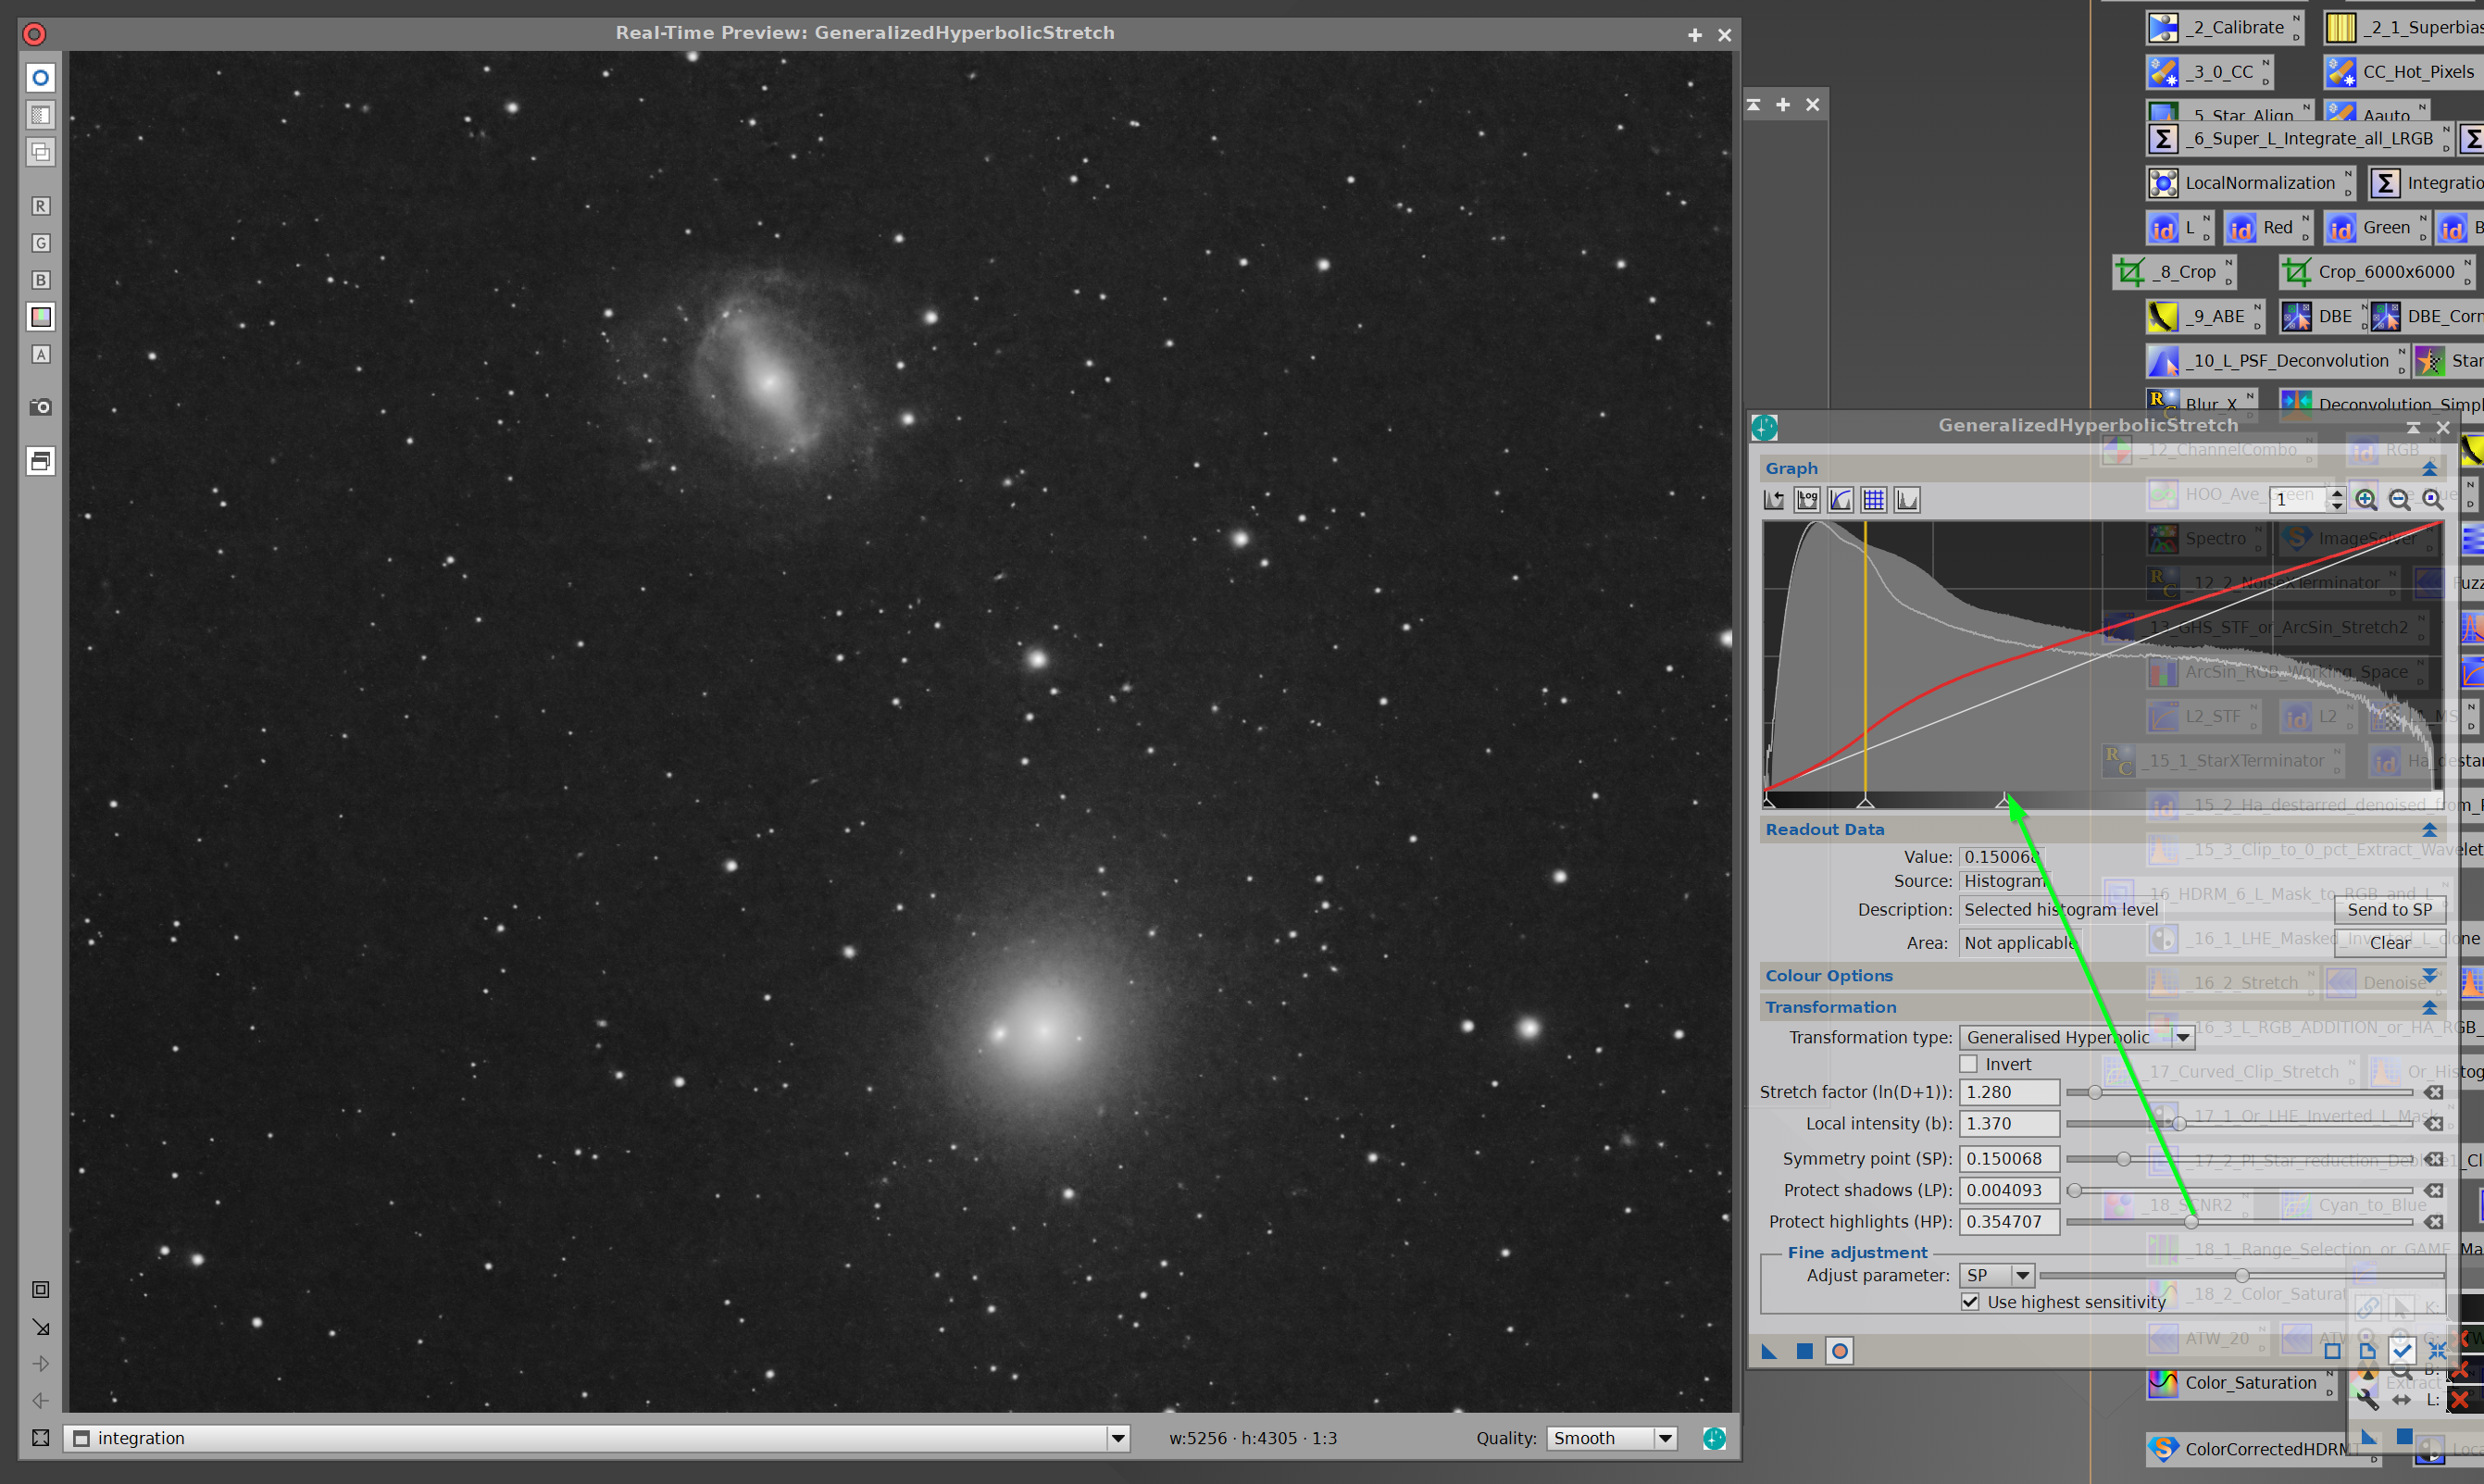
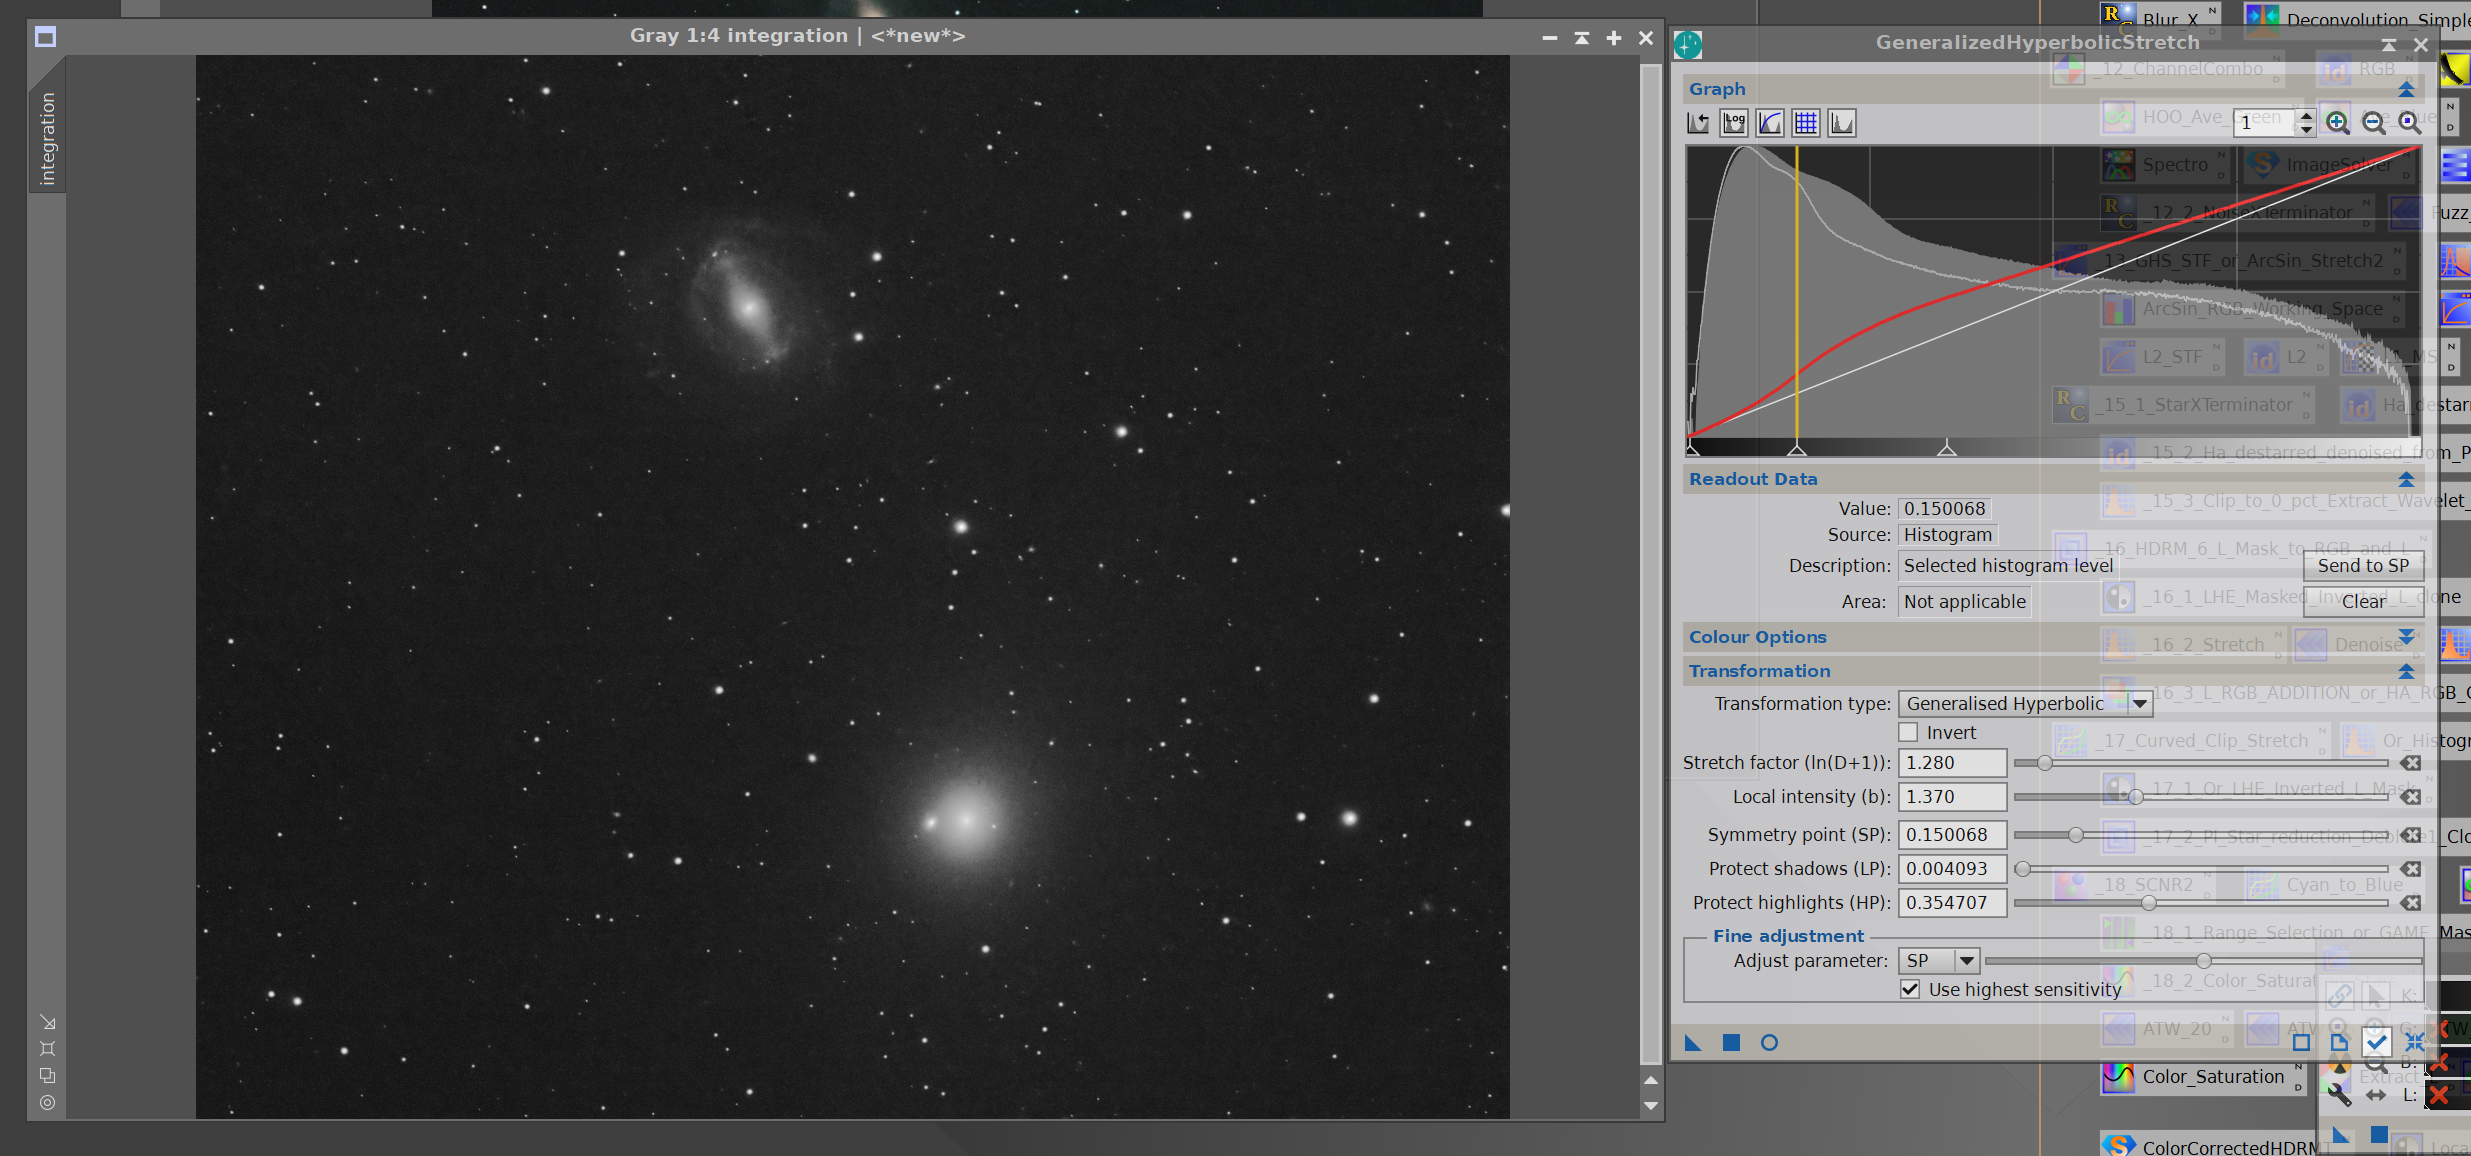
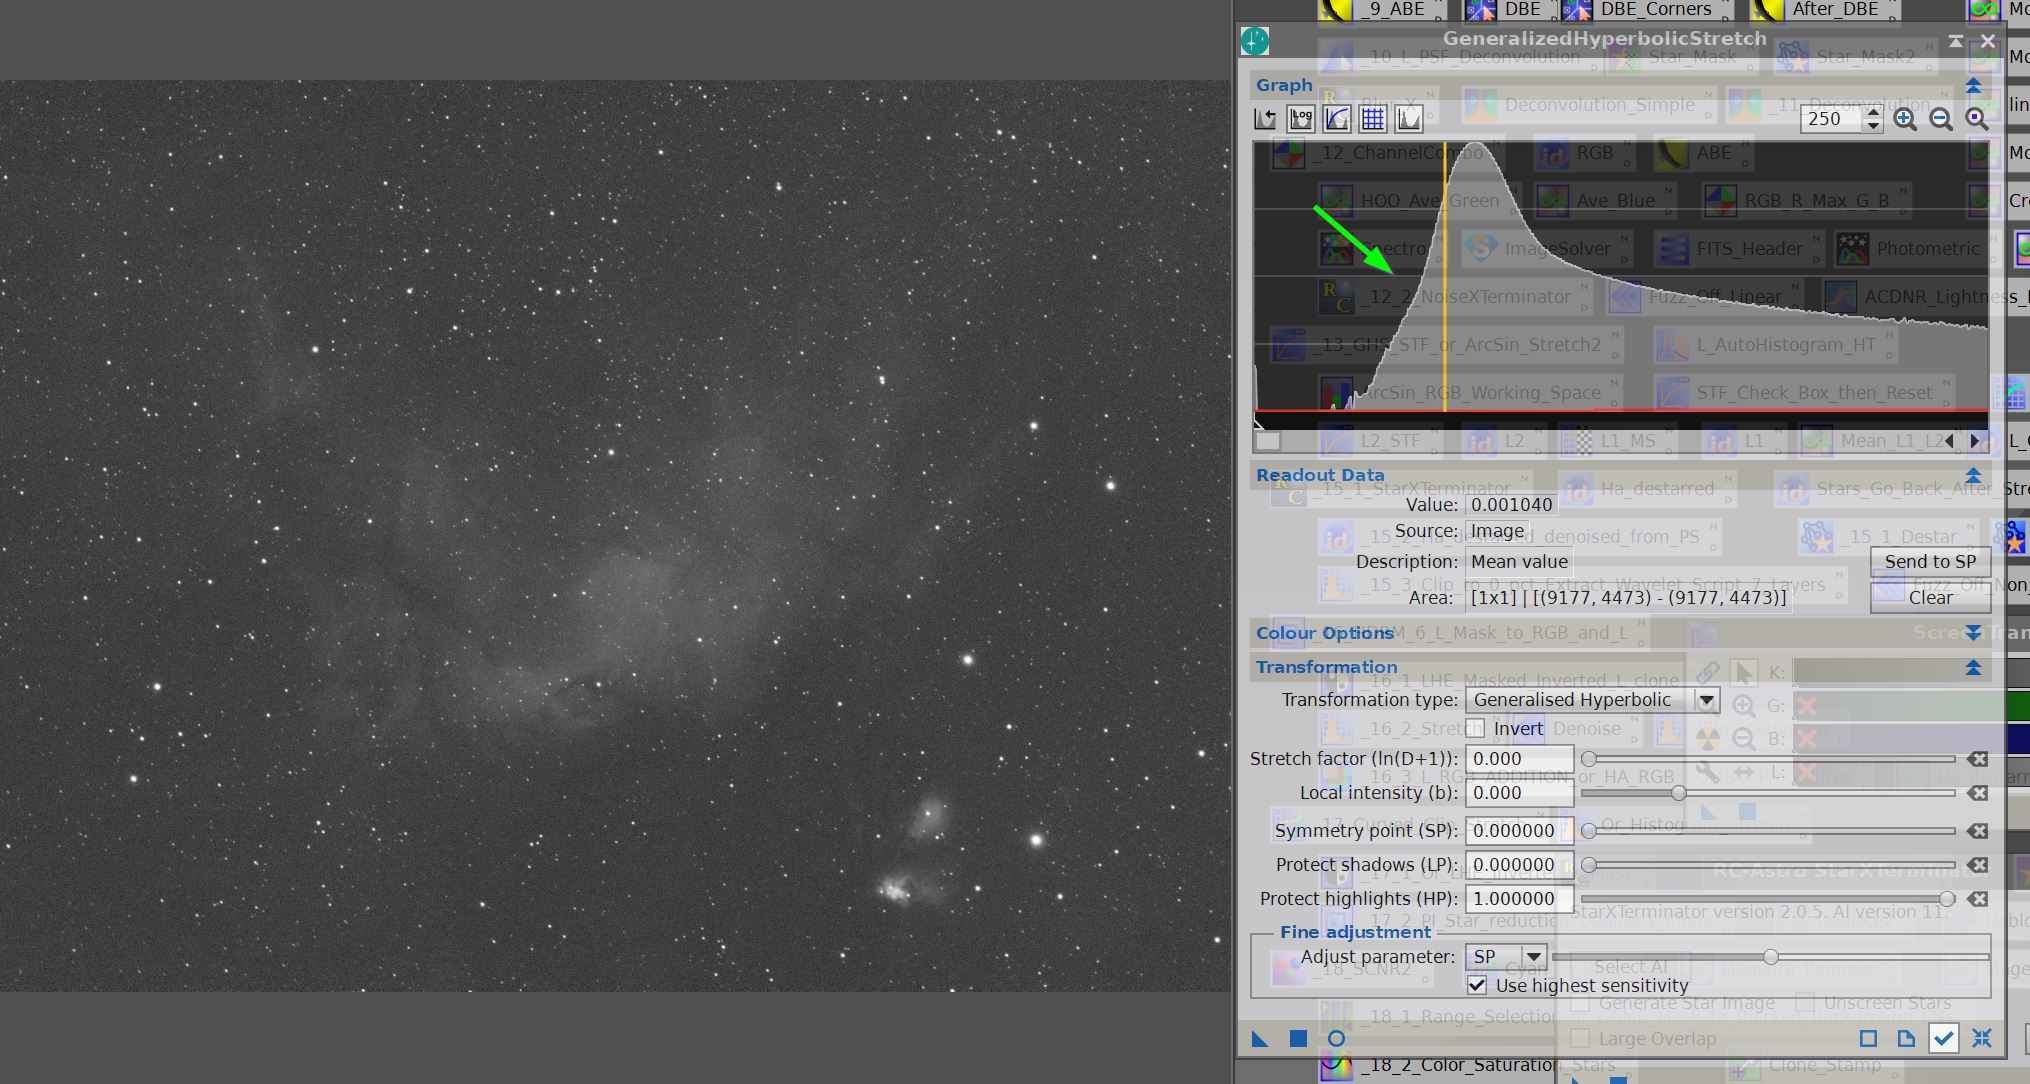
Tried to follow these instruction stretch this L image.... Set SP at the dimmest value you want to reveal (make sure your data quality will support this choice!) then set LP a bit below that value and HP a bit above that value, then a pretty aggressive b value and bring in the D factor. Do not see much with the LP... if I stretch the remaining hump, seem to get too much brightness in background. Thanks for the help. 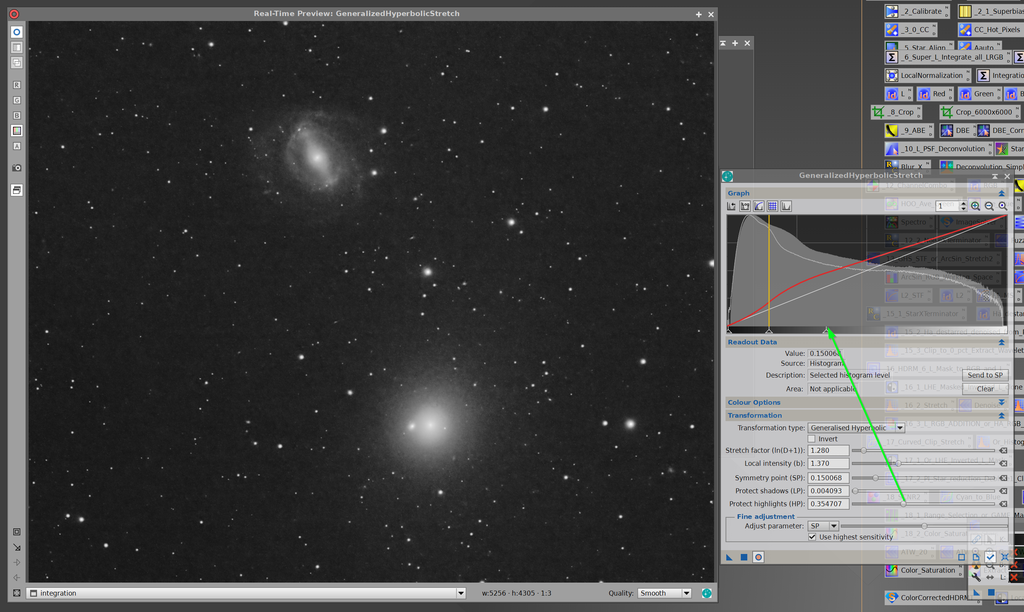 Prior to the preview above... background darker but less detail in galaxy arms. SP out of top galaxy arms. 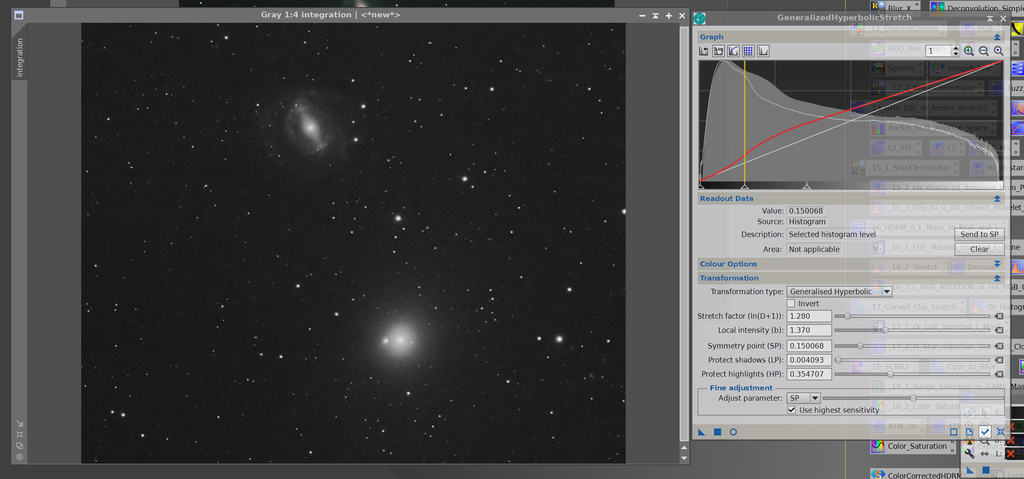 |
You cannot like this item. Reason: "ANONYMOUS".
You cannot remove your like from this item.
Editing a post is only allowed within 24 hours after creating it.
You cannot Like this post because the topic is closed.
Copy the URL below to share a direct link to this post.
This post cannot be edited using the classic forums editor.
To edit this post, please enable the "New forums experience" in your settings.
Hi Jerry,
My suggestions is to use the fine adjustment at the bottom (uncheck the high sensitivity box), then use the slider to fine tune your SP value. Then try tuning it further with b, and D, concentrating maining on the part of the images around your "hump" in the histogram, and don't worry too much about the brighter and darker until you are happy.
Then employ LP (to brighten) and HP (to darken), which may require you to increase D.
It's an interative process by checking the histogram and image preview as you go. So much of it is down to taste and what you want to show..
Hope this helps,
Dave
|
You cannot like this item. Reason: "ANONYMOUS".
You cannot remove your like from this item.
Editing a post is only allowed within 24 hours after creating it.
You cannot Like this post because the topic is closed.
Copy the URL below to share a direct link to this post.
This post cannot be edited using the classic forums editor.
To edit this post, please enable the "New forums experience" in your settings.
David Payne:
Hi Jerry,
My suggestions is to use the fine adjustment at the bottom (uncheck the high sensitivity box), then use the slider to fine tune your SP value. Then try tuning it further with b, and D, concentrating maining on the part of the images around your "hump" in the histogram, and don't worry too much about the brighter and darker until you are happy.
Then employ LP (to brighten) and HP (to darken), which may require you to increase D.
It's an interative process by checking the histogram and image preview as you go. So much of it is down to taste and what you want to show..
Hope this helps,
Dave Thanks, pretty much did what you said and it turned out OK. My big problem is the light pollution. Had to get around the glow even with your magic software. 
NGC 5846 5850I have been having a discussion with Gary Imm about length of subs and light pollution in the discussion of some of my recent shots. We both have the C11 but different Bortle Skys. It is in these images, in case that also interest you all. 
NGC 4712 4725 Duo
Virgo Trio (Arp 286) |
You cannot like this item. Reason: "ANONYMOUS".
You cannot remove your like from this item.
Editing a post is only allowed within 24 hours after creating it.
You cannot Like this post because the topic is closed.
Copy the URL below to share a direct link to this post.
This post cannot be edited using the classic forums editor.
To edit this post, please enable the "New forums experience" in your settings.
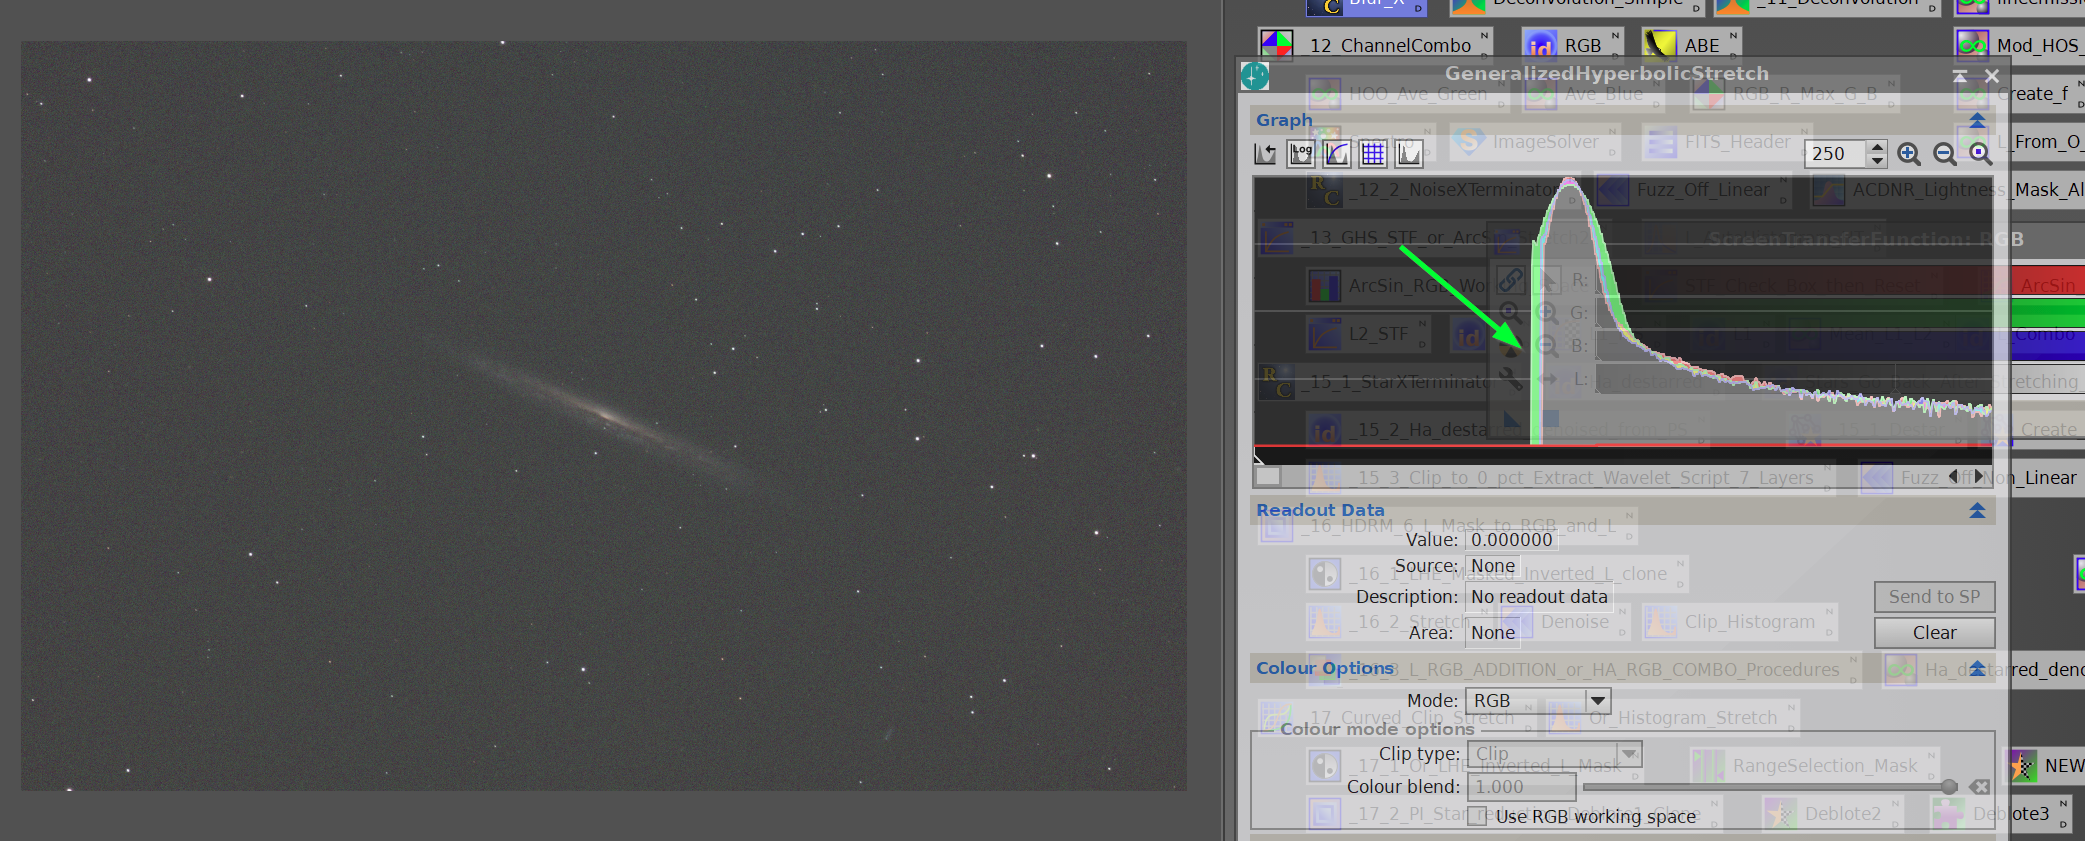
Finally clear skys and did a before and after BlurXterminator on the Splinter... look at the truncation of the left side (dark) of the histogram. 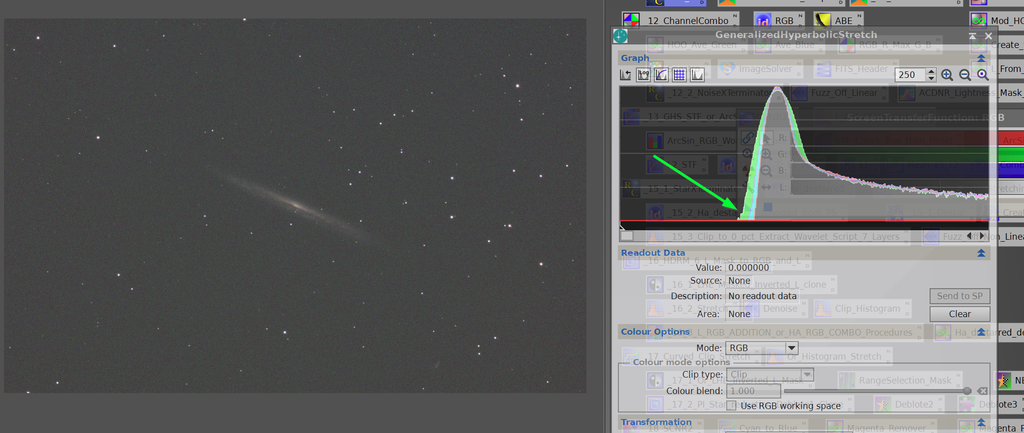 After BlurX... probably never noticed in normal histogram...... this is Log..... better use after stretched or they ought to fix BlurX: 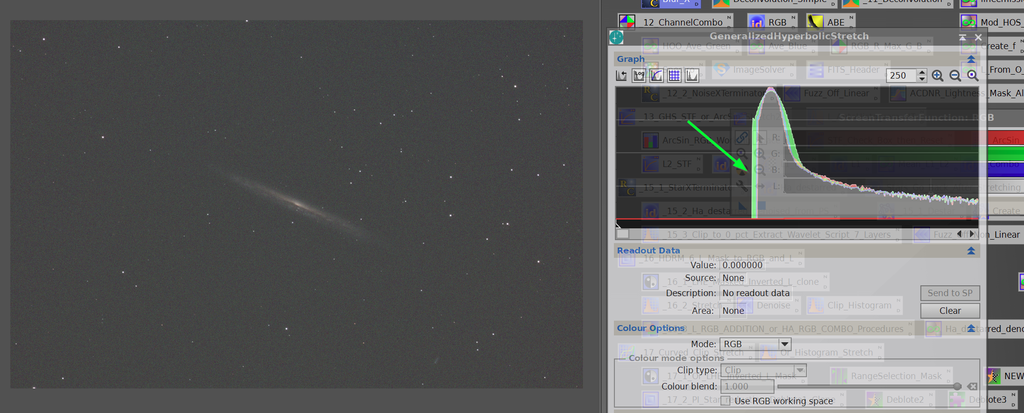 Image work in progress: 
NGC 5907 The Splinter |
You cannot like this item. Reason: "ANONYMOUS".
You cannot remove your like from this item.
Editing a post is only allowed within 24 hours after creating it.
You cannot Like this post because the topic is closed.
Copy the URL below to share a direct link to this post.
This post cannot be edited using the classic forums editor.
To edit this post, please enable the "New forums experience" in your settings.
Jerry if you create a default luminance mask and apply that to your image before applying BlurX that will protect that left hand edge. That should provide a stop gap until Russell makes a bug fix.
Thats assuming it really needs a bug fix, it just appears to be a bit of intended or unintended noise reduction. If you apply NoiseX to the image before BlurX you will see the same.
|
You cannot like this item. Reason: "ANONYMOUS".
You cannot remove your like from this item.
Editing a post is only allowed within 24 hours after creating it.
You cannot Like this post because the topic is closed.
Copy the URL below to share a direct link to this post.
This post cannot be edited using the classic forums editor.
To edit this post, please enable the "New forums experience" in your settings.
Paul Hancock:
Jerry if you create a default luminance mask and apply that to your image before applying BlurX that will protect that left hand edge. That should provide a stop gap until Russell makes a bug fix.
Thats assuming it really needs a bug fix, it just appears to be a bit of intended or unintended noise reduction. If you apply NoiseX to the image before BlurX you will see the same. Yes, was suggested in the comments on one of my recent images. Thanks. I tried it on this one and it helped: 
The Eyes NGC 4435 and 4438 (Arp 120) |
You cannot like this item. Reason: "ANONYMOUS".
You cannot remove your like from this item.
Editing a post is only allowed within 24 hours after creating it.
You cannot Like this post because the topic is closed.
Copy the URL below to share a direct link to this post.
This post cannot be edited using the classic forums editor.
To edit this post, please enable the "New forums experience" in your settings.
Well I have spent a fair few days looking at some of my images and have also spoken to Russell. He is aware of the issue and is working on an update, he also explained what is happening and why in simple terms for me. I put it all in my latest video, linked below. https://youtu.be/pM3X7fgD4pgBut in a nutshell, BlurX needs to stretch an image to get the luminance values into an appropriate range of normalised values, it does it magic and then inverts the stretch. The issue is that it can be overly aggressive with its choice of shadows clipping value and so when it inverts the stretch the left tail can be clipped. I can only reproduce the issue when using images with a lower SNR, my higher SNR images don't show clipping.
|
You cannot like this item. Reason: "ANONYMOUS".
You cannot remove your like from this item.
Editing a post is only allowed within 24 hours after creating it.
You cannot Like this post because the topic is closed.
Copy the URL below to share a direct link to this post.
This post cannot be edited using the classic forums editor.
To edit this post, please enable the "New forums experience" in your settings.
Paul Hancock:
Well I have spent a fair few days looking at some of my images and have also spoken to Russell. He is aware of the issue and is working on an update, he also explained what is happening and why in simple terms for me. I put it all in my latest video, linked below.
https://youtu.be/pM3X7fgD4pg
But in a nutshell, BlurX needs to stretch an image to get the luminance values into an appropriate range of normalised values, it does it magic and then inverts the stretch. The issue is that it can be overly aggressive with its choice of shadows clipping value and so when it inverts the stretch the left tail can be clipped. I can only reproduce the issue when using images with a lower SNR, my higher SNR images don't show clipping. As a scientist who runs a research Center it warms my heart to see my Green Arrow image used in your video. Normally I publish my best work in the Journal of Un-reproducible Results, but I guess we have an exception here. I figured some of what was going on and my remediation was to do a light stretch on the data before BlurX, like the Eyes above, but nice to see how the L-mask works. I did like the video music intro  [Same comment in YouTube]
|
You cannot like this item. Reason: "ANONYMOUS".
You cannot remove your like from this item.
Editing a post is only allowed within 24 hours after creating it.
You cannot Like this post because the topic is closed.
Copy the URL below to share a direct link to this post.
This post cannot be edited using the classic forums editor.
To edit this post, please enable the "New forums experience" in your settings.
Paul Hancock:
Well I have spent a fair few days looking at some of my images and have also spoken to Russell. He is aware of the issue and is working on an update, he also explained what is happening and why in simple terms for me. I put it all in my latest video, linked below.
https://youtu.be/pM3X7fgD4pg
But in a nutshell, BlurX needs to stretch an image to get the luminance values into an appropriate range of normalised values, it does it magic and then inverts the stretch. The issue is that it can be overly aggressive with its choice of shadows clipping value and so when it inverts the stretch the left tail can be clipped. I can only reproduce the issue when using images with a lower SNR, my higher SNR images don't show clipping.
As a scientist who runs a research Center it warms my heart to see my Green Arrow image used in your video. Normally I publish my best work in the Journal of Un-reproducible Results, but I guess we have an exception here. I figured some of what was going on and my remediation was to do a light stretch on the data before BlurX, like the Eyes above, but nice to see how the L-mask works. I did like the video music intro
[Same comment in YouTube]
Hi Paul and Jerry, Nice video Paul - I learned something and had a chuckle. Of course I am biased, but I would like to see the AI programs do their stretches using GHS. While the GHS does have the linear stretch option, there is absolutely no need to use it at all, and I almost never use it myself. How do I change my blackpoint then?, you may wonder. Well I do it via histogram/data compression on the LHS, rather than linear "black point" adjustment. I would really ask you guys to try it. To get a feel for it, at first stay in GHS and set SP at the same point where you would normally want to set the blackpoint in linear mode. Then set b to the maximum (15), leave LP alone, and drag HP with the slider all the way down from 1.0 until it bumps into SP - this will keep the stretch linear, to the right of SP, as would occur using standard black point setting. Once this is set, apply some stretch factor D and you will see the whole histogram move to the right, just as if you were adjusting black-point in linear mode. The difference is that this is being done by compressing the data, rather than clipping it. You may now say, "well, so what - it is doing the same thing". The big difference is, though that you don't have to be restricted to setting SP to the left of the histogram to avoid clipping. You can set SP into the histogram itself. The data to the right of the SP setting will still be stretched linearly, but the data to the left of the histogram (low SNR) will be compressed rather than clipped. You don't actually lose the data. In extreme "black-point" adjustment there may be some loss of fidelity due to compression left of SP, but the data remains largely recoverable and not lost. The other benefit is that by varying the amount of stretch (D slider), you can control how much data compression or "black point adjustmetn" there is. As for BlurX, if it did the black point adjustment in this way, rather than linear black-point clipping, then did its deconvolution routines, it would avoid the current problem described in the video. Note that if the BlurX developers wanted to stick to the midpoint transfer function, it is duplicated in GHS by setting b=1, and the whole problem would be solved. Ultimately, I would like to see an AI program determine the parameters for GHS stretches, or multiple GHS stretched based on some high level "image quality" settings, but this part is well beyond my capabilities to program. Please try out the "GHS compression" method of adjusting blackpoint and let me know what you think. Cheers, Dave
|
You cannot like this item. Reason: "ANONYMOUS".
You cannot remove your like from this item.
Editing a post is only allowed within 24 hours after creating it.
You cannot Like this post because the topic is closed.
Copy the URL below to share a direct link to this post.
This post cannot be edited using the classic forums editor.
To edit this post, please enable the "New forums experience" in your settings.
Dear Paul and Dave, Thanks to Dave putting up an old friend (Sh-2 73) , I reprocessed some 2016 data using BlurXterminator with the L-mask technique and then could apply noise Noise xTerminator. Probably doubled the amount of IGF visible... IMHO. 
Sh2 73 LRGB Combined 250 Frames L Data |
You cannot like this item. Reason: "ANONYMOUS".
You cannot remove your like from this item.
Editing a post is only allowed within 24 hours after creating it.
You cannot Like this post because the topic is closed.
Copy the URL below to share a direct link to this post.
This post cannot be edited using the classic forums editor.
To edit this post, please enable the "New forums experience" in your settings.
Thank you all for the great discussion about left Histogram truncation. Just to confirm/complete here are two log histograms of the same image deconvolved with BlurX, same parameters, with and without L mask. The truncation is pretty impressive! With Mask  Without Mask  In the second case the de convolution effect is weaker because of the mask, as expected.
|
You cannot like this item. Reason: "ANONYMOUS".
You cannot remove your like from this item.
Editing a post is only allowed within 24 hours after creating it.
You cannot Like this post because the topic is closed.
Copy the URL below to share a direct link to this post.
This post cannot be edited using the classic forums editor.
To edit this post, please enable the "New forums experience" in your settings.
Thank you all for the great discussion about left Histogram truncation.
Just to confirm/complete here are two log histograms of the same image deconvolved with BlurX, same parameters, with and without L mask.
The truncation is pretty impressive!
With Mask
Without Mask
In the second case the de convolution effect is weaker because of the mask, as expected. Hi Mau, Thanks for posting this, confirming @jerryyyyy 's findings. It seems that part of the BlurX routine is to set a minimum pixel brightness and either set all dimmer pixels to that brightness. Whether it is honouring superposition and taking that brightness away from brighter pixels, or just arbitrarily setting it to a value based on the AI training is not clear to me. I am thinking of doing some pixelmath to determine if the sum of all pixel brightnesses (over the entire image) remains the same both pre and post BlurX - which must be the case if deconvolution is being performed. On the other hand, if the AI was just trained on images where clipping was performed or noise was eliminated by setting this minimum, and the AI does not play by deconvolution rules, then naturally, it would do the same to images we feed it. One might say, who cares? because it makes the images look nice - and there is no money or lives at risk here, but the mathematician in me is bothered. Deconvolution means something in a mathematical sense that truly honours the data. Real world decisions are made based on the results of deconvolution in time series data. The Richardson-Lucy routines in Pixinsight goes through a process where it tries to figure out where all brightnesses recorded in an image should have originated, based on the PSF and superposition. One of the consequences of the RL routine is increased noise in the background, since the RL routine doesn't know background noise from data (stars) it simply tries to converge brightnesses on noise as well as stars. Reducing this effect is the goal of the "wavelet regularization" input. Another (brute force) method, might be to set a minimum pixel brightness level and somehow gather all the background brightness levels to set the minimum brightness at that minimum level, ignoring the PSF altogether. The result would be a histogram as you show, with no darker pixels remaining, and a spike of many pixels at the minimum. That way, any noise in the dark is completely eliminated. The same thing is done by setting a black point into the histogram. Yes, the noise is completely eliminated, but so is any data that might be there. It has the added benefit, if one isn't using GHS, of putting the maximum contrast level in the histogram transform closer to the histogram peak, without clipping data! - the data has already been clipped for you. One might think they are not losing any data, but really it has already been lost. Background noise reduction caused by deconvolution would be much better eliminated by wavelet regularization (averaging within the finest scales) and/or by following up with GHS and compressing the dark information, either of which avoids data loss. However, the noise will also still be there to some degree (only diminished). I don't think that BlurX is doing deconvolution - I think it is doing something else - deblurring of some sort that maybe nobody knows exactly how. I believe I understand how star removal by AI works, but what BlurX is doing is a mystery to me. It's that art vs science thing again. Would I calculate the M101 supernova magnitude based on a BlurX image - no I wouldn't. I can say the same for many processes but at least I would know whether, and how much, they would affect the result. With deconvolution I can confidently do and even improve the calculation from an image, but with BlurX I have no idea. There is no denying that BlurX images look nice though. Cheers, Dave
|
You cannot like this item. Reason: "ANONYMOUS".
You cannot remove your like from this item.
Editing a post is only allowed within 24 hours after creating it.
You cannot Like this post because the topic is closed.
Copy the URL below to share a direct link to this post.
This post cannot be edited using the classic forums editor.
To edit this post, please enable the "New forums experience" in your settings.
This is a very interesting discussion.
Dave, I was thinking about your point about the principle of superposition. Would I be right in thinking this principle should result in the reported "mean" value in the statistics process with the "unclipped" box checked, remaining unchanged? I have tried this and it does changed both with BXT and with deconvolution. The latter even with de-ringing and wavelet regularisation turned off.
Also mysterious to me is this issue of BXT stretching, doing its thing, then unstretching. I had understood deconvolution to rely on an uncompromised PSF. Stretching, as we know, will change the PSF.
CS, Mike
|
You cannot like this item. Reason: "ANONYMOUS".
You cannot remove your like from this item.
Editing a post is only allowed within 24 hours after creating it.
You cannot Like this post because the topic is closed.
Copy the URL below to share a direct link to this post.
This post cannot be edited using the classic forums editor.
To edit this post, please enable the "New forums experience" in your settings.
Mike Cranfield:
This is a very interesting discussion.
Dave, I was thinking about your point about the principle of superposition. Would I be right in thinking this principle should result in the reported "mean" value in the statistics process with the "unclipped" box checked, remaining unchanged? I have tried this and it does changed both with BXT and with deconvolution. The latter even with de-ringing and wavelet regularisation turned off.
Also mysterious to me is this issue of BXT stretching, doing its thing, then unstretching. I had understood deconvolution to rely on an uncompromised PSF. Stretching, as we know, will change the PSF.
CS, Mike Hi Mike, You are absolutely correct, the mean value or the sum of all the pixels values should not change under deconvolution. I like to think of it, as a picture of a star, which we know is a point source and should create a PSF on our image. If there are two stars, then two PSFs. A pixel in the middle will have some brightness contributed from both stars (which will happen if the pixels is within the PSF of both stars). Now the deconvolution takes a guess based on the PSF and if it guesses right will assign half the brightness to where star 1 is (the centroid) and half to where star 2 is. If there is sky glow, then brightness might stay where it is. At the end of the day, the brightness of a pixel can only be assigned to other points within the PSF and according to the distribution of brightness within the PSF. The total area under a PSF should equal unity so that at the end of the day, the total brightness of the image remains constant. So under this rule, an image of multiple stars is the same as multiple images of single stars superimposed on one another. When performed in this way, deconvolution is taking the single image and trying to work out what all the multiple images of single objects are. How does it do this? - by Newton iterations (or similar iteration method). With each iteration it should get closer to figuring out where all the brightness contributions come from. However, iterative methods are only approximations to the true equations, and other data and irregularities can cause side effects. But within error limits, the total brightness of an image should not change. This is a constraint that needs to be put on the method, and is normally done so by ensuring that the integral (or sum) of the PSF is equal to 1 (or the total brightness of a star). Shrinking a star should result in its brightening to compensate - which is indeed what happens under the deconvolution routine. It is also why proper deconvolution needs to be done in linear mode (before stretching) so that all the pixel values add up (ie. are linear). I have never checked the means as you have, so I am a bit surprised that you see it changing under deconvolution. Sorry if I am a bit wordy, Dave
|
You cannot like this item. Reason: "ANONYMOUS".
You cannot remove your like from this item.
Editing a post is only allowed within 24 hours after creating it.
You cannot Like this post because the topic is closed.
Copy the URL below to share a direct link to this post.
This post cannot be edited using the classic forums editor.
To edit this post, please enable the "New forums experience" in your settings.
Thanks for these comments, Dave. The change in the mean statistic is not huge and seems to be less for deconvolution than for BXT. I guess it may be down to numerical accuracy through multiple iterations?
CS, Mike
|
You cannot like this item. Reason: "ANONYMOUS".
You cannot remove your like from this item.
Editing a post is only allowed within 24 hours after creating it.
You cannot Like this post because the topic is closed.
Copy the URL below to share a direct link to this post.
This post cannot be edited using the classic forums editor.
To edit this post, please enable the "New forums experience" in your settings.
I have been thinking about this a bit more and I have come up with "the snowball analogy for deconvolution"!
Think of the light from the star as a snowball and the path as your sensor. When you drop the snowball on the path it spreads out, ie a kind of PSF. (Ok I know the PSF is not created by light splatting on the sensor but bear with me!). Deconvolution can then be thought of as gathering up the scattered parts of the snowball and packing then back into a tight shape again. No extra snow is added or taken away, it is just gathered up. Now a consequence of this will be that the snow ball will get higher in the middle - ie the peak of the star in deconvolution will get brighter. For a few bright stars I guess this could mean the cores go over a value of 1.0 and may then get clipped back to 1.0. If this happens the mean will reduce and that may be the source of the discrepancy in the mean statistic I have seen.
Those of you in warmer climes may need to substitute some other material for the snow!
CS, Mike
|
You cannot like this item. Reason: "ANONYMOUS".
You cannot remove your like from this item.
Editing a post is only allowed within 24 hours after creating it.
You cannot Like this post because the topic is closed.
Copy the URL below to share a direct link to this post.
This post cannot be edited using the classic forums editor.
To edit this post, please enable the "New forums experience" in your settings.
Well guys, the clipping occurs in StarXterminator as well as BlurXterminator. Hopefully somebody can get to the developer. I saw this because I am tweaking my guiding and had some more than normal elipticity so I wanted to remove the stars... have not been doing this since I started using GHS. I guess there is some initial process that is used in all the procedures. Maybe Paul can get to Russel... I noticed this because I saw it clobbered the detail in and Sh2 80 image I was enhancing... This is Sh2 88 and you can see I will lose the darker parts of the nebulosity... this probably has been going on for a while... I guess if you clip this also the artifacts from star removal will look better but then you lose detail in the background too... no free lunch. 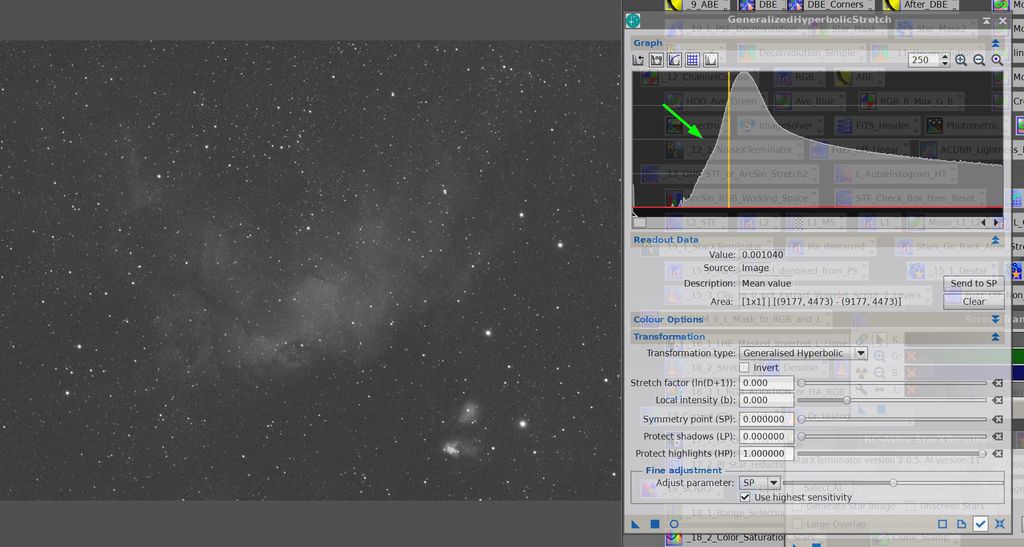 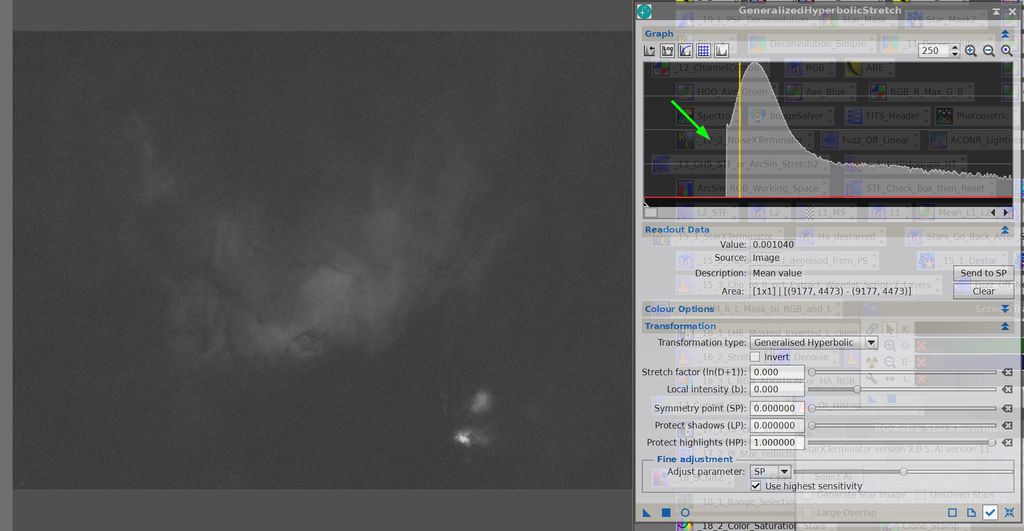 |
You cannot like this item. Reason: "ANONYMOUS".
You cannot remove your like from this item.
Editing a post is only allowed within 24 hours after creating it.
You cannot Like this post because the topic is closed.
Copy the URL below to share a direct link to this post.
This post cannot be edited using the classic forums editor.
To edit this post, please enable the "New forums experience" in your settings.
Well guys, the clipping occurs in StarXterminator as well as BlurXterminator. Hopefully somebody can get to the developer.
I saw this because I am tweaking my guiding and had some more than normal elipticity so I wanted to remove the stars... have not been doing this since I started using GHS.
I guess there is some initial process that is used in all the procedures. Maybe Paul can get to Russel... I noticed this because I saw it clobbered the detail in and Sh2 80 image I was enhancing...
This is Sh2 88 and you can see I will lose the darker parts of the nebulosity... this probably has been going on for a while... I guess if you clip this also the artifacts from star removal will look better but then you lose detail in the background too... no free lunch. Nice detective work Jerry. With some of the more sophisticated (especially AI) processes, its all about compromise. Maybe, BlurX or StarX wouldn't work as well without this loss of data. When you think about it, if you have a single pixel that is brighter than its surrounds, is it a bit of noise or is it a small star. Should the pixel be put in the star image (considered a star), the starless image (dim nebulosity), or eliminated altogether (noise). These are the decisions that an AI is making based on its training - so someone else who made the training images and picked the internal methodology - has made these decision for us. Allowing a user to make some of these decision would require more input from the user, which would require more understanding of what is going on. Your detective work is great and I would also post it to a forum dealing with BlurX and StarX specifically - I am curious what people have to say. I think you will end up with two camps - those that say that the dim nebulosity is too noisy - and look at the beauty in the images that RCAstro routines produce vs. those that would prefer a more realistic and scientific result, with the warts that come with real data. I just feel a slight need to indicate that since this is a GHS forum, GHS will not harm or abuse data in any way. The data is being conformally mapped and as long as you record the process (and don't deliberately clip data) anything you see is actually in your data - exaggerated maybe, but it is there. For lipstick, you have to go somewhere else. There is a lot of buzz in the news about the dangers of AI. Those that just want to have one button at the beginning that is labelled "Process my Image with AI". and out pops a beautiful result, that can some day be done within the camera itself!. Mind you, we may all end up with very similar images. There are many people don't enjoy the processing side of the hobby. Then there are those that want to use the tools themselves to do the best they can do while maintaining control over what is done and create something more unique. I have to admit that there is a little of both camps in me - processing without Star removal (Starnet or StarX) to get a great result is so much harder!
|
You cannot like this item. Reason: "ANONYMOUS".
You cannot remove your like from this item.
Editing a post is only allowed within 24 hours after creating it.
You cannot Like this post because the topic is closed.
Copy the URL below to share a direct link to this post.
This post cannot be edited using the classic forums editor.
To edit this post, please enable the "New forums experience" in your settings.
Interesting!
The low end could be restored using PixelMath along the lines of: iif(original < x, original, starless). Where x is found by examining the histogram and finding the cut off point.
|
You cannot like this item. Reason: "ANONYMOUS".
You cannot remove your like from this item.
Editing a post is only allowed within 24 hours after creating it.
You cannot Like this post because the topic is closed.
Copy the URL below to share a direct link to this post.
This post cannot be edited using the classic forums editor.
To edit this post, please enable the "New forums experience" in your settings.
Mike Cranfield:
Interesting!
The low end could be restored using PixelMath along the lines of: iif(original < x, original, starless). Where x is found by examining the histogram and finding the cut off point. Do you know that Mike are you just assuming...? Were the pixels just clipped - if so then why doesn't Blurx or StarNet just restore them. It could be, that BlurX assigned the value of these pixels to neighbouring pixels, which, if you added them back in, would amount to a relative over-brightening of the pixels their values were assigned to. Without knowing what happened to these pixel values it is hard to say (that darned superposition thing again. Once again again, is BlurX doing deconvolution or not?
|
You cannot like this item. Reason: "ANONYMOUS".
You cannot remove your like from this item.
Editing a post is only allowed within 24 hours after creating it.
You cannot Like this post because the topic is closed.
Copy the URL below to share a direct link to this post.
This post cannot be edited using the classic forums editor.
To edit this post, please enable the "New forums experience" in your settings.