I feel like I've hit a bit of a wall with my processing skills and am struggling to know where to look to make improvements. So far, I've learned most of what I know by following YouTube tutorials (The usual channels) but I'm looking for something a bit more. Here's my profile: https://app.astrobin.com/u/craigdixon1986I have two setups: 1: Skywatcher 190MN, EQ6-R Pro on permanent pier in custom observatory, ASI533MC Pro, Optolong L-enhance, Astronomik L3 (UV/IR Cut), ASIAir Plus, EAF, Altair MG60 guide scope, 120MM Mini 2: ZWO FF65, AM3, ASI183MM Pro, 7x36mm EFW, ZWO LRGB & SHO filters, ASIAir Mini, EAF, Mini guide scope, 120MM Mini I tend to collect a good amount of data (usually 20+ hours with my longest integration time at 62 hours) and I have fairly good gear so I think the only thing holding me up now is my processing skills. my general workflow is as follows but does vary a little from image to image: 1) Manually inspect all subs in ASI FITS View & delete anything with visible cloud or non-round stars 2) WBPP - defaults with "best quality" preset selected 3) Gradient removal - I usually clone the image & then use Graxpert, gradient correction & Seti Astro ADBE to see which gives the best results. I sometimes lack confidence here and worry that I'm removing good signal so am tempted to go back to using DBE. 4) SPCC - select correct sensor & filters 5) BlurX - defaults 6) StarX 7) Stretch - Often using GHS, sometimes using Bill's unlinked stretch & then use curves later in the workflow 7a) Narrowband Normalisation if DNB 8) Curves to adjust contract, saturation, etc. I often use colour masks here, particularly with DNB data. 9) Local Histogram Equalisation if necessary - very gently. 10) NoiseX I think the biggest thing I struggle with is avoiding the imaging turning blotchy, like here: https://app.astrobin.com/u/craigdixon1986?i=imady6This target was fairly low down and shot through less-than-ideal seeing but I should have done a better job with the processing. I'm finding that as I start to image the less popular and harder targets, processing becomes much more important and I'm not sure that I'm doing my targets justice. Any help is very much appreciated. I'm willing to put the time into learning but I'm just not sure where to go from here.
|
You cannot like this item. Reason: "ANONYMOUS".
You cannot remove your like from this item.
Editing a post is only allowed within 24 hours after creating it.
You cannot Like this post because the topic is closed.
Copy the URL below to share a direct link to this post.
This post cannot be edited using the classic forums editor.
To edit this post, please enable the "New forums experience" in your settings.
Your image scale is FAR too high to yield good SNR, so I'd start start with leaving the drizzle button alone. And processing everything as a NB Hubble palette is doing those images no favour either. That's even more so because they are most emphatically NOT NB images at the source. And as for the rest, it's not what you do is how you do it. Same as cooking, in a way.
|
You cannot like this item. Reason: "ANONYMOUS".
You cannot remove your like from this item.
Editing a post is only allowed within 24 hours after creating it.
You cannot Like this post because the topic is closed.
Copy the URL below to share a direct link to this post.
This post cannot be edited using the classic forums editor.
To edit this post, please enable the "New forums experience" in your settings.
Every step you do, take a look at the previous at the pixel level, and particularly in locations with sharp edges. Did my step help or improve the image? Compare it to the original raw image. Does it look worse? Often times, the answer is yes. AI tools are extremely powerful and must be used in moderation. In the case of your splotchy image, I would venture to guess this was due to a combination of heavy denoise and overstretching your data. 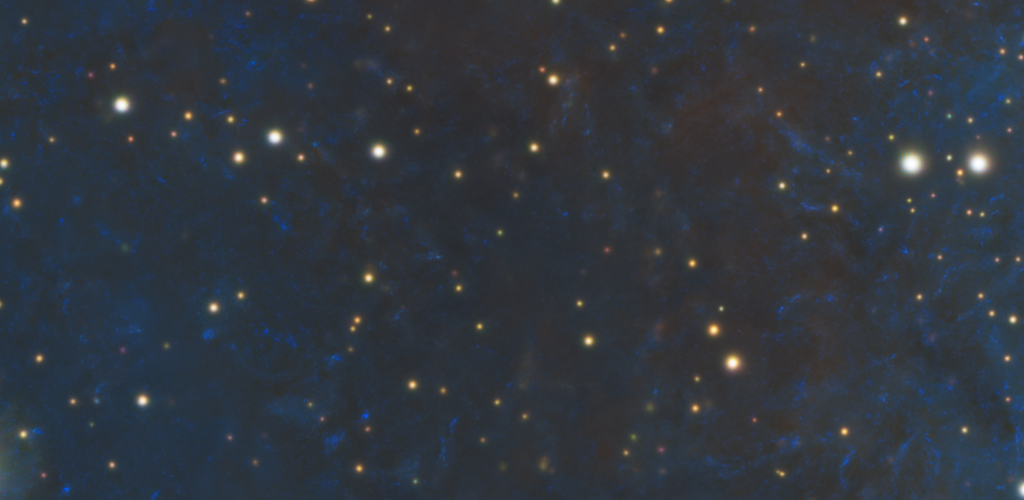 This background is a hallucination resulting from AI denoise, and you amplified it with your curves or stretch.
|
You cannot like this item. Reason: "ANONYMOUS".
You cannot remove your like from this item.
Editing a post is only allowed within 24 hours after creating it.
You cannot Like this post because the topic is closed.
Copy the URL below to share a direct link to this post.
This post cannot be edited using the classic forums editor.
To edit this post, please enable the "New forums experience" in your settings.
andrea tasselli:
Your image scale is FAR too high to yield good SNR, so I'd start start with leaving the drizzle button alone. And processing everything as a NB Hubble palette is doing those images no favour either. That's even more so because they are most emphatically NOT NB images at the source. And as for the rest, it's not what you do is how you do it. Same as cooking, in a way. Thanks for your response, I appreciate you taking the time. Can you elaborate please as I'm not sure that I fully understand. Are you saying that my camera/scope combinations are incorrect and I'm therefore not capturing as much signal as I should be or are you saying that by Drizzling the data I'm introducing noise and reducing the S/N ratio? I read somewhere that 1x drizzling is beneficial for bringing the colour out in OSC data and that by using a 2x drizzle, I can crop more aggressively without loosing resolution. The L-enhance filter has very broad band passes so are you saying that I should avoid using narrowband normalisation and just process these images in true colour and just stick with the mono setup for Hubble pallet or HOO images?
|
You cannot like this item. Reason: "ANONYMOUS".
You cannot remove your like from this item.
Editing a post is only allowed within 24 hours after creating it.
You cannot Like this post because the topic is closed.
Copy the URL below to share a direct link to this post.
This post cannot be edited using the classic forums editor.
To edit this post, please enable the "New forums experience" in your settings.
Brian Puhl:
Every step you do, take a look at the previous at the pixel level, and particularly in locations with sharp edges. Did my step help or improve the image? Compare it to the original raw image. Does it look worse? Often times, the answer is yes. AI tools are extremely powerful and must be used in moderation.
In the case of your splotchy image, I would venture to guess this was due to a combination of heavy denoise and overstretching your data.
This background is a hallucination resulting from AI denoise, and you amplified it with your curves or stretch. Thanks, that's really useful. Sometimes it's hard to have self control and it's easy to forget to look at the image at a 1:1 scale. With this image in particular, I think I was just so desperate to pull the blue out that I lost sight of everything. Most YouTubers recommend running noise reduction at the linear stage but I found that this just causes blotching far worse than in this example. I therefore started leaving NR until later in the process. Would you suggest just scaling back on the noise reduction or taking out of the workflow altogether?
|
You cannot like this item. Reason: "ANONYMOUS".
You cannot remove your like from this item.
Editing a post is only allowed within 24 hours after creating it.
You cannot Like this post because the topic is closed.
Copy the URL below to share a direct link to this post.
This post cannot be edited using the classic forums editor.
To edit this post, please enable the "New forums experience" in your settings.
Craig Dixon:
Thanks for your response, I appreciate you taking the time. Can you elaborate please as I'm not sure that I fully understand. Are you saying that my camera/scope combinations are incorrect and I'm therefore not capturing as much signal as I should be or are you saying that by Drizzling the data I'm introducing noise and reducing the S/N ratio? I read somewhere that 1x drizzling is beneficial for bringing the colour out in OSC data and that by using a 2x drizzle, I can crop more aggressively without loosing resolution.
The L-enhance filter has very broad band passes so are you saying that I should avoid using narrowband normalisation and just process these images in true colour and just stick with the mono setup for Hubble pallet or HOO images? Craig, Your native resolution is 0.78"/px which is high enough for a f/5.3 @ 1000 mm of FL in our typical NE environment (with not great seeing, let's say). Unless you are undersampling big time, and by that I mean you are at around 2px per AVERAGE FWHM (or less) then you have no hope to regain much if any resolution loss, even at the price of diminished SNR. And to me SNR is the undisputed king on the hill here. CFA drizzling is different from drizzling 2x, which is what you have done on your image there (SH2-155). Even that will introduce some SNR loss and I find difficult to see any effective gain except, maybe, for star color fidelity. And I have used it for ages (CFA drizzle). And you can crop as much as you want, whatever is there is still there. This isn't terrestrial photography and cropping doesn't lead to the same results (even because, by and large, we produce for display, not for print). The L-ENH is very broad, so much so as to be really a posh version of LP suppresion filter. In fact you can use it even on reflection nebulae and get decent results. More importantly, cross-talk between the different color channels (using an OSC camera) means you haven't got a clean Ha/OIII/Hb separation which results in Ha polluting the G/B signal which you would normally associate to the OIII band. And the same applies, to a lesser degree, with the Hb signal. What this filter will excel in is to give you enhanced RGB colors in the visible spectrum for emission nebulae and should be used to produce RGB images and that is it. To summarize: use it only for RGB "true" color imagery.
|
You cannot like this item. Reason: "ANONYMOUS".
You cannot remove your like from this item.
Editing a post is only allowed within 24 hours after creating it.
You cannot Like this post because the topic is closed.
Copy the URL below to share a direct link to this post.
This post cannot be edited using the classic forums editor.
To edit this post, please enable the "New forums experience" in your settings.
Craig Dixon:
Brian Puhl:
Every step you do, take a look at the previous at the pixel level, and particularly in locations with sharp edges. Did my step help or improve the image? Compare it to the original raw image. Does it look worse? Often times, the answer is yes. AI tools are extremely powerful and must be used in moderation.
In the case of your splotchy image, I would venture to guess this was due to a combination of heavy denoise and overstretching your data.
This background is a hallucination resulting from AI denoise, and you amplified it with your curves or stretch.
Thanks, that's really useful. Sometimes it's hard to have self control and it's easy to forget to look at the image at a 1:1 scale. With this image in particular, I think I was just so desperate to pull the blue out that I lost sight of everything. Most YouTubers recommend running noise reduction at the linear stage but I found that this just causes blotching far worse than in this example. I therefore started leaving NR until later in the process. Would you suggest just scaling back on the noise reduction or taking out of the workflow altogether? I hate to be that person, but I don't recommend Youtube in general for alot of processing techniques. Very few have it right, and the ones that do I just generally don't agree with. That being said, it's generally accepted that you perform noise reduction at the linear stage. Personally, I try do do most my noise reduction towards the end of the process. Prior to that, my goal is to manipulate the data in a way that doesn't require noise reduction as much. Basically that means stretching it less. To achieve this, my basic stretch is simply an STF, then I back off the black point, and mid points until I don't have significant visible noise. Stretching, it's like a rubber band. Stretch it far enough and you'll begin to see the little cracks in the rubber. My goal is to never push the data that far.. Things like brightness can be adjusted with luminance, instead of RGB curves.
|
You cannot like this item. Reason: "ANONYMOUS".
You cannot remove your like from this item.
Editing a post is only allowed within 24 hours after creating it.
You cannot Like this post because the topic is closed.
Copy the URL below to share a direct link to this post.
This post cannot be edited using the classic forums editor.
To edit this post, please enable the "New forums experience" in your settings.
These are some rules of thumb I -try- to follow (although not always successfully): I always look at my image at 100% during each step. If I can make it look fairly natural at 100, it will always look good at a smaller scale. And I agree if you aren't happy with a step you did, un-do it and try a lighter touch. Once you obliterate data, it's gone for the rest of the processing train. I try not to stretch the background more than the data can handle. I'd much rather have a hint of slightly grainy detail rather than in-your-face smoothed out, blotchy background. I noise reduce luminance (detail) and color differently. I'm more aggressive with color denoise and keep a lighter touch on the luminance. The new NXT in Pixinsight supports this. Previously I was doing it in Photoshop. I do one pass of mild noise reduction at the linear stage, and then usually don't touch noise reduction until near the end Increasing saturation of the sky background creates a lot of headaches. I can ramp up saturation in the brighter areas that are smooth to begin with as well as the stars. Here's my latest image that I'm pretty happy with the dark and lighter areas. Looking at 100%, there's a lot of grain, but I tried to be light on NR so you can find all those faint fuzzies in the distance. https://app.astrobin.com/u/Ricksastro?i=tj2dos |
You cannot like this item. Reason: "ANONYMOUS".
You cannot remove your like from this item.
Editing a post is only allowed within 24 hours after creating it.
You cannot Like this post because the topic is closed.
Copy the URL below to share a direct link to this post.
This post cannot be edited using the classic forums editor.
To edit this post, please enable the "New forums experience" in your settings.
andrea tasselli:
Your native resolution is 0.78"/px which is high enough for a f/5.3 @ 1000 mm of FL in our typical NE environment (with not great seeing, let's say). Unless you are undersampling big time, and by that I mean you are at around 2px per AVERAGE FWHM (or less) then you have no hope to regain much if any resolution loss, even at the price of diminished SNR. And to me SNR is the undisputed king on the hill here. CFA drizzling is different from drizzling 2x, which is what you have done on your image there (SH2-155). Even that will introduce some SNR loss and I find difficult to see any effective gain except, maybe, for star color fidelity. And I have used it for ages (CFA drizzle). And you can crop as much as you want, whatever is there is still there. This isn't terrestrial photography and cropping doesn't lead to the same results (even because, by and large, we produce for display, not for print). That's clear, thanks for explaining. So my takeaway from this is just to not drizzle and data from my 190MN/ASI533 as there is no benefit. This is an easy fix so all good. andrea tasselli:
The L-ENH is very broad, so much so as to be really a posh version of LP suppresion filter. In fact you can use it even on reflection nebulae and get decent results. More importantly, cross-talk between the different color channels (using an OSC camera) means you haven't got a clean Ha/OIII/Hb separation which results in Ha polluting the G/B signal which you would normally associate to the OIII band. And the same applies, to a lesser degree, with the Hb signal. What this filter will excel in is to give you enhanced RGB colors in the visible spectrum for emission nebulae and should be used to produce RGB images and that is it. To summarize: use it only for RGB "true" color imagery. Again, this is really useful so thanks. I've started proper narrowband imaging with a mono camera fairly recently so I'm learning more and more about this kind of thing. I have read in the past about the colour crossover issue but I don't thinkI fully understood it until now. So I'd be better off avoiding the narrowband normalisation tool with L-enhance data as it's doing me no favours. I have thought about upgrading to the L-ultimate or the Antlia ALP-T but those filters are expensive and I start to wonder if it's best to just go full mono at that point. Many people are now adding an Sii/Oiii to their workflow that that's even more cost and seems like an inefficient way of imaging to me.
|
You cannot like this item. Reason: "ANONYMOUS".
You cannot remove your like from this item.
Editing a post is only allowed within 24 hours after creating it.
You cannot Like this post because the topic is closed.
Copy the URL below to share a direct link to this post.
This post cannot be edited using the classic forums editor.
To edit this post, please enable the "New forums experience" in your settings.
Brian Puhl:
I hate to be that person, but I don't recommend Youtube in general for alot of processing techniques. Very few have it right, and the ones that do I just generally don't agree with. I absolutely agree. The resources on YouTube are great when getting started. It can really help to get to the stage of producing a finished image but I'm now at the point where I would like to progress from that and am staring to see the flaws in a lot of what's out there. I'm just not sure where to look for better resources. Brian Puhl:
That being said, it's generally accepted that you perform noise reduction at the linear stage. Personally, I try do do most my noise reduction towards the end of the process. Prior to that, my goal is to manipulate the data in a way that doesn't require noise reduction as much. Basically that means stretching it less. To achieve this, my basic stretch is simply an STF, then I back off the black point, and mid points until I don't have significant visible noise. Stretching, it's like a rubber band. Stretch it far enough and you'll begin to see the little cracks in the rubber. My goal is to never push the data that far.. Things like brightness can be adjusted with luminance, instead of RGB curves. I'm certainly guilty of over-doing the NR and the stretching so that's something I need to actively work on improving. I notice in all of your images, the data is smooth and the colours blend nicely. Many of my images in comparison just look forced. Your Pelican nebula in particular is inspiring ( https://app.astrobin.com/u/WhooptieDo?i=pli5hq) as you've got nice deep blacks and nice transitions between the slight magenta in the Oiii into the blues. This is the look I'd like to achieve.
|
You cannot like this item. Reason: "ANONYMOUS".
You cannot remove your like from this item.
Editing a post is only allowed within 24 hours after creating it.
You cannot Like this post because the topic is closed.
Copy the URL below to share a direct link to this post.
This post cannot be edited using the classic forums editor.
To edit this post, please enable the "New forums experience" in your settings.
Rick Krejci:
These are some rules of thumb I -try- to follow (although not always successfully):
I always look at my image at 100% during each step. If I can make it look fairly natural at 100, it will always look good at a smaller scale. And I agree if you aren't happy with a step you did, un-do it and try a lighter touch. Once you obliterate data, it's gone for the rest of the processing train.
I try not to stretch the background more than the data can handle. I'd much rather have a hint of slightly grainy detail rather than in-your-face smoothed out, blotchy background.
I noise reduce luminance (detail) and color differently. I'm more aggressive with color denoise and keep a lighter touch on the luminance. The new NXT in Pixinsight supports this. Previously I was doing it in Photoshop.
I do one pass of mild noise reduction at the linear stage, and then usually don't touch noise reduction until near the end
Increasing saturation of the sky background creates a lot of headaches. I can ramp up saturation in the brighter areas that are smooth to begin with as well as the stars.
Here's my latest image that I'm pretty happy with the dark and lighter areas. Looking at 100%, there's a lot of grain, but I tried to be light on NR so you can find all those faint fuzzies in the distance.
https://app.astrobin.com/u/Ricksastro?i=tj2dos Thanks for your advice, this is also really helpful. From what you're saying, I'm being too heavy handed with a few things. I can do NR separately on luminance for mono data but don't have this option for OSC so I'll just have to be careful and remember to view the image at 1:1. Re: saturation of the background, I think I'd benefit from learning how to use masks more effectively. I find Pixinsight to be very clunky with masks and I wish it were a bit more like Photoshop where you can use a soft brush to create a mask where you like.
|
You cannot like this item. Reason: "ANONYMOUS".
You cannot remove your like from this item.
Editing a post is only allowed within 24 hours after creating it.
You cannot Like this post because the topic is closed.
Copy the URL below to share a direct link to this post.
This post cannot be edited using the classic forums editor.
To edit this post, please enable the "New forums experience" in your settings.
I hear you on PIs clunkiness. I actually use Photoshop for a lot of what I do, including the saturation adjustments. I mainly use PI for WBPO, color combination, gradients and Russ Crowman’s XT tools and just mild linear stretching. I then save as 16 bit TIFs and load into PS to do the curves adjustments and all the rest
If you use Noise Xterminator, the newest version has the ability to use different values for color noise reduction even for OSC.
|
You cannot like this item. Reason: "ANONYMOUS".
You cannot remove your like from this item.
Editing a post is only allowed within 24 hours after creating it.
You cannot Like this post because the topic is closed.
Copy the URL below to share a direct link to this post.
This post cannot be edited using the classic forums editor.
To edit this post, please enable the "New forums experience" in your settings.
I would certainly add 'Subframe Selector' processing right after the visual inspection with FITSview. Also, I start my stretch using Seti's 'Statistical Stretch' but with 'normalize image range' off, and a very low 'target median' (e.g. 9-12). Then I go to GHS for final stretching.
|
You cannot like this item. Reason: "ANONYMOUS".
You cannot remove your like from this item.
Editing a post is only allowed within 24 hours after creating it.
You cannot Like this post because the topic is closed.
Copy the URL below to share a direct link to this post.
This post cannot be edited using the classic forums editor.
To edit this post, please enable the "New forums experience" in your settings.
Hi
i don't recommend running noise reduction at the linear stage, never and ever
also before blurXT or any deconvolution process.
CS
Brian
|
You cannot like this item. Reason: "ANONYMOUS".
You cannot remove your like from this item.
Editing a post is only allowed within 24 hours after creating it.
You cannot Like this post because the topic is closed.
Copy the URL below to share a direct link to this post.
This post cannot be edited using the classic forums editor.
To edit this post, please enable the "New forums experience" in your settings.
I'm re-visiting my data on the Cave Nebula and have decided to process the image in RGB as suggested above. I'm hoping to take the above onboard and see how I get one. Here's what I get when trying to stretch the data after NoiseX with gentle settings (0.4). This tends to happen with every image I try to process when I do noise reduction in the linear stage. Is this the kind of thing you get @Brian Diaz ? (I know the stretch is aggressive, this is just to show the effect clearly). 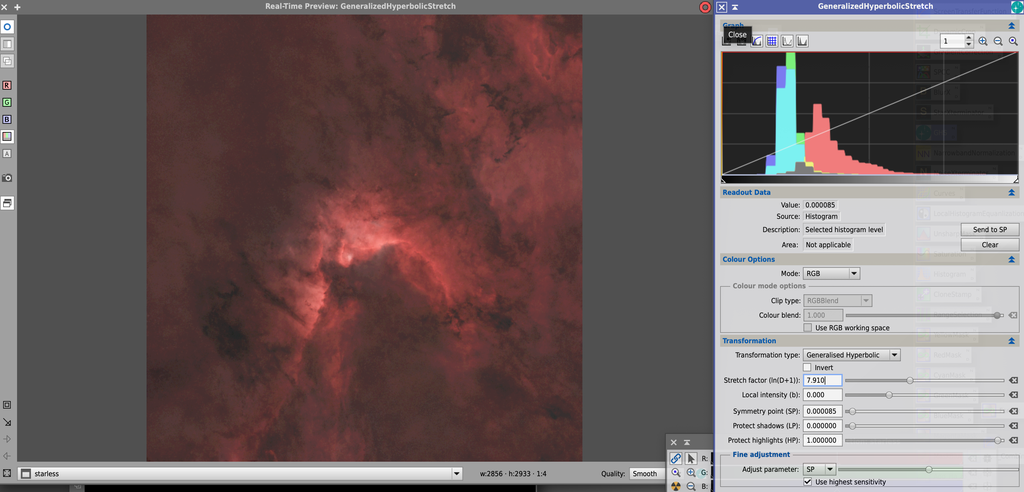 |
You cannot like this item. Reason: "ANONYMOUS".
You cannot remove your like from this item.
Editing a post is only allowed within 24 hours after creating it.
You cannot Like this post because the topic is closed.
Copy the URL below to share a direct link to this post.
This post cannot be edited using the classic forums editor.
To edit this post, please enable the "New forums experience" in your settings.
Perhaps your symmetry point is too far to the left, and you are stretching background?
|
You cannot like this item. Reason: "ANONYMOUS".
You cannot remove your like from this item.
Editing a post is only allowed within 24 hours after creating it.
You cannot Like this post because the topic is closed.
Copy the URL below to share a direct link to this post.
This post cannot be edited using the classic forums editor.
To edit this post, please enable the "New forums experience" in your settings.
Craig Dixon:
I'm re-visiting my data on the Cave Nebula and have decided to process the image in RGB as suggested above. I'm hoping to take the above onboard and see how I get one. Here's what I get when trying to stretch the data after NoiseX with gentle settings (0.4). This tends to happen with every image I try to process when I do noise reduction in the linear stage. Is this the kind of thing you get @Brian Diaz ? (I know the stretch is aggressive, this is just to show the effect clearly). I'm not exactly sure what I'm looking for, current on mobile device, but I do think I see posterization in the background. If that's the case, you need to enable 24 Bit LUT, which can be found on the Taskbar to the left of the Nuke /STF button.
|
You cannot like this item. Reason: "ANONYMOUS".
You cannot remove your like from this item.
Editing a post is only allowed within 24 hours after creating it.
You cannot Like this post because the topic is closed.
Copy the URL below to share a direct link to this post.
This post cannot be edited using the classic forums editor.
To edit this post, please enable the "New forums experience" in your settings.
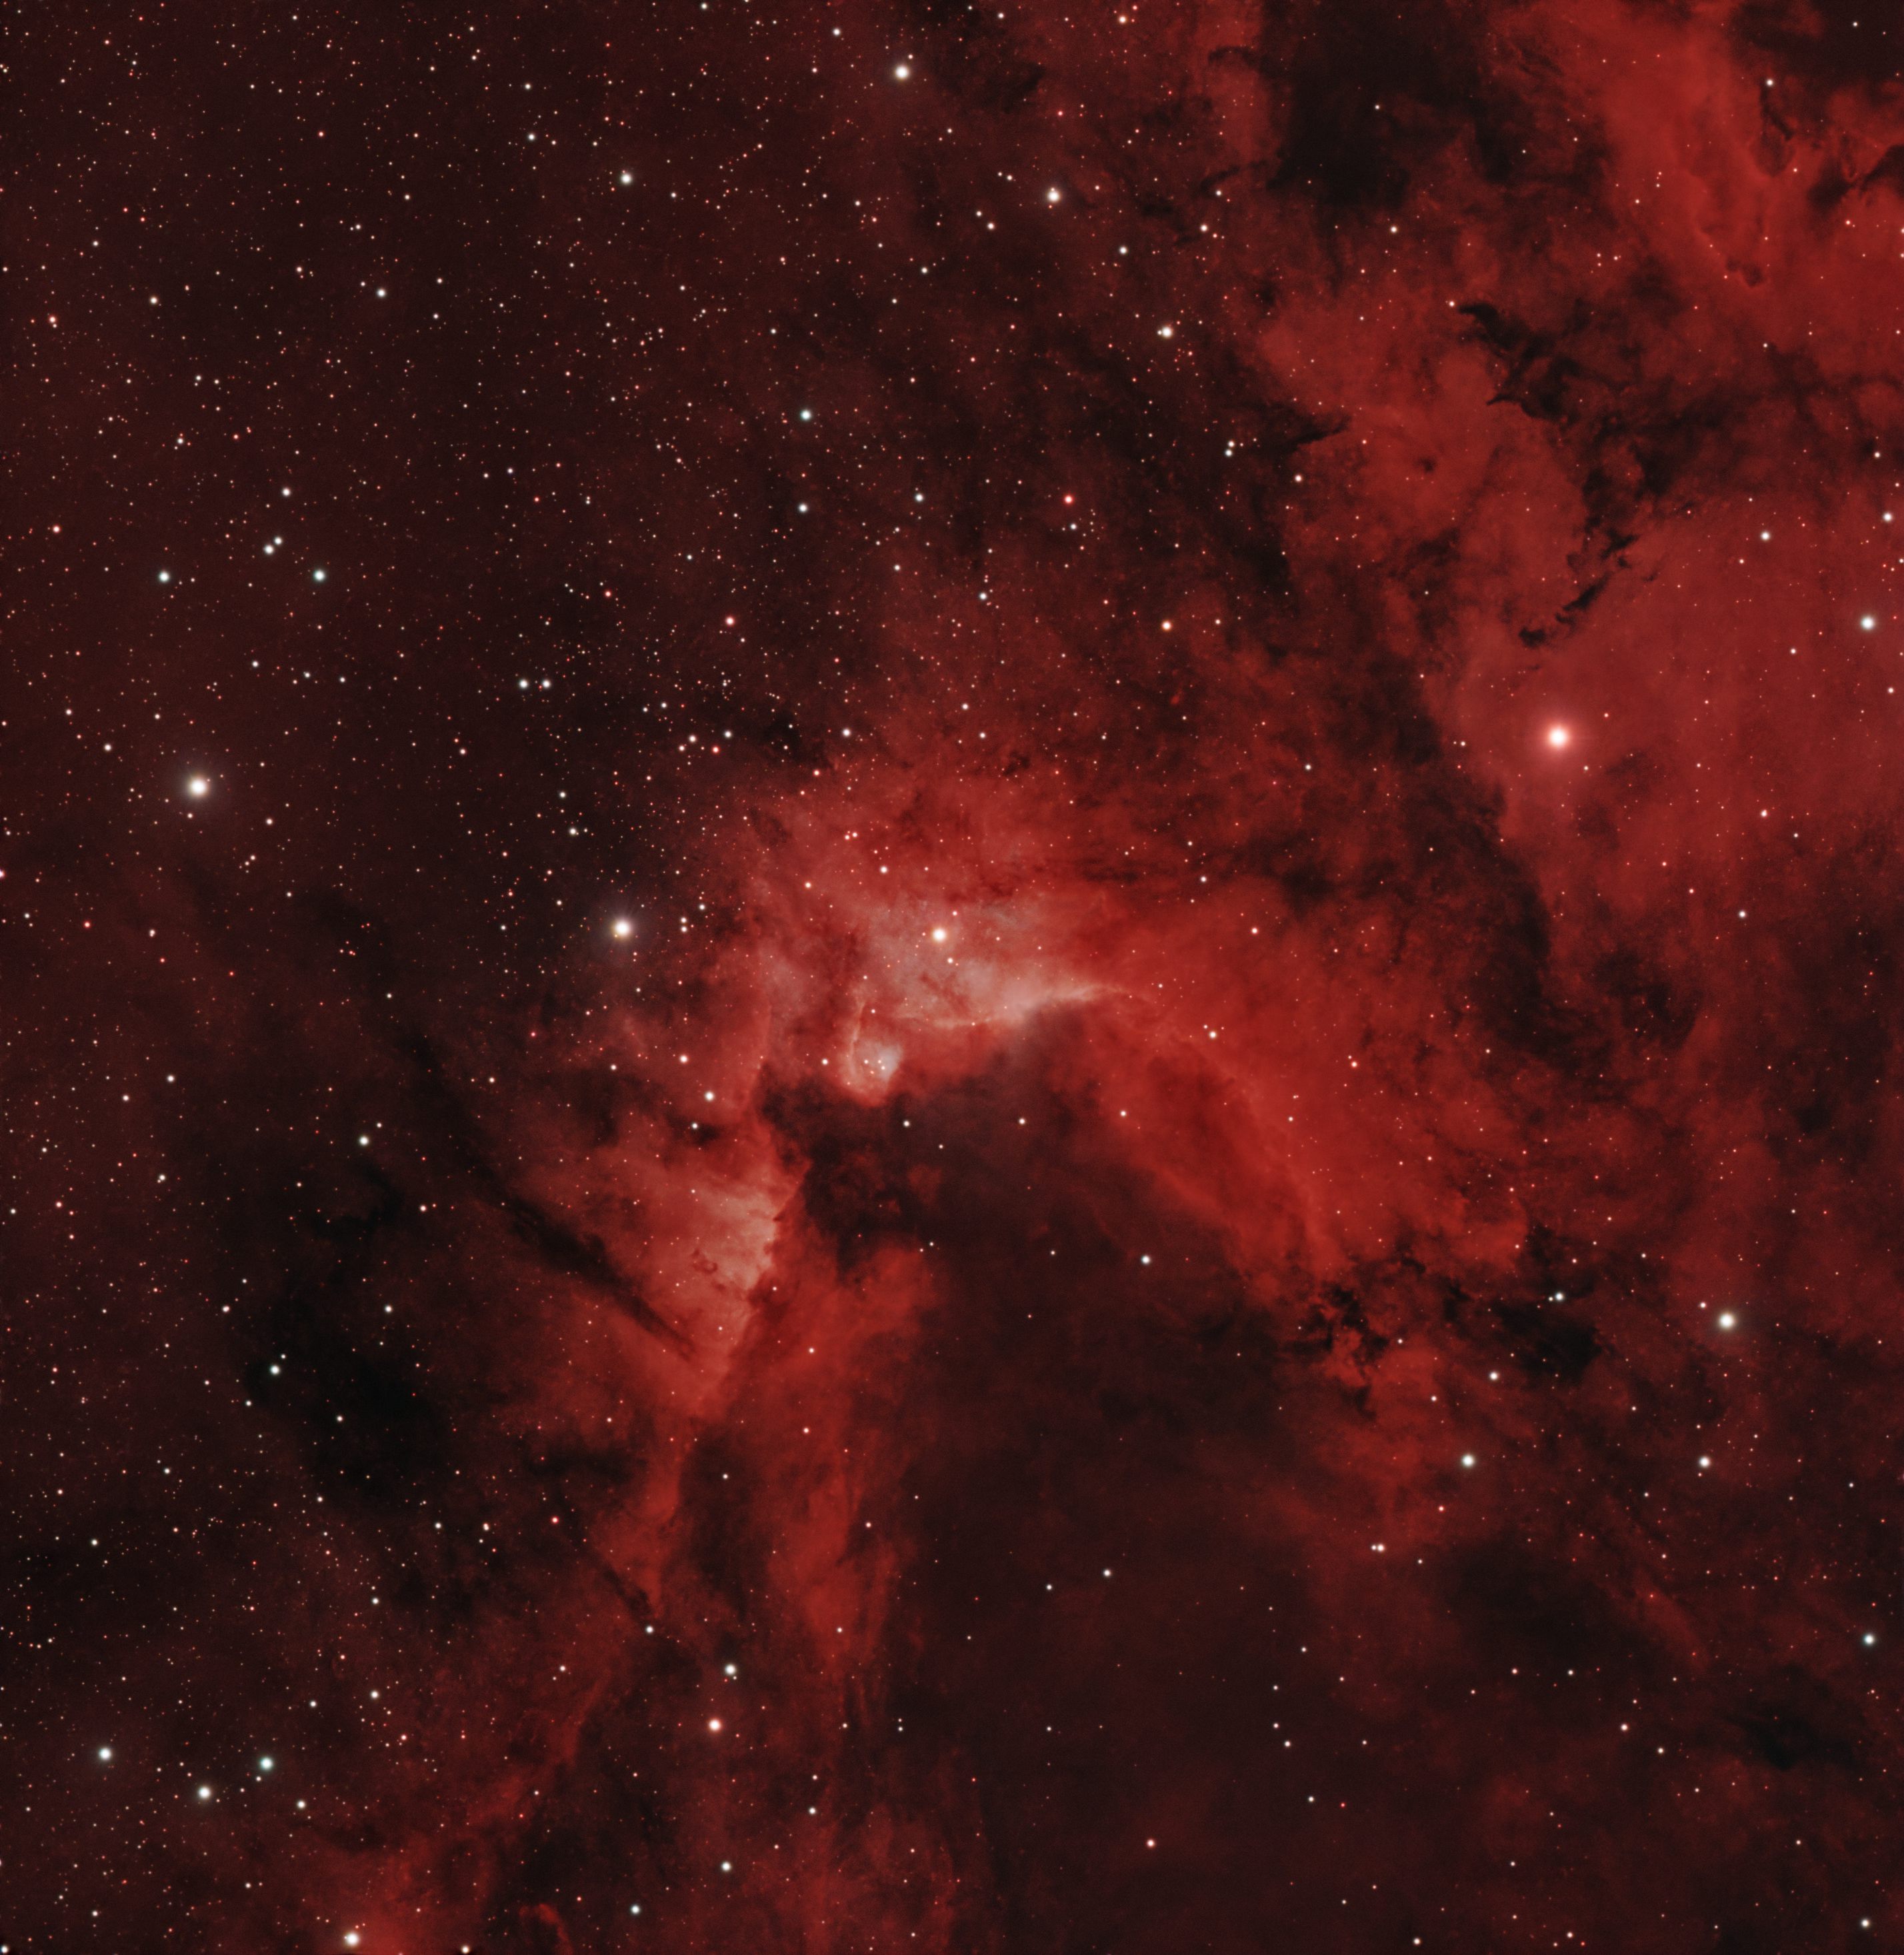
In light of everything said above, here's where I am on the re-process of my SH2-155 data but in RGB this time. This is basically the same linear workflow, and then stretching in GHS with a very small amount of tweaking in curves for the contrast. This is a definite improvement over the first iteration in terms of smoothness but I can't help but think there are still improvements to be made. Where can I go from here with it?  |
You cannot like this item. Reason: "ANONYMOUS".
You cannot remove your like from this item.
Editing a post is only allowed within 24 hours after creating it.
You cannot Like this post because the topic is closed.
Copy the URL below to share a direct link to this post.
This post cannot be edited using the classic forums editor.
To edit this post, please enable the "New forums experience" in your settings.
It is essentially the R channel. Where is the rest?
|
You cannot like this item. Reason: "ANONYMOUS".
You cannot remove your like from this item.
Editing a post is only allowed within 24 hours after creating it.
You cannot Like this post because the topic is closed.
Copy the URL below to share a direct link to this post.
This post cannot be edited using the classic forums editor.
To edit this post, please enable the "New forums experience" in your settings.
Nope, that’s RGB from the L-enhance.
background extraction
blurx
spcc
starx
ghs
curves
add stars
|
You cannot like this item. Reason: "ANONYMOUS".
You cannot remove your like from this item.
Editing a post is only allowed within 24 hours after creating it.
You cannot Like this post because the topic is closed.
Copy the URL below to share a direct link to this post.
This post cannot be edited using the classic forums editor.
To edit this post, please enable the "New forums experience" in your settings.
I know it's a RGB image, the point is that you're showing nearly only the R channel while the rest is essentially absent. And it should be really there given the exposure length. This is also confirmed by the stars' colors, essentially monochromatic.
|
You cannot like this item. Reason: "ANONYMOUS".
You cannot remove your like from this item.
Editing a post is only allowed within 24 hours after creating it.
You cannot Like this post because the topic is closed.
Copy the URL below to share a direct link to this post.
This post cannot be edited using the classic forums editor.
To edit this post, please enable the "New forums experience" in your settings.
Craig Dixon:
Nope, that’s RGB from the L-enhance.
background extraction
blurx
spcc
starx
ghs
curves
add stars I think you did a really nice job on both images but this go round certainly looks better to my eye. In comparison, the first image seems a bit over nuked on the stretch and a bit flat - this all seems to be corrected on the rework - as well as the blockiness you mentioned in your first post. I think youre losing some information by running narrowband normalization after your stretch. However, you can still acheive an excellent HOO process with the LEnhance which you were going for in your first image with a little extra pixel math and re-ordering of your initial steps. First load the toolbox script DBXtract if you dont already have it (you can do pixel math here and I can send you the formulas, but this is slicker to use). (repository here https://dbxtract.astrocitas.com/) 1. separate your stars then run correction only in BXT on them - the corrected stars will get you a better result in SPCC. 2. Run DBE on the starless image - ADBE is great tool but applies a light stretch, so you will need to recombine the stars first and then run it if you choose that tool (I still prefer DBE). -->side note, if you use ADBE, you can go into the history explorer, find the DBE applied, pull it up and see exactly where the sample points were applied, adjust and re-run DBE if you need too. 3. If you used DBE on the starless image, now recombine the stars and run SPCC - settings, make sure you apply a sample region, select the L Enhance filter for the RGB, under signal evaluation change signal saturation threshold to 0.95 4. Now separate your stars and set them aside for stretch and final processing later. 5. Run DBXtract on your starless image so you have Ha and OIII separated out 6. Run BXT on your Ha and OIII images separately (use a reasonable PSF size, somewhere between 3.5-4, you can measure this if you want to be exact) 7. Use channel combination, put Ha in R and OIII in G,B channels (save Ha for luminace detail for later if needed) 8. NOW run Narrowband Normalization - choose HOO and turn the blend mode slider all the way left to zero (its best to do this before stretch not after as in your initial post). Leave the settings default otherwise unless you want to reduce brightness intentionally - then this should be done after GHS. The preview may look prettier post stretch with OIII boost, but I find this method gives me better results in the end. 9. Use GHS to stretch (youtube different techniques to develop your own, but in general, dont go ham in one giant stretch). Seti also has a statistical stetch that does a reasonable job for the initial stretch. 10. now use curves adjustments to finalize your contrast, saturation and color. 11. now apply NXT (its very forgiving in the newest AI model) 12. Stretch and adjust your stars 13. Combine image, reduce stars with pixel math to taste if you wish Couple additional steps you could incorporate if you want -You can refine WBPP to do better than preset "best" quality, I can help with that if you need. -you can apply a bit more BXT to the Ha file that you set aside, stretch it so only the detailed parts are visible and then apply this as a luminance layer to your finished HOO (prior to stars combination) for detail - this is typically best done in the imageblend script. -Load the toolbox script for selective color adjustment - this is a much more precise way to adjust color than color masking and curves -you can add "detail" - really it's contrast, by applying a mild high pass filter in the image blend script. Good luck!
|
You cannot like this item. Reason: "ANONYMOUS".
You cannot remove your like from this item.
Editing a post is only allowed within 24 hours after creating it.
You cannot Like this post because the topic is closed.
Copy the URL below to share a direct link to this post.
This post cannot be edited using the classic forums editor.
To edit this post, please enable the "New forums experience" in your settings.
Scott Horton:
8. NOW run Narrowband Normalization - choose HOO and turn the blend mode slider all the way left to zero (its best to do this before stretch not after as in your initial post). Leave the settings default otherwise unless you want to reduce brightness intentionally. 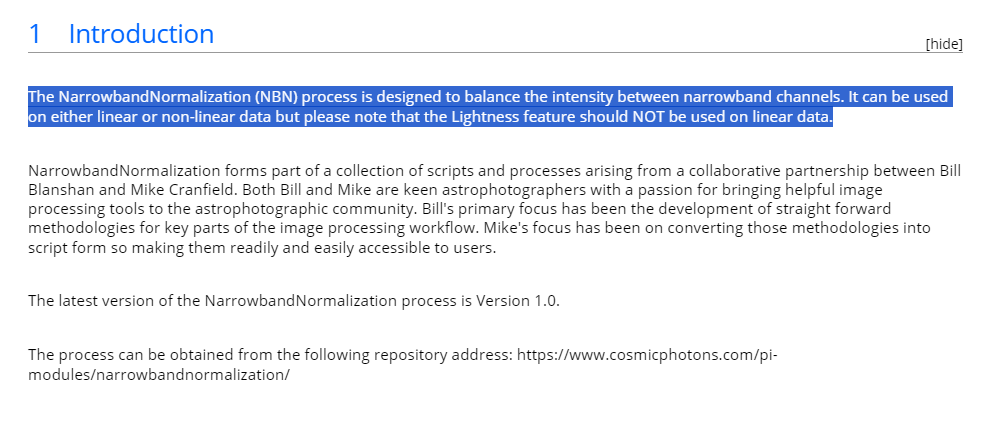 |
You cannot like this item. Reason: "ANONYMOUS".
You cannot remove your like from this item.
Editing a post is only allowed within 24 hours after creating it.
You cannot Like this post because the topic is closed.
Copy the URL below to share a direct link to this post.
This post cannot be edited using the classic forums editor.
To edit this post, please enable the "New forums experience" in your settings.
John Stone:
Scott Horton:
8. NOW run Narrowband Normalization - choose HOO and turn the blend mode slider all the way left to zero (its best to do this before stretch not after as in your initial post). Leave the settings default otherwise unless you want to reduce brightness intentionally.
Ah yes, I was typing this furiously on my cell phone - haha, and the way it reads is you can use the sliders if you want on a non linear image, but was supposed to say "Leave the settings default otherwise unless you want to reduce brightness intentionally, then do this step on a non linear image". I will amend my post so this is not confusing for future readers. Based on the OPs comment, he was really wanting the OIII saturation to come through and suspect he boosted it in NBN which nooked the image in the end. Doing NBN with the method above then using selective color post stretch with a low saturation mask and or even applying the extracted OIII data as a mask to increase saturation will be much cleaner.
|
You cannot like this item. Reason: "ANONYMOUS".
You cannot remove your like from this item.
Editing a post is only allowed within 24 hours after creating it.
You cannot Like this post because the topic is closed.
Copy the URL below to share a direct link to this post.
This post cannot be edited using the classic forums editor.
To edit this post, please enable the "New forums experience" in your settings.
Thanks for the continued support and help with this. I'm trying to find the time to progress with this so apologies if I'm slow to react. andrea tasselli:
I know it's a RGB image, the point is that you're showing nearly only the R channel while the rest is essentially absent. And it should be really there given the exposure length. This is also confirmed by the stars' colors, essentially monochromatic. I absolutely agree there is a lot of red but this is just how the data stretched, I haven't done anything to boost the red over the other colours. I've had a little look this morning and realised that, even after SPCC, the histogram shows the red channel much further to the right. When I link and unlink the channels in STF, I get a significantly different results. This make me wonder if SPCC has been ineffective? If I apply just a standard colour calibration, I get a much more natural looking image with a histogram that is more aligned. Even the extracted stars look very red after running SPCC.
|
You cannot like this item. Reason: "ANONYMOUS".
You cannot remove your like from this item.
Editing a post is only allowed within 24 hours after creating it.
You cannot Like this post because the topic is closed.
Copy the URL below to share a direct link to this post.
This post cannot be edited using the classic forums editor.
To edit this post, please enable the "New forums experience" in your settings.