Chris White- Overcast Observatory:
Ashraf AbuSara:
Sooner or later I am going to have to collimate it anyway.
Amen to that! Get to know your scope. Dont fear collimation. Even if you dont nail it at first, you will become familiar with the tools and before long it will be second nature. I used the Tak tools, thought they were awesome. There is a thread currently talking about using OCAL here: https://www.astrobin.com/forum/c/equipment-forums/takahashi-epsilon-130/guide-collimating-tak-epsilon-130d-w-ocal/ Thanks! Yes I have been reading that post very helpful. What is everyone's thoughts on installing a fan for a remote setup? I am just wondering if the excess dust and light leak will be an issue?
|
You cannot like this item. Reason: "ANONYMOUS".
You cannot remove your like from this item.
Editing a post is only allowed within 24 hours after creating it.
You cannot Like this post because the topic is closed.
Copy the URL below to share a direct link to this post.
This post cannot be edited using the classic forums editor.
To edit this post, please enable the "New forums experience" in your settings.
A primary mirror fan is essential to get round stars. Otherwise tube currents can distort things.
|
You cannot like this item. Reason: "ANONYMOUS".
You cannot remove your like from this item.
Editing a post is only allowed within 24 hours after creating it.
You cannot Like this post because the topic is closed.
Copy the URL below to share a direct link to this post.
This post cannot be edited using the classic forums editor.
To edit this post, please enable the "New forums experience" in your settings.
Chris White- Overcast Observatory:
A primary mirror fan is essential to get round stars. Otherwise tube currents can distort things. Is everyone setting it up in exhaust mode?
|
You cannot like this item. Reason: "ANONYMOUS".
You cannot remove your like from this item.
Editing a post is only allowed within 24 hours after creating it.
You cannot Like this post because the topic is closed.
Copy the URL below to share a direct link to this post.
This post cannot be edited using the classic forums editor.
To edit this post, please enable the "New forums experience" in your settings.
Ashraf AbuSara:
Got the 160Ed. I did not install the Optec focuser. Did not touch factory collimation. I transported it personally from Takahashi America and was very gentle so hopefully it held the collimation. I am waiting on the 1.5x extender and 3D printed part for the rear fan. I think the weight of everything is under 28lbs, but I will have to weigh things.
I installed the EAF on the stock focuser first. Going to see how that works before I attempt using my Opetec Leo focuser. I don't have the extender and I like to use an OAG-L.
I am getting a precise parts custom adapter made measuring exactly 7.2mm to bolt directly on the OAG-L without having to use the tilt plate. That will give me a backfocus of exactly 57.2mm taking into account the 3mm Chroma filters.
Anxious to see how all this performs on the AM5. It is very front heavy which is worrying me a little bit. First light wil not be for at least another 10 days unless I am really lucky and tonight's forcast improves.
 *Hope you like those lightweight rings and dovetails  Many users reported good weight savings with that combo - looking forward to your results!
|
You cannot like this item. Reason: "ANONYMOUS".
You cannot remove your like from this item.
Editing a post is only allowed within 24 hours after creating it.
You cannot Like this post because the topic is closed.
Copy the URL below to share a direct link to this post.
This post cannot be edited using the classic forums editor.
To edit this post, please enable the "New forums experience" in your settings.
Rouz Astro:
Ashraf AbuSara:
Got the 160Ed. I did not install the Optec focuser. Did not touch factory collimation. I transported it personally from Takahashi America and was very gentle so hopefully it held the collimation. I am waiting on the 1.5x extender and 3D printed part for the rear fan. I think the weight of everything is under 28lbs, but I will have to weigh things.
I installed the EAF on the stock focuser first. Going to see how that works before I attempt using my Opetec Leo focuser. I don't have the extender and I like to use an OAG-L.
I am getting a precise parts custom adapter made measuring exactly 7.2mm to bolt directly on the OAG-L without having to use the tilt plate. That will give me a backfocus of exactly 57.2mm taking into account the 3mm Chroma filters.
Anxious to see how all this performs on the AM5. It is very front heavy which is worrying me a little bit. First light wil not be for at least another 10 days unless I am really lucky and tonight's forcast improves.
*Hope you like those lightweight rings and dovetails
Many users reported good weight savings with that combo - looking forward to your results! Love the rings/dovetails! I am looking forward to seeing them perform under night sky!
|
You cannot like this item. Reason: "ANONYMOUS".
You cannot remove your like from this item.
Editing a post is only allowed within 24 hours after creating it.
You cannot Like this post because the topic is closed.
Copy the URL below to share a direct link to this post.
This post cannot be edited using the classic forums editor.
To edit this post, please enable the "New forums experience" in your settings.
Fitted the Noctua cooling fan. Going to test exhaust mode first, as this is used in most imaging systems such as the CDK, RCOS, etc. Flipping the fan is pretty easy to do though.
Variable voltage port on the Pegasus Ultimate Powerbox V2 allows operating the fan at 5-12v.
 So I got exactly the setup you have in this picture. I know this is an old post. Did you find the exhaust mode to be the best way to orient the fan for imaging? Also the native screws that came with the Noctua fan don't seem to fit through its actual holes. What did you use to secure the fan to the 3D printed square bracket? Nevermind. It is M4x30mm. The description on the 3D files is what they suggest.
|
You cannot like this item. Reason: "ANONYMOUS".
You cannot remove your like from this item.
Editing a post is only allowed within 24 hours after creating it.
You cannot Like this post because the topic is closed.
Copy the URL below to share a direct link to this post.
This post cannot be edited using the classic forums editor.
To edit this post, please enable the "New forums experience" in your settings.
Ashraf AbuSara:
Exhaust is how I have mine setup. If i recall most of the others using this fan use it the same way.
|
You cannot like this item. Reason: "ANONYMOUS".
You cannot remove your like from this item.
Editing a post is only allowed within 24 hours after creating it.
You cannot Like this post because the topic is closed.
Copy the URL below to share a direct link to this post.
This post cannot be edited using the classic forums editor.
To edit this post, please enable the "New forums experience" in your settings.
Daniel Carter:
Ashraf AbuSara:
Exhaust is how I have mine setup. If i recall most of the others using this fan use it the same way. I use it in exhaust mode too. Works well for me
|
You cannot like this item. Reason: "ANONYMOUS".
You cannot remove your like from this item.
Editing a post is only allowed within 24 hours after creating it.
You cannot Like this post because the topic is closed.
Copy the URL below to share a direct link to this post.
This post cannot be edited using the classic forums editor.
To edit this post, please enable the "New forums experience" in your settings.
Thanks! Almost done with this setup with just the native focuser. Will test it out hopefully tonight properly. See how the tilt and collimation looks and decide if I need to swap the focuser for the Optec Leo that I have.
|
You cannot like this item. Reason: "ANONYMOUS".
You cannot remove your like from this item.
Editing a post is only allowed within 24 hours after creating it.
You cannot Like this post because the topic is closed.
Copy the URL below to share a direct link to this post.
This post cannot be edited using the classic forums editor.
To edit this post, please enable the "New forums experience" in your settings.
[if this message is disturbing, you can delete it]
Hello !
To adjust the backfocus and the tilt of the camera on my Epsilon 160 I purchased the Octopi. following the advice on this discussion.
He made my job easier.
For those who might be interested, I am reselling this Octopi (change of setup).
[Francais]
Pour régler le backfocus et tilt de la caméra sur mon Epsilon 160 je m'étais procuré l'Octopi. suite aux conseils sur cette discussion.
Il m'a grandement facilité la tâche.
Pour ceux que ca pourrait intéresser, je revends cet Octopi (changement de setup).
|
You cannot like this item. Reason: "ANONYMOUS".
You cannot remove your like from this item.
Editing a post is only allowed within 24 hours after creating it.
You cannot Like this post because the topic is closed.
Copy the URL below to share a direct link to this post.
This post cannot be edited using the classic forums editor.
To edit this post, please enable the "New forums experience" in your settings.
Julien Dufour:
[if this message is disturbing, you can delete it]
Hello !
To adjust the backfocus and the tilt of the camera on my Epsilon 160 I purchased the Octopi. following the advice on this discussion.
He made my job easier.
For those who might be interested, I am reselling this Octopi (change of setup).
[Francais]
Pour régler le backfocus et tilt de la caméra sur mon Epsilon 160 je m'étais procuré l'Octopi. suite aux conseils sur cette discussion.
Il m'a grandement facilité la tâche.
Pour ceux que ca pourrait intéresser, je revends cet Octopi (changement de setup). How much backfocus does it take?
|
You cannot like this item. Reason: "ANONYMOUS".
You cannot remove your like from this item.
Editing a post is only allowed within 24 hours after creating it.
You cannot Like this post because the topic is closed.
Copy the URL below to share a direct link to this post.
This post cannot be edited using the classic forums editor.
To edit this post, please enable the "New forums experience" in your settings.
Ashraf AbuSara:
Julien Dufour:
[if this message is disturbing, you can delete it]
Hello !
To adjust the backfocus and the tilt of the camera on my Epsilon 160 I purchased the Octopi. following the advice on this discussion.
He made my job easier.
For those who might be interested, I am reselling this Octopi (change of setup).
[Francais]
Pour régler le backfocus et tilt de la caméra sur mon Epsilon 160 je m'étais procuré l'Octopi. suite aux conseils sur cette discussion.
Il m'a grandement facilité la tâche.
Pour ceux que ca pourrait intéresser, je revends cet Octopi (changement de setup).
How much backfocus does it take? [EDIT] minimum BF = 3mm [EDIT] From 3mm to 9 mm.  |
You cannot like this item. Reason: "ANONYMOUS".
You cannot remove your like from this item.
Editing a post is only allowed within 24 hours after creating it.
You cannot Like this post because the topic is closed.
Copy the URL below to share a direct link to this post.
This post cannot be edited using the classic forums editor.
To edit this post, please enable the "New forums experience" in your settings.
Julien Dufour:
Ashraf AbuSara:
Julien Dufour:
[if this message is disturbing, you can delete it]
Hello !
To adjust the backfocus and the tilt of the camera on my Epsilon 160 I purchased the Octopi. following the advice on this discussion.
He made my job easier.
For those who might be interested, I am reselling this Octopi (change of setup).
[Francais]
Pour régler le backfocus et tilt de la caméra sur mon Epsilon 160 je m'étais procuré l'Octopi. suite aux conseils sur cette discussion.
Il m'a grandement facilité la tâche.
Pour ceux que ca pourrait intéresser, je revends cet Octopi (changement de setup).
How much backfocus does it take?
From 5mm to 9 mm. Wish I could use it, but I like using an OAG in my imaging train. Seems impossible to incorporate with my OAG. If I remove the OAG tilt plate I have 7.2mm of backfocus left. Not sure if there is a way to directly bolt this to the OAG-L from ZWO. With the additional 5mm of tilt plate there is no way I could use this.
|
You cannot like this item. Reason: "ANONYMOUS".
You cannot remove your like from this item.
Editing a post is only allowed within 24 hours after creating it.
You cannot Like this post because the topic is closed.
Copy the URL below to share a direct link to this post.
This post cannot be edited using the classic forums editor.
To edit this post, please enable the "New forums experience" in your settings.
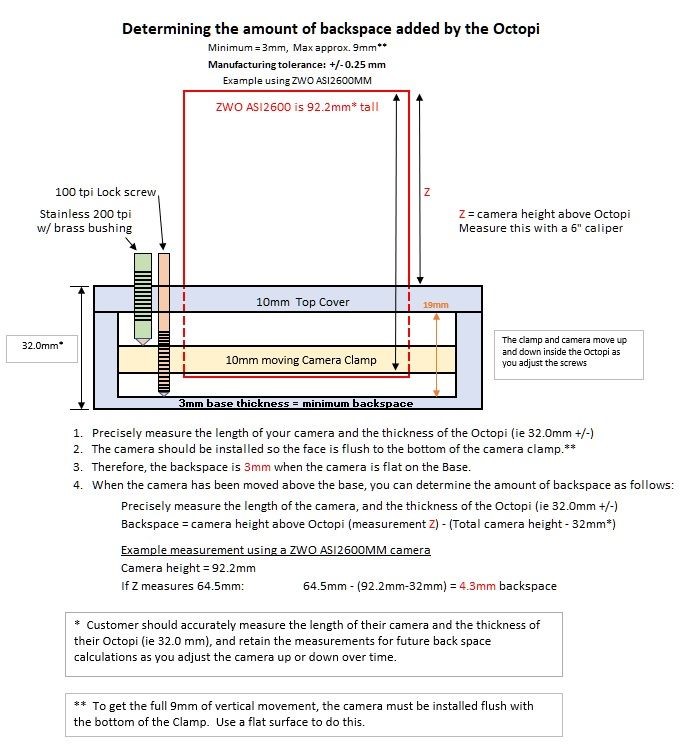
Minimum backspacing for the octopi is 3mm with the unit zeroed out and the camera inserted all the wat.
|
You cannot like this item. Reason: "ANONYMOUS".
You cannot remove your like from this item.
Editing a post is only allowed within 24 hours after creating it.
You cannot Like this post because the topic is closed.
Copy the URL below to share a direct link to this post.
This post cannot be edited using the classic forums editor.
To edit this post, please enable the "New forums experience" in your settings.
Chris White- Overcast Observatory:
Minimum backspacing for the octopi is 3mm with the unit zeroed out and the camera inserted all the wat. So does this slot in between the camera and the filter wheel?
|
You cannot like this item. Reason: "ANONYMOUS".
You cannot remove your like from this item.
Editing a post is only allowed within 24 hours after creating it.
You cannot Like this post because the topic is closed.
Copy the URL below to share a direct link to this post.
This post cannot be edited using the classic forums editor.
To edit this post, please enable the "New forums experience" in your settings.
Ashraf AbuSara:
Chris White- Overcast Observatory:
Minimum backspacing for the octopi is 3mm with the unit zeroed out and the camera inserted all the wat.
So does this slot in between the camera and the filter wheel? Correct. Your image train would go: Camera, Octopi, Filter Wheel, OAG, Spacers, Corrector I was able to fit it all within the available backspacing by using QHY600 SBFL, Tilt Device, ZWO Filter Wheel, Pegasus OAG. You'll need to do the math, but it's possible. I dont know if the focuser on the OAG would be a problem... it *might* hit the focuser of the scope. I'm sure someone has mentioned it in this megathread somewhere... lol.
|
You cannot like this item. Reason: "ANONYMOUS".
You cannot remove your like from this item.
Editing a post is only allowed within 24 hours after creating it.
You cannot Like this post because the topic is closed.
Copy the URL below to share a direct link to this post.
This post cannot be edited using the classic forums editor.
To edit this post, please enable the "New forums experience" in your settings.
Chris White- Overcast Observatory:
Ashraf AbuSara:
Chris White- Overcast Observatory:
Minimum backspacing for the octopi is 3mm with the unit zeroed out and the camera inserted all the wat.
So does this slot in between the camera and the filter wheel?
Correct. Your image train would go: Camera, Octopi, Filter Wheel, OAG, Spacers, Corrector
I was able to fit it all within the available backspacing by using QHY600 SBFL, Tilt Device, ZWO Filter Wheel, Pegasus OAG. You'll need to do the math, but it's possible. I dont know if the focuser on the OAG would be a problem... it *might* hit the focuser of the scope. I'm sure someone has mentioned it in this megathread somewhere... lol. I like to have the camera sensor bolted directly to the EFW to be as close as possible. Not for me at this point. Thanks Chris. Btw for those who live in the suffocatingly humid locations, like south coastal Texas, Florida etc, has anyone installed dew heaters on the primary and secondary mirror? I have installed a CF dew shield, along with the rear fan at maximum power. Looking at the primary mirror, I feel like droplets are just forming on the primary mirror. Not full blown dew. But at this rate by the end of the summer the mirror will need cleaning every month or two. What has been everyone's dew fighting solution?
|
You cannot like this item. Reason: "ANONYMOUS".
You cannot remove your like from this item.
Editing a post is only allowed within 24 hours after creating it.
You cannot Like this post because the topic is closed.
Copy the URL below to share a direct link to this post.
This post cannot be edited using the classic forums editor.
To edit this post, please enable the "New forums experience" in your settings.
You can remove the tilt plate from your camera and use the octopi. I think the tilt plate is 5mm. So it would actually get your sensor closer to your filters.
|
You cannot like this item. Reason: "ANONYMOUS".
You cannot remove your like from this item.
Editing a post is only allowed within 24 hours after creating it.
You cannot Like this post because the topic is closed.
Copy the URL below to share a direct link to this post.
This post cannot be edited using the classic forums editor.
To edit this post, please enable the "New forums experience" in your settings.
Chris White- Overcast Observatory:
You can remove the tilt plate from your camera and use the octopi. I think the tilt plate is 5mm. So it would actually get your sensor closer to your filters. Thanks Chris. For me the camera is bolted directly to the EFW with no tilt plate on between. The tilt plate is located between the OAG and the corrector adapter/focuser.
|
You cannot like this item. Reason: "ANONYMOUS".
You cannot remove your like from this item.
Editing a post is only allowed within 24 hours after creating it.
You cannot Like this post because the topic is closed.
Copy the URL below to share a direct link to this post.
This post cannot be edited using the classic forums editor.
To edit this post, please enable the "New forums experience" in your settings.
Ashraf AbuSara:
Thanks Chris. For me the camera is bolted directly to the EFW with no tilt plate on between. The tilt plate is located between the OAG and the corrector adapter/focuser. I see. What camera are you using? I have used both the QHY600PH as well as the QHY600 SBFL with tilt devices. I couldnt see any difference between the two for vignetting even though the QHY600PH has a very long distance to the filters. I am using 50mm filters however. 2" mounted filters are a different story altogether....
|
You cannot like this item. Reason: "ANONYMOUS".
You cannot remove your like from this item.
Editing a post is only allowed within 24 hours after creating it.
You cannot Like this post because the topic is closed.
Copy the URL below to share a direct link to this post.
This post cannot be edited using the classic forums editor.
To edit this post, please enable the "New forums experience" in your settings.
Chris White- Overcast Observatory:
Ashraf AbuSara:
Thanks Chris. For me the camera is bolted directly to the EFW with no tilt plate on between. The tilt plate is located between the OAG and the corrector adapter/focuser.
I see. What camera are you using? I have used both the QHY600PH as well as the QHY600 SBFL with tilt devices. I couldnt see any difference between the two for vignetting even though the QHY600PH has a very long distance to the filters. I am using 50mm filters however. 2" mounted filters are a different story altogether.... I am using ZWO 6200mm pro with with 50mm umounted filters directly bolted to the ZWO 2" EFW. It is the closest the sensor can be to the filter in this configuration.
|
You cannot like this item. Reason: "ANONYMOUS".
You cannot remove your like from this item.
Editing a post is only allowed within 24 hours after creating it.
You cannot Like this post because the topic is closed.
Copy the URL below to share a direct link to this post.
This post cannot be edited using the classic forums editor.
To edit this post, please enable the "New forums experience" in your settings.
Daniel Carter:
I am going to get the Optec Leo on order for my E160 tomorrow (just got my 160 on Friday). They said it would probably be about 8 weeks until it gets to me (bummer). Do you have any tips or advice on installing the Leo?
Thanks,
Daniel
Hi Daniel,
Installation of the Leo is very straightforward. There are 4 screws on the focuser you remove, and they have nuts on the inside of the tube you need to be mindful of. Also, these nuts are painted flat black, so you will want to be careful not to scuff that off or have something like chalkboard paint handy if you need. These screws and nuts are also used during the install of the Leo. I was able to remove and reinstall them with no issues with scuffing. Please ensure you remove the corrector prior to removing the stock focuser.
There are an additional 2 hex bolts on the inside of the stock focuser (more clearly inside of the tube connected to the stock focuser) that you need to remove, and these are not used in the installation of the Leo.
Install the Leo saddle using the 4 screws and nuts you removed from the stock focuser. You may need to pay close attention to alignment of the 4 holes on the Leo saddle, to the 4 holes drilled by Tak into the tube. With some careful finesse (and a few curse words) they should all set squarely and straight. Do not install them crooked. Take your time.
Once installed, place the dovetail adapter provided by Optec, which has the same threads as the stock drawtube, into the drawtube and lock it down with the set screws. You may need to connect the controller and move the drawtube out to access these set screws. Once that is all done collimate the telescope with the Takahashi collimation tools (with the corrector still removed). Prior to that, and this is very optional, you may want to thread the Optec dovetail in a few (say 3) revolutions to increase where the focuser will come to focus. At proper back spacing from the corrector, I come into focus at 18k steps out of 112k available. This does not cause me any problems, but I did want to note that for others. To do this there is a gold ring above the saddle you unlock, then thread the dovetail assembly in, and lock the gold ring back down. I did not need to do this myself, but it's a worthy call-out.
Once you have collimated the scope, thread the corrector back on, and add your imaging system. Metal back distance is 56.2mm + filter considerations. You may find that you need to tweak this (as I did) which is a whole other ball of wax you can dive into once you make it to this point.
Congrats on your E-160ED. It is a beast of a telescope and while somewhat of a journey to get perfectly dialed in, the results speak for themselves.
-Bill
I just went through this exercise. This post was extremely helpful. Couple of comments and questions. There are 4 screws that came with the Leo saddle that are longer than the screws that are on the Epsilon's focuser. There was barely any thread getting into the nuts with the original Tak screws. I used the ones that came with the saddle instead. Not sure if they did not supply those screws before, or there is a reason you preferred the Tak screws? They do come in quite a bit into the light path of the OTA. Was that the reason you preferred the Tak scews? I did end up painting the tips black with some ultra black paint. Hopefully I won't get any weird spikes or reflections. The other thing is, I spent a lot of time aligning the wholes. They definitely were not crooked, but there seemed to be a lot of play side to side in where you can tighten the screws, while still being straight. How are we sure exactly how centered the focuser is? If the focuser is slightly off center, does it affect the performance of the OTA, or is it all fixable with adjusting the tilt and collimation?    Thanks!
|
You cannot like this item. Reason: "ANONYMOUS".
You cannot remove your like from this item.
Editing a post is only allowed within 24 hours after creating it.
You cannot Like this post because the topic is closed.
Copy the URL below to share a direct link to this post.
This post cannot be edited using the classic forums editor.
To edit this post, please enable the "New forums experience" in your settings.
you may want to paint those screws with some Matt black paint - they are looking a little shiny!
|
You cannot like this item. Reason: "ANONYMOUS".
You cannot remove your like from this item.
Editing a post is only allowed within 24 hours after creating it.
You cannot Like this post because the topic is closed.
Copy the URL below to share a direct link to this post.
This post cannot be edited using the classic forums editor.
To edit this post, please enable the "New forums experience" in your settings.
Just got my Hercules focuser/rotator. Will install next week (as I'm imaging this weekend, fires permitting). It has the same positioning as the original Tak focuser and the Leo - so, 56.2mm backfocus…but WITH a rotator built in (so I save 19mm of backfocus, as I was using a Pegasus Astro Falcon). Whoohoooo!!!
|
You cannot like this item. Reason: "ANONYMOUS".
You cannot remove your like from this item.
Editing a post is only allowed within 24 hours after creating it.
You cannot Like this post because the topic is closed.
Copy the URL below to share a direct link to this post.
This post cannot be edited using the classic forums editor.
To edit this post, please enable the "New forums experience" in your settings.