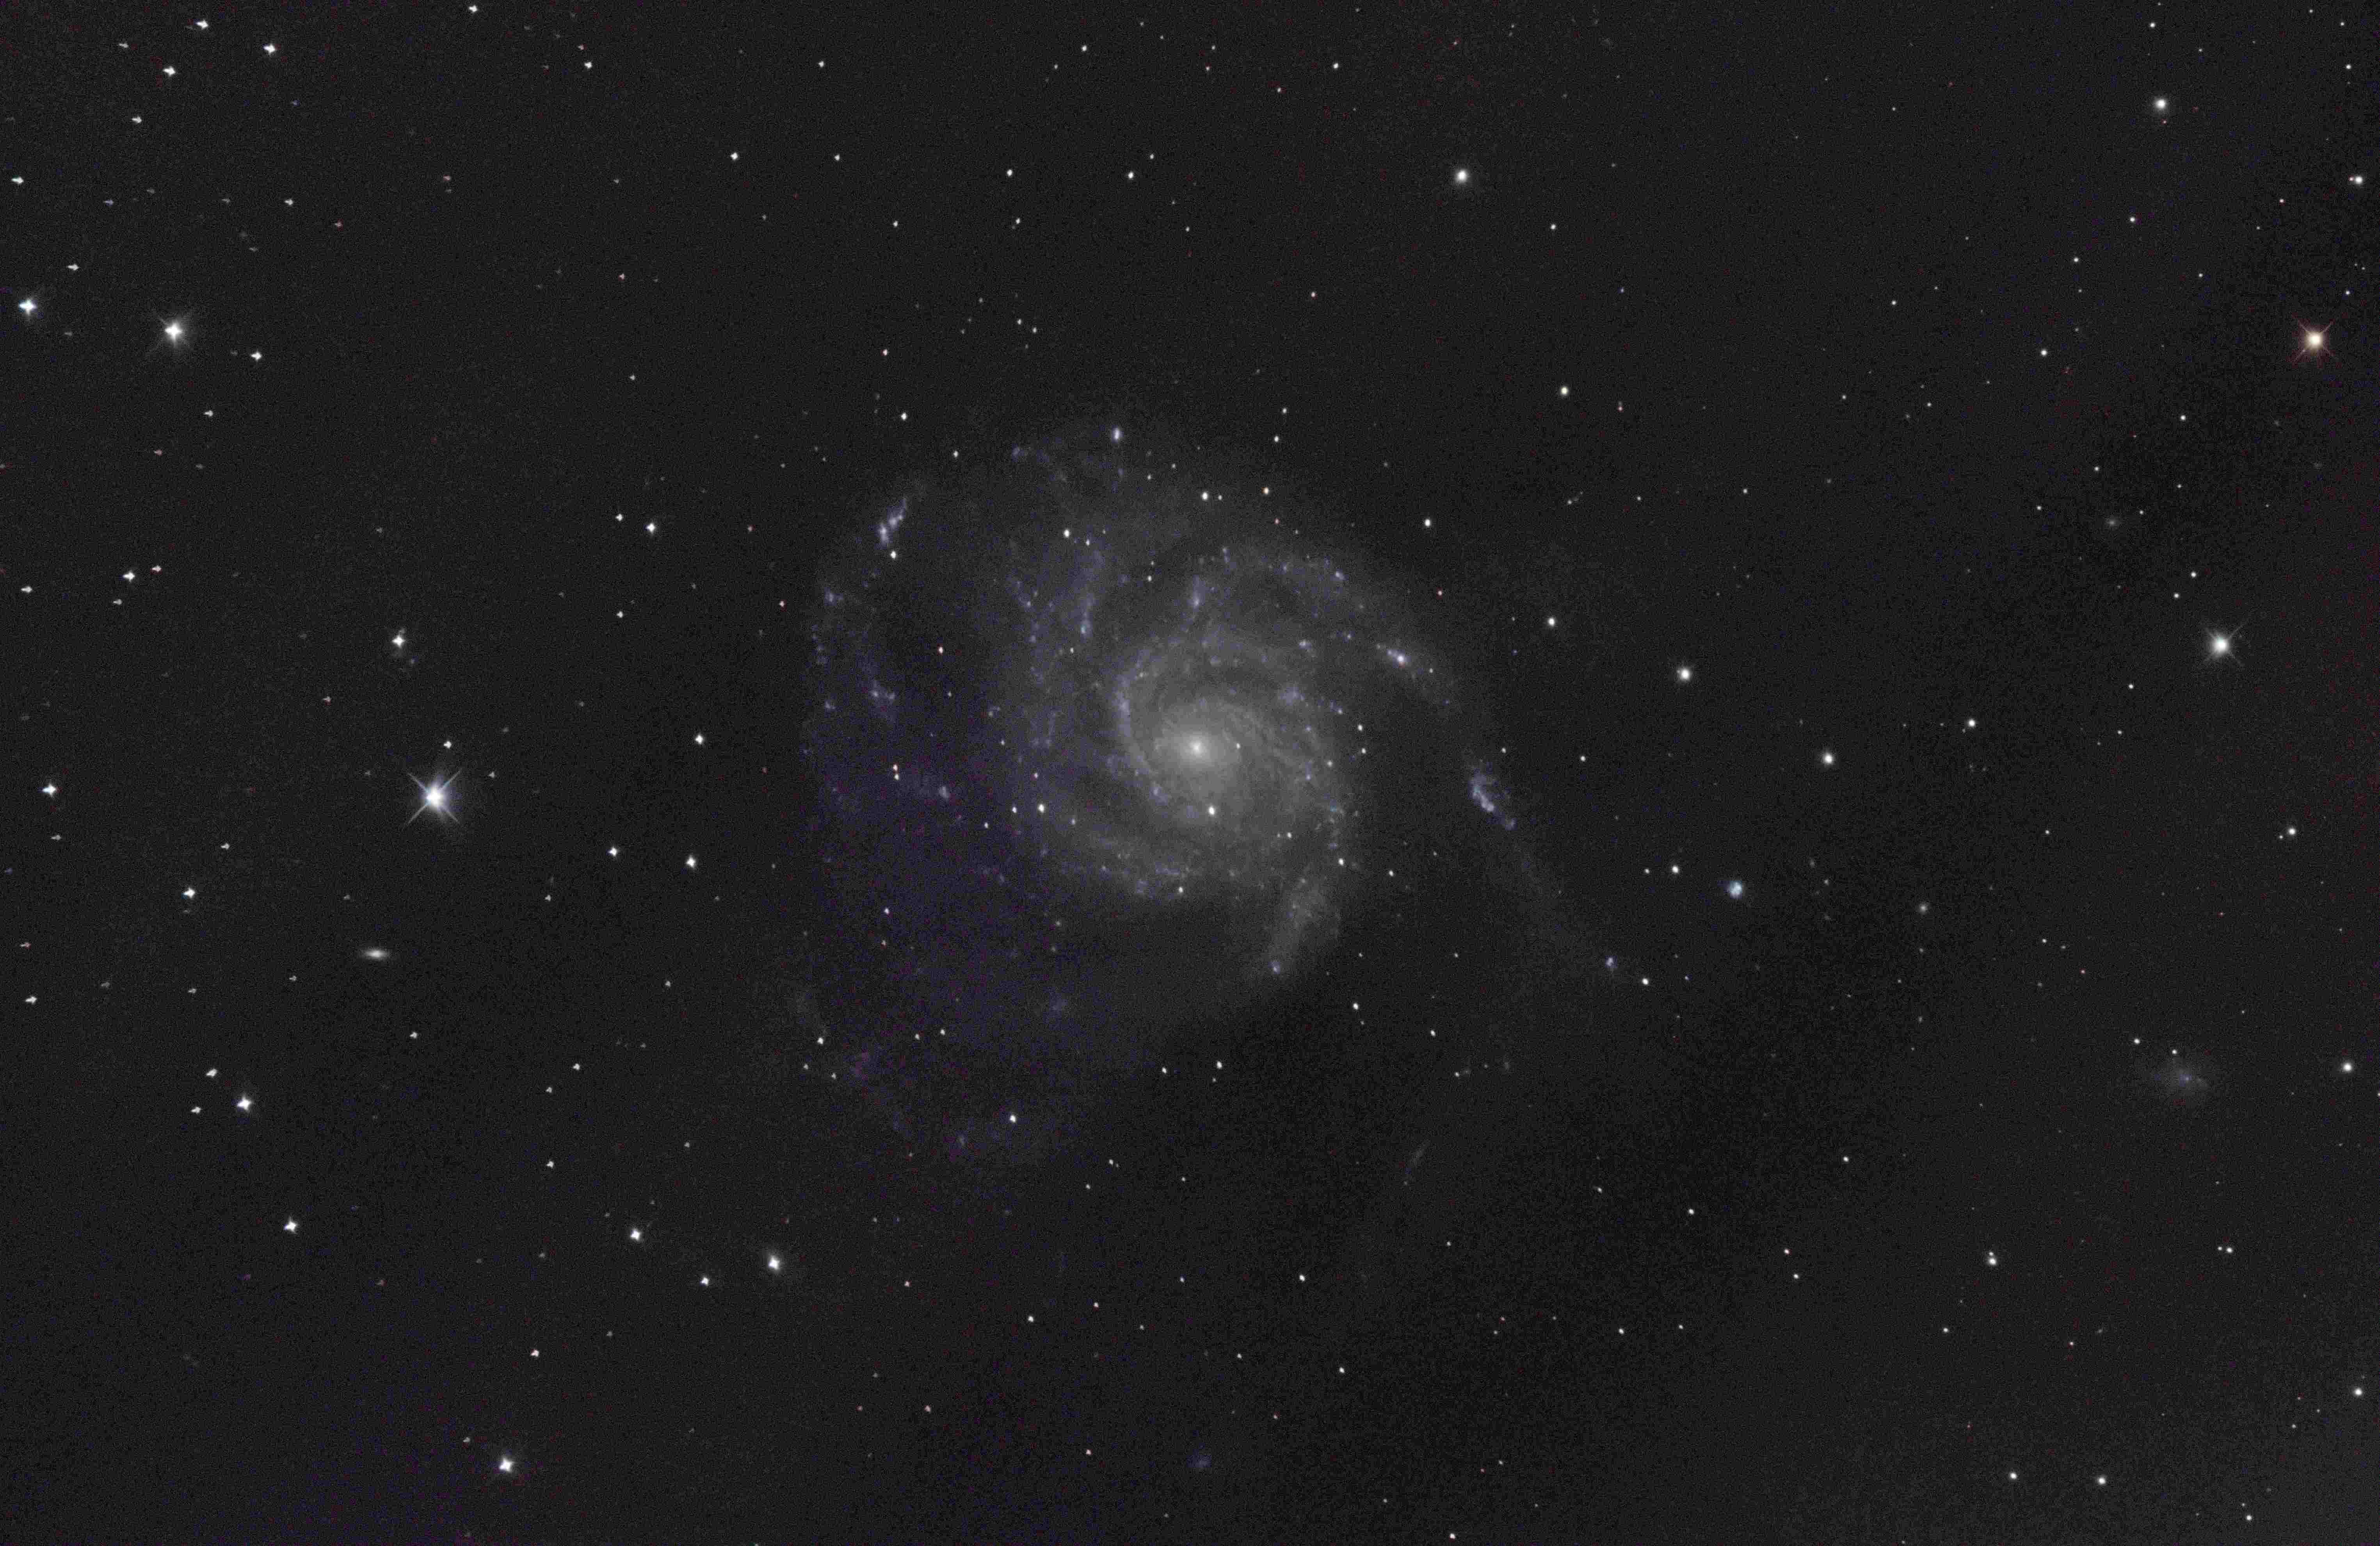
Does anyone have an idea why the stars on the left side of image look like plus marks. I just got an Aperura 8" RC and collimated using OCAL then on stars. Inner focus and outer focus the stars are round donuts. All subs in LRGB look the same as the final image. Guiding was 0.4 to 0.6 rms with a few spikes to 2 arcsec from wind gusts.  |
You cannot like this item. Reason: "ANONYMOUS".
You cannot remove your like from this item.
Editing a post is only allowed within 24 hours after creating it.
You cannot Like this post because the topic is closed.
Copy the URL below to share a direct link to this post.
This post cannot be edited using the classic forums editor.
To edit this post, please enable the "New forums experience" in your settings.
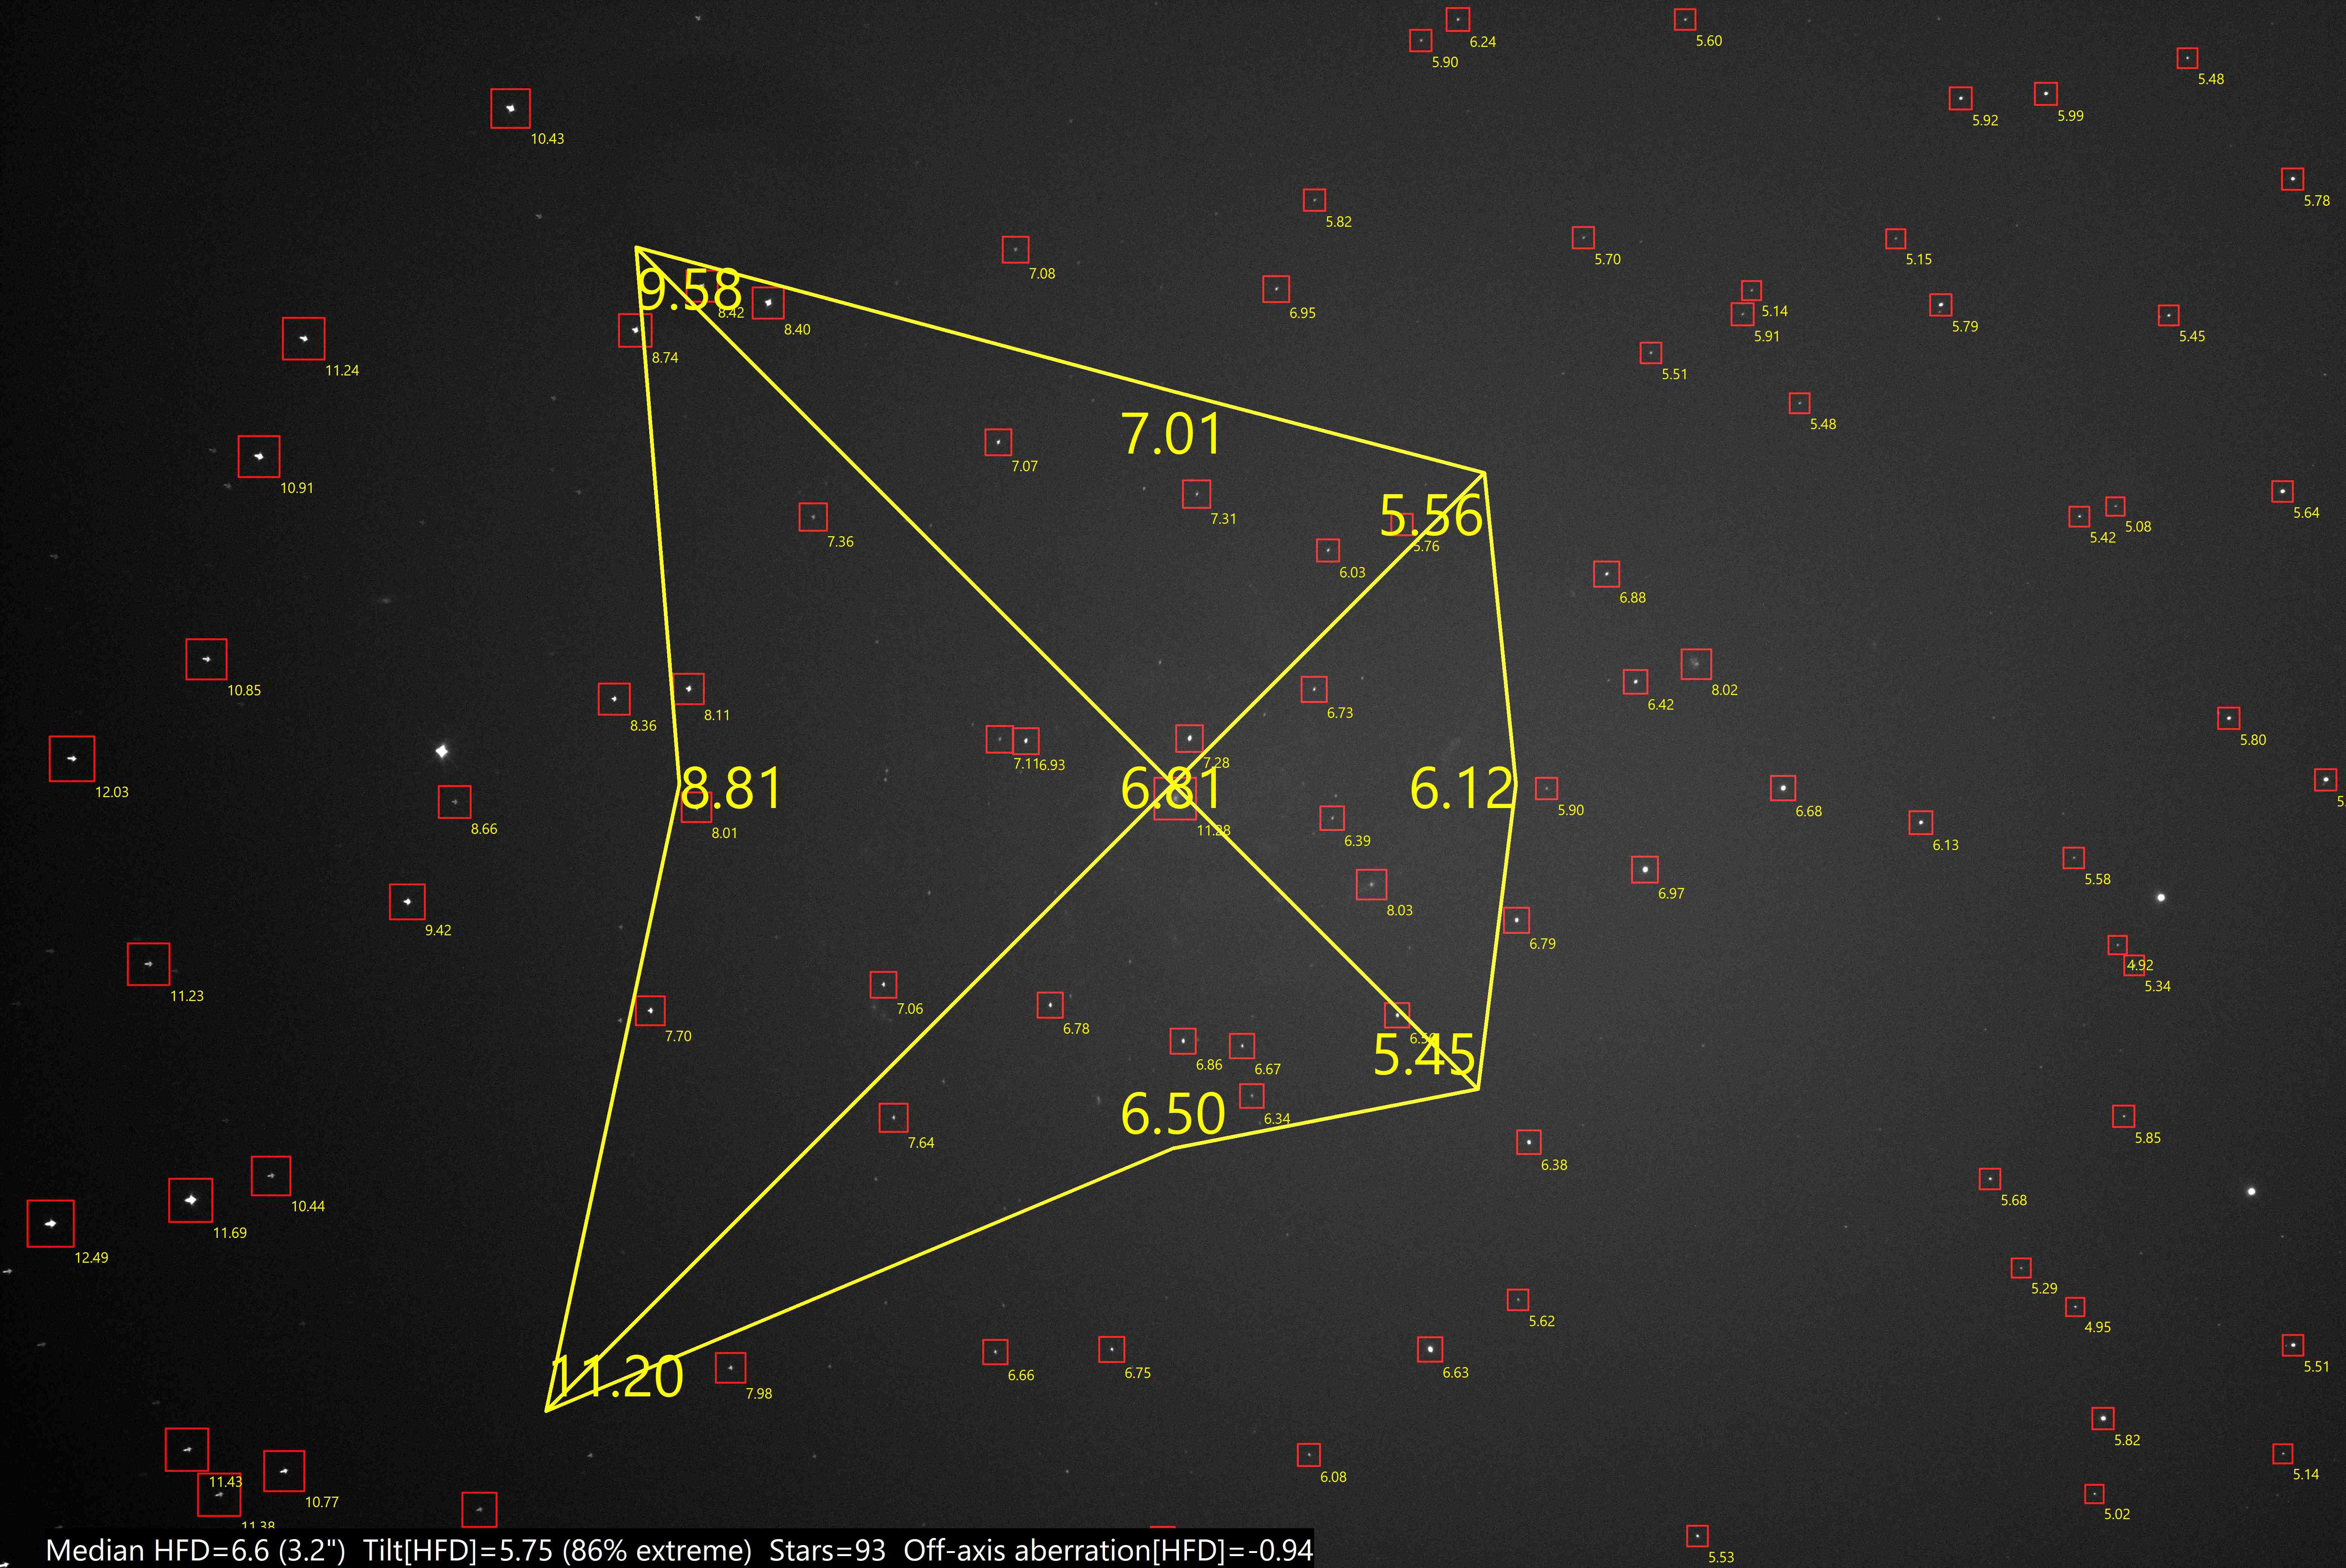
Obviously wasn't collimated at the time the image was taken. Your best focus is toward the upper right corner. Move that point toward the center of the image and check again *in focus*.
|
You cannot like this item. Reason: "ANONYMOUS".
You cannot remove your like from this item.
Editing a post is only allowed within 24 hours after creating it.
You cannot Like this post because the topic is closed.
Copy the URL below to share a direct link to this post.
This post cannot be edited using the classic forums editor.
To edit this post, please enable the "New forums experience" in your settings.
Yeah I'm going with not actually collimated as well. After struggling with my off center secondary donut I found the DSI method to be very useful and about the best way to collimate. I have a new RC8 now so hopefully the center donut is in the correct spot this time. The star donut is only one of the two checks for RC collimation, the other is donut shape across your camera view. For the DSI method you basically center a star and defocus to check for uniform brightness of the donut, adjusting the primary mirror to get it evenly lit. Then adjust the secondary to balance the donut shapes across the field so they are evenly misshaped across the field (some will be slanted, some will be flat, the goal is to get them even with the center being round). https://www.google.com/url?sa=t&source=web&rct=j&opi=89978449&url=http://www.deepskyinstruments.com/truerc/docs/DSI_Collimation_Procedure_Ver_1.0.pdf&ved=2ahUKEwio-anZm_SNAxVeEUQIHXwgGtwQFnoECBsQAQ&usg=AOvVaw1TQ8YAhohC9_gr_IRXBo3x
|
You cannot like this item. Reason: "ANONYMOUS".
You cannot remove your like from this item.
Editing a post is only allowed within 24 hours after creating it.
You cannot Like this post because the topic is closed.
Copy the URL below to share a direct link to this post.
This post cannot be edited using the classic forums editor.
To edit this post, please enable the "New forums experience" in your settings.
I have a 6in RC and needed a tilt plate to get everything round from corner to corner. I got this one: https://agenaastro.com/gso-rc-6-8-focuser-collimation-ring.html |
You cannot like this item. Reason: "ANONYMOUS".
You cannot remove your like from this item.
Editing a post is only allowed within 24 hours after creating it.
You cannot Like this post because the topic is closed.
Copy the URL below to share a direct link to this post.
This post cannot be edited using the classic forums editor.
To edit this post, please enable the "New forums experience" in your settings.
Mitchell Mysliwiec:
I have a 6in RC and needed a tilt plate to get everything round from corner to corner. I got this one:
https://agenaastro.com/gso-rc-6-8-focuser-collimation-ring.html Apertura has a matching one for the Carbonstar, probably the exact same one. I actually found that there is very little tilt when using a rack and pinion focuser, which apparently the new Carbonstar RC8s all have, so a tilt plate might not be necessary. Focuser tilt can be checked by removing the entire center baffle and checking the concentricity of the tube opening and focuser opening. I haven't checked this on my new RC8, but found that I didn't need the tilt plate on my old one after changing focusers.
|
You cannot like this item. Reason: "ANONYMOUS".
You cannot remove your like from this item.
Editing a post is only allowed within 24 hours after creating it.
You cannot Like this post because the topic is closed.
Copy the URL below to share a direct link to this post.
This post cannot be edited using the classic forums editor.
To edit this post, please enable the "New forums experience" in your settings.
I found that ASTAP has a camera tilt checker. You need to use it on subs not stacked images. My camera tilt looks to be way off. I ordered the Apertura camera tilt adapter for the 6"/8" RC. When I get it I will post an update to see if it helped. The direction it shows the tilt is matches the star shapes.  |
You cannot like this item. Reason: "ANONYMOUS".
You cannot remove your like from this item.
Editing a post is only allowed within 24 hours after creating it.
You cannot Like this post because the topic is closed.
Copy the URL below to share a direct link to this post.
This post cannot be edited using the classic forums editor.
To edit this post, please enable the "New forums experience" in your settings.
The only way I was able to achieve collimation was to add in a tip/tilt plate between the OTA and the focuser. The focuser is attached to the housing holding the mirror, I believe, for the 6 and 8" models …. so getting the mirrors aligned might mean the focuser is off-axis. When I started, my stars looked like a starlink rocket launch with the bow wave  |
You cannot like this item. Reason: "ANONYMOUS".
You cannot remove your like from this item.
Editing a post is only allowed within 24 hours after creating it.
You cannot Like this post because the topic is closed.
Copy the URL below to share a direct link to this post.
This post cannot be edited using the classic forums editor.
To edit this post, please enable the "New forums experience" in your settings.
I noticed that my secondary mirror was off center. I moved it best as I could to center. Then redid collimation of primary and secondary mirroes. Stars look good now. ASTAP shows tilt at 8% now. I ran ASTAP monitoring of tilt by checking sub images. The RC does flex quite a bit as it moves across the sky. Tilt went from 8% to 20% over the night. Still waiting for the tilt adapter. 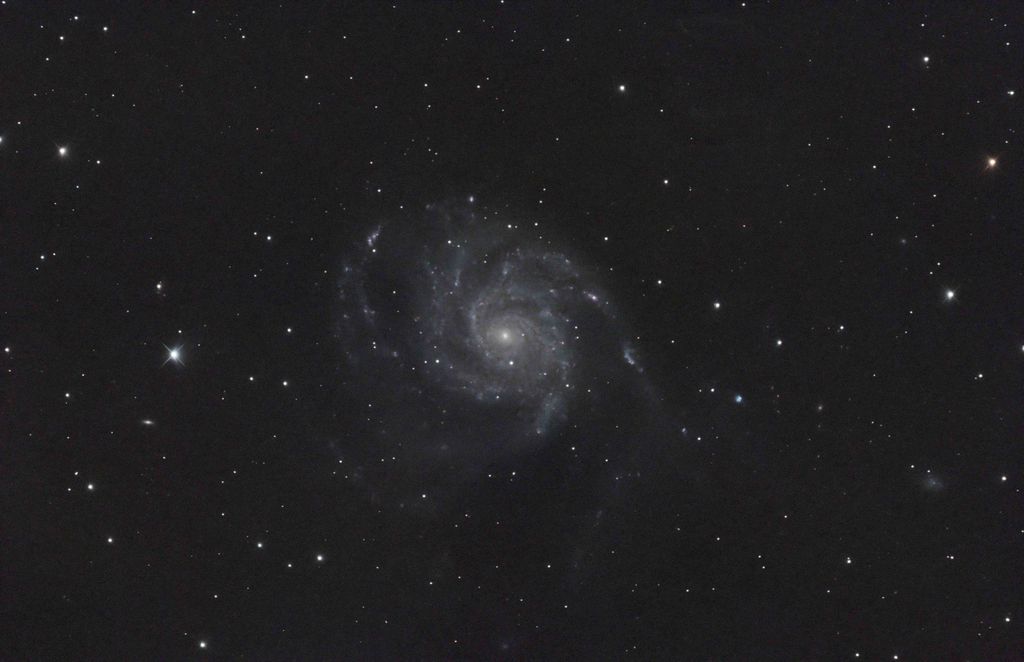 |
You cannot like this item. Reason: "ANONYMOUS".
You cannot remove your like from this item.
Editing a post is only allowed within 24 hours after creating it.
You cannot Like this post because the topic is closed.
Copy the URL below to share a direct link to this post.
This post cannot be edited using the classic forums editor.
To edit this post, please enable the "New forums experience" in your settings.
I noticed that my secondary mirror was off center. I moved it best as I could to center. Then redid collimation of primary and secondary mirroes. Stars look good now. ASTAP shows tilt at 8% now. I ran ASTAP monitoring of tilt by checking sub images. The RC does flex quite a bit as it moves across the sky. Tilt went from 8% to 20% over the night. Still waiting for the tilt adapter. Not sure how old your RC8 is, but highpointscientific replaced mine because of the bad center spot on the secondary mirror. The tilt issue is more than likely because of the focuser, the original one is terrible and will change throughout the night. The new models apparently have an upgraded rack and pinion focuser, but you can also buy a rack and pinion from highpointscientific if you are out of warranty period maybe. The center spot mis-centering is very frustrating, but you can take out the mirror and mark the actual center with a marker or something for a temporary fix.
|
You cannot like this item. Reason: "ANONYMOUS".
You cannot remove your like from this item.
Editing a post is only allowed within 24 hours after creating it.
You cannot Like this post because the topic is closed.
Copy the URL below to share a direct link to this post.
This post cannot be edited using the classic forums editor.
To edit this post, please enable the "New forums experience" in your settings.
That is an evident collimation issue. But not impossibile to solve via software with BluerXTerminator. But i suggest a collimation. t's all very simple and you will need a guide camera to mount in the focuser and a software like this one: https://github.com/sajmons/CollimationCirclesFirst of all you have to remove the secondary mirror so that the front spider hole is free. Then you will mount the guide camera and with that software you will adjust the primary mirror with the 3 screws so that the center of the guide camera points exactly to the center of the spider. Once this is done you will NEVER touch the primary mirror again: THIS IS VERY IMPORTANT! You reassemble the secondary mirror and at that point you use a normal eyepiece (or the guide camera in live view on the PC monitor) and with the intra-extra focus technique you will adjust the collimation of the secondary mirror until you have perfect donuts in the entire field. You will never reach perfection with this system for photographic use it is perfect. Once you have done this you should measure the effective focal length with a plate solve and this should be about 1624 mm. If it is not you have to move the secondary closer or further away from the primary (screwing or unscrewing the central screw) and each time you will have to repeat the collimation. For once you will have to dedicate a bit of time to it but then after that you will not have to touch it again for a long time.
|
You cannot like this item. Reason: "ANONYMOUS".
You cannot remove your like from this item.
Editing a post is only allowed within 24 hours after creating it.
You cannot Like this post because the topic is closed.
Copy the URL below to share a direct link to this post.
This post cannot be edited using the classic forums editor.
To edit this post, please enable the "New forums experience" in your settings.
I had the same issues with my RC8, due to a lot of heavy equipment attached which causes flexing and pinching. The issue was solved when I had a bracket printed in aluminum to separate the main mirror from the attached equipment. The drive train is now held by the housing and not by the screws of the main mirror. After that, collimating the mirrors was a lot easier and I've not had to repeat the process for over a year now. In addition, I also have a tilt adapter connected which also helps.
I've seen that there are some dealers who now sell these brackets, so you don't have to have it printed.
|
You cannot like this item. Reason: "ANONYMOUS".
You cannot remove your like from this item.
Editing a post is only allowed within 24 hours after creating it.
You cannot Like this post because the topic is closed.
Copy the URL below to share a direct link to this post.
This post cannot be edited using the classic forums editor.
To edit this post, please enable the "New forums experience" in your settings.
Michele Campini:
That is an evident collimation issue. But not impossibile to solve via software with BluerXTerminator. But i suggest a collimation.
t's all very simple and you will need a guide camera to mount in the focuser and a software like this one:
https://github.com/sajmons/CollimationCircles
First of all you have to remove the secondary mirror so that the front spider hole is free.
Then you will mount the guide camera and with that software you will adjust the primary mirror with the 3 screws so that the center of the guide camera points exactly to the center of the spider.
Once this is done you will NEVER touch the primary mirror again: THIS IS VERY IMPORTANT!
You reassemble the secondary mirror and at that point you use a normal eyepiece (or the guide camera in live view on the PC monitor) and with the intra-extra focus technique you will adjust the collimation of the secondary mirror until you have perfect donuts in the entire field. You will never reach perfection with this system for photographic use it is perfect.
Once you have done this you should measure the effective focal length with a plate solve and this should be about 1624 mm. If it is not you have to move the secondary closer or further away from the primary (screwing or unscrewing the central screw) and each time you will have to repeat the collimation.
For once you will have to dedicate a bit of time to it but then after that you will not have to touch it again for a long time. Interesting technic Michele and I never heard before. Is there anywhere in the web more step by step description of this method? Can this be done indoor (daylight) or only pointing at stars at night? It seems the second, but regarding the part when you remove the secondary mirror so that the front spider hole and adjust primary mirror so the guide camera is centerd to the hole of the spider, how do you do that at night? And why do you use the guide camere? Can I use the guide camera while being installed in the OAG? Sorry, too many questions hence why I was looking for a more detialed description in the web if available. Grazie mille! Sebastiano
|
You cannot like this item. Reason: "ANONYMOUS".
You cannot remove your like from this item.
Editing a post is only allowed within 24 hours after creating it.
You cannot Like this post because the topic is closed.
Copy the URL below to share a direct link to this post.
This post cannot be edited using the classic forums editor.
To edit this post, please enable the "New forums experience" in your settings.
Still higly interested to hear about above  |
You cannot like this item. Reason: "ANONYMOUS".
You cannot remove your like from this item.
Editing a post is only allowed within 24 hours after creating it.
You cannot Like this post because the topic is closed.
Copy the URL below to share a direct link to this post.
This post cannot be edited using the classic forums editor.
To edit this post, please enable the "New forums experience" in your settings.