Claudio Boicu:
idk if it is useful but back when I got my camera I still didn't have my filters so I used a oiii 2" filter that I had lying around and with a filter drawer, the flats looked perfect, so I guess having a off center filter wheel that is 1.25", it has little to no wiggle room for error and it would work when the filters are positioned perfectly in the center. Maybe. At least that's an idea. But the edges of the filters are round. I can't say if my filter wheels are dead center. I only use 2" filters on my 294 cams. It is possible and of course would affect the flats. But if it is the cause for your problem? Well, if we take out all other stuff that can't be, it might be the solution.
|
You cannot like this item. Reason: "ANONYMOUS".
You cannot remove your like from this item.
Editing a post is only allowed within 24 hours after creating it.
You cannot Like this post because the topic is closed.
Copy the URL below to share a direct link to this post.
This post cannot be edited using the classic forums editor.
To edit this post, please enable the "New forums experience" in your settings.
the problem is that that cut off part is only there in the narrowband filters. for LRGB there is nothing there to see, its just a normal looking flat without any edges of cut off parts.
should I contact my vendor to see if I could get replacements?
|
You cannot like this item. Reason: "ANONYMOUS".
You cannot remove your like from this item.
Editing a post is only allowed within 24 hours after creating it.
You cannot Like this post because the topic is closed.
Copy the URL below to share a direct link to this post.
This post cannot be edited using the classic forums editor.
To edit this post, please enable the "New forums experience" in your settings.
Claudio Boicu:
should I contact my vendor to see if I could get replacements? You could try. But I'm not convinced, that the edge is not there in the LRGB images. The filters let in much more light and the pixels may be filled up by photons of stray light. Maybe, the edge is there but the contrast is much much lower. I think you can check this. It's just a theoretical method I never tried: Use the STF in PI with the master flat and keep the mid point slider at where you set your target mean value. I use 50%, others use 30%, I think you know what you used for taking your flats. Then slide in the white and the black point sliders towards your middle slider to over- and underexpose the pixels that are much brighter/darker. At some point, you start to see mostly black and white pixels. If the edge is there, it should appear at some point. Maybe slide the mid point slider around the guessed mean value of your flat a bit. If the edge doesn't appear, chances are good that it's not there, But this method is not fool proove, I guess.
|
You cannot like this item. Reason: "ANONYMOUS".
You cannot remove your like from this item.
Editing a post is only allowed within 24 hours after creating it.
You cannot Like this post because the topic is closed.
Copy the URL below to share a direct link to this post.
This post cannot be edited using the classic forums editor.
To edit this post, please enable the "New forums experience" in your settings.
I would suggest taking the narrowband filters out and holding them up to the light to see if they are visually uniform. If you have not done this are are open to, swap out the narrow band filter and one of the LRGB filters and see if the issue shows up if the filter is in a different spot in the wheel.
|
You cannot like this item. Reason: "ANONYMOUS".
You cannot remove your like from this item.
Editing a post is only allowed within 24 hours after creating it.
You cannot Like this post because the topic is closed.
Copy the URL below to share a direct link to this post.
This post cannot be edited using the classic forums editor.
To edit this post, please enable the "New forums experience" in your settings.
Christian Großmann:
Claudio Boicu:
should I contact my vendor to see if I could get replacements?
You could try. But I'm not convinced, that the edge is not there in the LRGB images. The filters let in much more light and the pixels may be filled up by photons of stray light. Maybe, the edge is there but the contrast is much much lower. I think you can check this. It's just a theoretical method I never tried: Use the STF in PI with the master flat and keep the mid point slider at where you set your target mean value. I use 50%, others use 30%, I think you know what you used for taking your flats. Then slide in the white and the black point sliders towards your middle slider to over- and underexpose the pixels that are much brighter/darker. At some point, you start to see mostly black and white pixels. If the edge is there, it should appear at some point. Maybe slide the mid point slider around the guessed mean value of your flat a bit. If the edge doesn't appear, chances are good that it's not there, But this method is not fool proove, I guess. I tried it, the cut off part is non existent
|
You cannot like this item. Reason: "ANONYMOUS".
You cannot remove your like from this item.
Editing a post is only allowed within 24 hours after creating it.
You cannot Like this post because the topic is closed.
Copy the URL below to share a direct link to this post.
This post cannot be edited using the classic forums editor.
To edit this post, please enable the "New forums experience" in your settings.
Arun H:
I would suggest taking the narrowband filters out and holding them up to the light to see if they are visually uniform. If you have not done this are are open to, swap out the narrow band filter and one of the LRGB filters and see if the issue shows up if the filter is in a different spot in the wheel. I will try that now.
|
You cannot like this item. Reason: "ANONYMOUS".
You cannot remove your like from this item.
Editing a post is only allowed within 24 hours after creating it.
You cannot Like this post because the topic is closed.
Copy the URL below to share a direct link to this post.
This post cannot be edited using the classic forums editor.
To edit this post, please enable the "New forums experience" in your settings.
Going back to your original post, you showed an image of the wizard nebula. If these lights and flats were taken with the same filter and the same equipment, the only thing that's different is the flat panel. If you have these problems in the flats and the lights, they would have disappeared in the final image. Because you see the edge in your processed data too, it must be in the flats but not in the lights. The flats were calculated out and over-corrected your lights. That's why the dark areas of the flats are bright in the final stack. If the only thing that's different then is the flat panel, I am back to where we were before. But the sky flats also didn't work. The thing that comes to mind now and then is some kind of reflection. But these are usually not straight. But they could explain, why they are only visible in different filters (or at least with different levels). They might also explain (although I'm not convinced) why the light frames of the wizard nebula differ from the flats. But it really doesn't look like reflections. They are usually round and only small rings. I really have no clue what to look for. Every logic we use is refuted by another logic. It's like the search for dark matter… we know there must be something and there are several theories but we can't find the right one - and maybe, there isn't even a problem.  |
You cannot like this item. Reason: "ANONYMOUS".
You cannot remove your like from this item.
Editing a post is only allowed within 24 hours after creating it.
You cannot Like this post because the topic is closed.
Copy the URL below to share a direct link to this post.
This post cannot be edited using the classic forums editor.
To edit this post, please enable the "New forums experience" in your settings.
Claudio Boicu:
Arun H:
I would suggest taking the narrowband filters out and holding them up to the light to see if they are visually uniform. If you have not done this are are open to, swap out the narrow band filter and one of the LRGB filters and see if the issue shows up if the filter is in a different spot in the wheel.
I will try that now. tried it out, nothing visible when looking trough, and also I switched SHO filters with LRG (sii for L, ha for R and oiii for G), and still the same cut off part visible, I also tried to de-thread the filters a bit so if it was something on the filters it would be visible, but nothing there swell, the flats looked like always, with the cut off part. what I noticed when I was playing around with rotating the camera, that one corner was always more exposed than the rest, and conveniently, the more exposed side also showed the cut off part. meaning that the edge was following the over exposed part for some reason. here are some screenshots of me slowly rotating the camera between exposures. bottom right:  bottom in the middle:  bottom left:  and top left:  idk what can cause this. I tried so many things to fix this that im starting to lose hope  |
You cannot like this item. Reason: "ANONYMOUS".
You cannot remove your like from this item.
Editing a post is only allowed within 24 hours after creating it.
You cannot Like this post because the topic is closed.
Copy the URL below to share a direct link to this post.
This post cannot be edited using the classic forums editor.
To edit this post, please enable the "New forums experience" in your settings.
Christian Großmann:
Going back to your original post, you showed an image of the wizard nebula. If these lights and flats were taken with the same filter and the same equipment, the only thing that's different is the flat panel. If you have these problems in the flats and the lights, they would have disappeared in the final image. Because you see the edge in your processed data too, it must be in the flats but not in the lights. The flats were calculated out and over-corrected your lights. That's why the dark areas of the flats are bright in the final stack. If the only thing that's different then is the flat panel, I am back to where we were before. But the sky flats also didn't work.
The thing that comes to mind now and then is some kind of reflection. But these are usually not straight. But they could explain, why they are only visible in different filters (or at least with different levels). They might also explain (although I'm not convinced) why the light frames of the wizard nebula differ from the flats. But it really doesn't look like reflections. They are usually round and only small rings. I really have no clue what to look for.
Every logic we use is refuted by another logic. It's like the search for dark matter... we know there must be something and there are several theories but we can't find the right one - and maybe, there isn't even a problem.  I saw the edge in my light frames aswell, and they got over corrected, but it wasn't that bad and it wasn't in the nebula so I took the starless image in photoshop and used the spot healing brush to erase them away Lol. also i normally didn't do sky flats, I used the shirt with iPad method and every time they worked well until I switched to the filters in my filter wheel. when I bought everything, the filters were the last thing that arrived, but when I had the camera and the scope I couldn't wait so I used an optolong 2 inch oiii filter (6.5nm) and a starizona filter drawer I had, and shot random targets. I took flats aswell because I wanted to see how they looked like and there was not problem with them. took them using iPad and t-shirt. only after my filters came in I put them in the filter wheel and attached everything I had problems. and so if I isolated that the problem isn't the filter itself, nor the camera, and there is nothing in the lightpath I just think there might be a problem with the filter wheel? but at this point I don't even know... I have an 8x1.25" filter wheel from ZWO because at the time the 7 position FW was out o stock... could it be because it is 8 positions??
|
You cannot like this item. Reason: "ANONYMOUS".
You cannot remove your like from this item.
Editing a post is only allowed within 24 hours after creating it.
You cannot Like this post because the topic is closed.
Copy the URL below to share a direct link to this post.
This post cannot be edited using the classic forums editor.
To edit this post, please enable the "New forums experience" in your settings.
I use an 8 position filter wheel as well. The difference is that I use 31 mm unmounted filters. The only thing that I can think of based on what you have shared is that there some kind of interference from the mounting of the filters. I assume if they are the 1.25”, they are the mounted kind? If there is a true obstruction close to the sensor, that is hard to correct with flats. Back in the day, I was using my DSLR with my Stellarvue 80mm scope. The mirror box would ever so slightly protrude into the light cone and give a very similar effect. It was impossible to correct with flats. In your case, perhaps moving to unmounted filters would fix the issue. The asymmetry is because the filters are probably slightly offset - which of course can contribute to the issue.
Edit: if you are using fast optics, the light cone will be sharper which would certainly make the issue easier to show up.
|
You cannot like this item. Reason: "ANONYMOUS".
You cannot remove your like from this item.
Editing a post is only allowed within 24 hours after creating it.
You cannot Like this post because the topic is closed.
Copy the URL below to share a direct link to this post.
This post cannot be edited using the classic forums editor.
To edit this post, please enable the "New forums experience" in your settings.
I used to have the camera threaded directly to the filter wheel. But there is this 11mm ring to get a backfocus distance of 17.5mm with the ASI294mm. Maybe you should increase the distance from the filter wheel to the camera and look if this has an impact (If this is even possible). Then the filter threads are not as close to the sensor. I don't know…
|
You cannot like this item. Reason: "ANONYMOUS".
You cannot remove your like from this item.
Editing a post is only allowed within 24 hours after creating it.
You cannot Like this post because the topic is closed.
Copy the URL below to share a direct link to this post.
This post cannot be edited using the classic forums editor.
To edit this post, please enable the "New forums experience" in your settings.
Christian Großmann:
I used to have the camera threaded directly to the filter wheel. But there is this 11mm ring to get a backfocus distance of 17.5mm with the ASI294mm. Maybe you should increase the distance from the filter wheel to the camera and look if this has an impact (If this is even possible). Then the filter threads are not as close to the sensor. I don't know... im already doing that lol. back when I put everything together, I had the camera directly threaded to the filter wheel, but it didnt have correct back focus and I had to put the spacer that is on the standard camera body back on it, then with a male to male thread connect the camera to the filterwheel I could try to get an adapter to get good back focus when the camera is directly threaded to the filterwheel, then the problem might be gone.
|
You cannot like this item. Reason: "ANONYMOUS".
You cannot remove your like from this item.
Editing a post is only allowed within 24 hours after creating it.
You cannot Like this post because the topic is closed.
Copy the URL below to share a direct link to this post.
This post cannot be edited using the classic forums editor.
To edit this post, please enable the "New forums experience" in your settings.
Claudio Boicu:
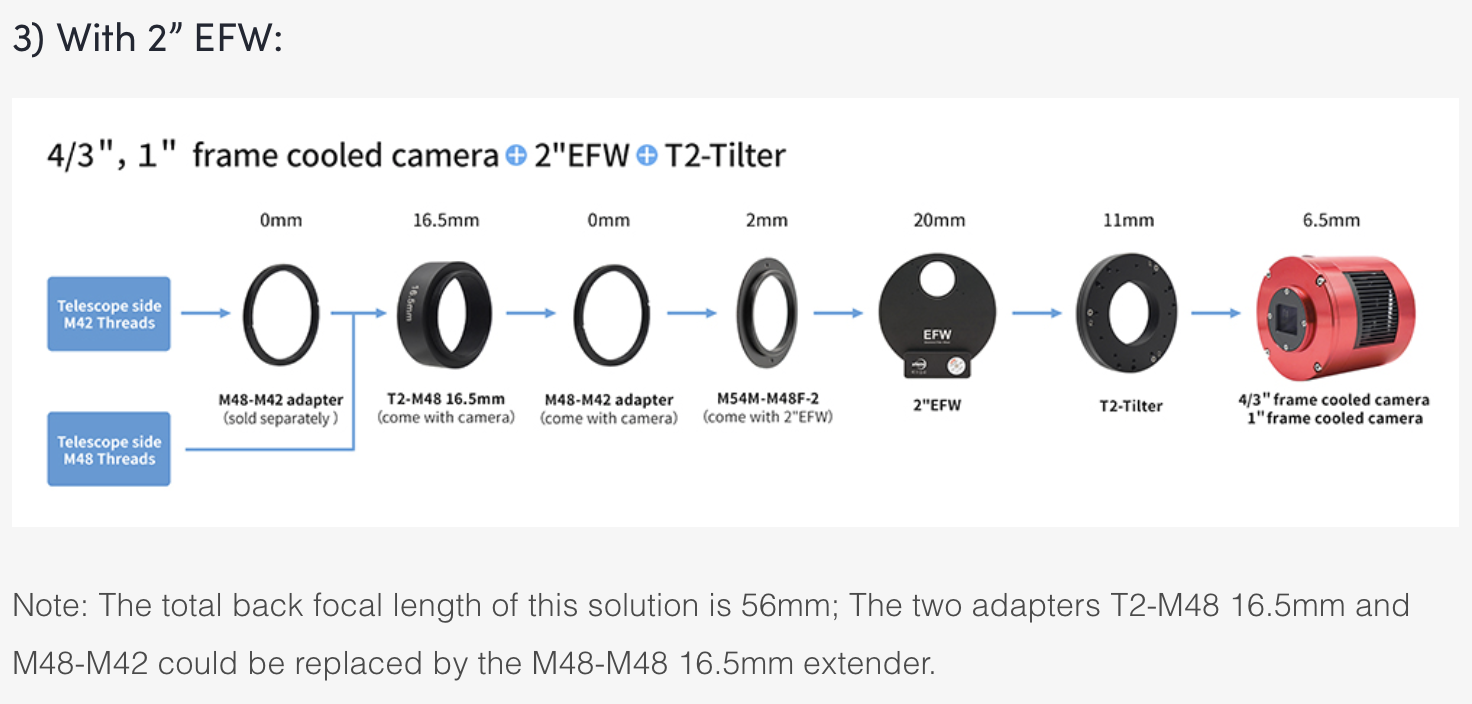
I had the camera directly threaded to the filter wheel I have the ASI294MC Pro and wanted to buy the ZWO OAG-L and was reading a bit up on the BF and spacers. Seems like the ASI294 + EFW + OAG-L is not a fitting combination... But related to this threat, I also noticed that ZWO suggests the 11mm T2 tilter when using a 4/3" & 1" cooled camera with the 2" EFW (even without the OAG). A far fetched guess, but could this perhaps cause the interference? https://www.zwoastro.com/2018/06/14/best-back-focus-length-solutions-55mm/ |
You cannot like this item. Reason: "ANONYMOUS".
You cannot remove your like from this item.
Editing a post is only allowed within 24 hours after creating it.
You cannot Like this post because the topic is closed.
Copy the URL below to share a direct link to this post.
This post cannot be edited using the classic forums editor.
To edit this post, please enable the "New forums experience" in your settings.
Claudio Boicu:
I had the camera directly threaded to the filter wheel
I have the ASI294MC Pro and wanted to buy the ZWO OAG-L and was reading a bit up on the BF and spacers. Seems like the ASI294 + EFW + OAG-L is not a fitting combination... But related to this threat, I also noticed that ZWO suggests the 11mm T2 tilter when using a 4/3" & 1" cooled camera with the 2" EFW (even without the OAG). A far fetched guess, but could this perhaps cause the interference?
https://www.zwoastro.com/2018/06/14/best-back-focus-length-solutions-55mm/
I mean, i have the stock “adapter/spacer” that comes alreday screwed on the camera that is also 11mm… so i dont think thats the problem, but it couldnt hurt to look into it
|
You cannot like this item. Reason: "ANONYMOUS".
You cannot remove your like from this item.
Editing a post is only allowed within 24 hours after creating it.
You cannot Like this post because the topic is closed.
Copy the URL below to share a direct link to this post.
This post cannot be edited using the classic forums editor.
To edit this post, please enable the "New forums experience" in your settings.
Tonight i set up mo camera with the filterwheel o nthr rokinon, that way i can screw it on directly into the FW, maybe that will clear up some things…
|
You cannot like this item. Reason: "ANONYMOUS".
You cannot remove your like from this item.
Editing a post is only allowed within 24 hours after creating it.
You cannot Like this post because the topic is closed.
Copy the URL below to share a direct link to this post.
This post cannot be edited using the classic forums editor.
To edit this post, please enable the "New forums experience" in your settings.
I have the ASI294MC Pro and wanted to buy the ZWO OAG-L and was reading a bit up on the BF and spacers. Seems like the ASI294 + EFW + OAG-L is not a fitting combination... But related to this threat, I also noticed that ZWO suggests the 11mm T2 tilter when using a 4/3" & 1" cooled camera with the 2" EFW (even without the OAG). A far fetched guess, but could this perhaps cause the interference? I use the ASI294MM with a 2 inch filter wheel and the OAG-L on my EdgeHD 8" scope. Its camera, 11mm spacer, 2mm adapter ring, OAG-L. This works for months now without issues. The tilt adapter doesn't need the 2mm adapter ring, because it is screwed directly onto the filter wheel. But all this works only with the 2" wheels. With the smaller 1,25" filter wheels, things might be different. I'm not sure, if there are the screw holes for the OAG-L in it. But the smaller OAG will work with them. My 5pos 1,25" filter wheel does not have any screw holes. Maybe my 8x 1,25" wheel does, but I can't check at the moment. But the small filters are our best guess, I think.
|
You cannot like this item. Reason: "ANONYMOUS".
You cannot remove your like from this item.
Editing a post is only allowed within 24 hours after creating it.
You cannot Like this post because the topic is closed.
Copy the URL below to share a direct link to this post.
This post cannot be edited using the classic forums editor.
To edit this post, please enable the "New forums experience" in your settings.
Claudio Boicu:
Tonight i set up mo camera with the filterwheel o nthr rokinon, that way i can screw it on directly into the FW, maybe that will clear up some things… if you have another lens, a slower one, try with that. I am very inclined to think your isssue is that a sharp light cone with the mounted filters is causing some interference. I’m willing to bet $1 that if you use a slower lens, like an f/4 or f/5.6, your issue will go away.
|
You cannot like this item. Reason: "ANONYMOUS".
You cannot remove your like from this item.
Editing a post is only allowed within 24 hours after creating it.
You cannot Like this post because the topic is closed.
Copy the URL below to share a direct link to this post.
This post cannot be edited using the classic forums editor.
To edit this post, please enable the "New forums experience" in your settings.
Arun H:
Claudio Boicu:
Tonight i set up mo camera with the filterwheel o nthr rokinon, that way i can screw it on directly into the FW, maybe that will clear up some things…
if you have another lens, a slower one, try with that. I am very inclined to think your isssue is that a sharp light cone with the mounted filters is causing some interference. I’m willing to bet $1 that if you use a slower lens, like an f/4 or f/5.6, your issue will go away. first im gonna try with the camera completely screwed on th filterwheel, and if that doesn't work il step down the lens because I aint got another scope :/
|
You cannot like this item. Reason: "ANONYMOUS".
You cannot remove your like from this item.
Editing a post is only allowed within 24 hours after creating it.
You cannot Like this post because the topic is closed.
Copy the URL below to share a direct link to this post.
This post cannot be edited using the classic forums editor.
To edit this post, please enable the "New forums experience" in your settings.
FINALLY. after posting the problem to the starfron Obervatories discord server, someone asked how my filterwheel is attached to the camera... because of backspacing I used the native spacer that comes with the camera and used a male to male thread to thread it to the filterwheel. now someone suggested that I should put the spacers and the other end of the filterwheel and just mount the camera directly to it. and voila, the edge is gone. flats for ha and oiii. I checked the sii filter aswell, just forgot to take a screenshot of it.   sometimes it really is the most simple thing that you oversee, that ends up to be the solution |
You cannot like this item. Reason: "ANONYMOUS".
You cannot remove your like from this item.
Editing a post is only allowed within 24 hours after creating it.
You cannot Like this post because the topic is closed.
Copy the URL below to share a direct link to this post.
This post cannot be edited using the classic forums editor.
To edit this post, please enable the "New forums experience" in your settings.
Glad you solved it. This was a tough one. So clear skies to you!!!
|
You cannot like this item. Reason: "ANONYMOUS".
You cannot remove your like from this item.
Editing a post is only allowed within 24 hours after creating it.
You cannot Like this post because the topic is closed.
Copy the URL below to share a direct link to this post.
This post cannot be edited using the classic forums editor.
To edit this post, please enable the "New forums experience" in your settings.
Claudio Boicu:
sometimes it really is the most simple thing that you oversee, that ends up to be the solution Thanks for sharing the solution. So many people pose problems to these forums but never end up posting what ultimately worked, which is helpful to others in the future that read it!
|
You cannot like this item. Reason: "ANONYMOUS".
You cannot remove your like from this item.
Editing a post is only allowed within 24 hours after creating it.
You cannot Like this post because the topic is closed.
Copy the URL below to share a direct link to this post.
This post cannot be edited using the classic forums editor.
To edit this post, please enable the "New forums experience" in your settings.
Do you accept some advice?
Buy an Astronomik 31mm UV-IR cut filter unmounted, the L2 for example or the L1.
With a screw philips driver, remove the front window of the ASI294MC/MM Pro and substitute the glass windows with that UV-IR filter. Do it the most clean way that you can.
You're problems with flats and calibration frames and everyting will be gone. This also works with the ASI1600MC/MM Pro regarding the microlensing.
I used in my ZWO cameras the Astronomik glass because they are top quality and I'm in Europe. But you can use other brands, as long as the filter quality is top noch.
Regards,
Cesar
|
You cannot like this item. Reason: "ANONYMOUS".
You cannot remove your like from this item.
Editing a post is only allowed within 24 hours after creating it.
You cannot Like this post because the topic is closed.
Copy the URL below to share a direct link to this post.
This post cannot be edited using the classic forums editor.
To edit this post, please enable the "New forums experience" in your settings.
Observatório Astrográfico do Boqueirão:
Do you accept some advice?
Buy an Astronomik 31mm UV-IR cut filter of 31mm, the L2 for example.
With a screw philips driver, remove the front window of the ASI294MC/MM Pro and substitute the glass windows with that UV-IR filter. Do it the most clean way that you can.
You're problems with flats and calibration frames and everyting will be gone. This also works with the ASI1600MC/MM Pro regarding the microlensing.
I used in mine Astronomik because they are top quality. But you can use other brands, as long as the filter quality is top noch.
Regards,
Cesar Mounted or unmounted? I opened the front of my 294mm once, but I don't remember how the glass window is attached.
|
You cannot like this item. Reason: "ANONYMOUS".
You cannot remove your like from this item.
Editing a post is only allowed within 24 hours after creating it.
You cannot Like this post because the topic is closed.
Copy the URL below to share a direct link to this post.
This post cannot be edited using the classic forums editor.
To edit this post, please enable the "New forums experience" in your settings.
Mounted or unmounted? I opened the front of my 294mm once, but I don't remember how the glass window is attached. Needs to be unmounted.. just the glass.. and the coatings go to face the side of the sensor. The glass window is mounted with an O-Ring in the face to the sensor, and the black plastic plate with the four screws is what holds and tight the AR window into the camera itself.
|
You cannot like this item. Reason: "ANONYMOUS".
You cannot remove your like from this item.
Editing a post is only allowed within 24 hours after creating it.
You cannot Like this post because the topic is closed.
Copy the URL below to share a direct link to this post.
This post cannot be edited using the classic forums editor.
To edit this post, please enable the "New forums experience" in your settings.