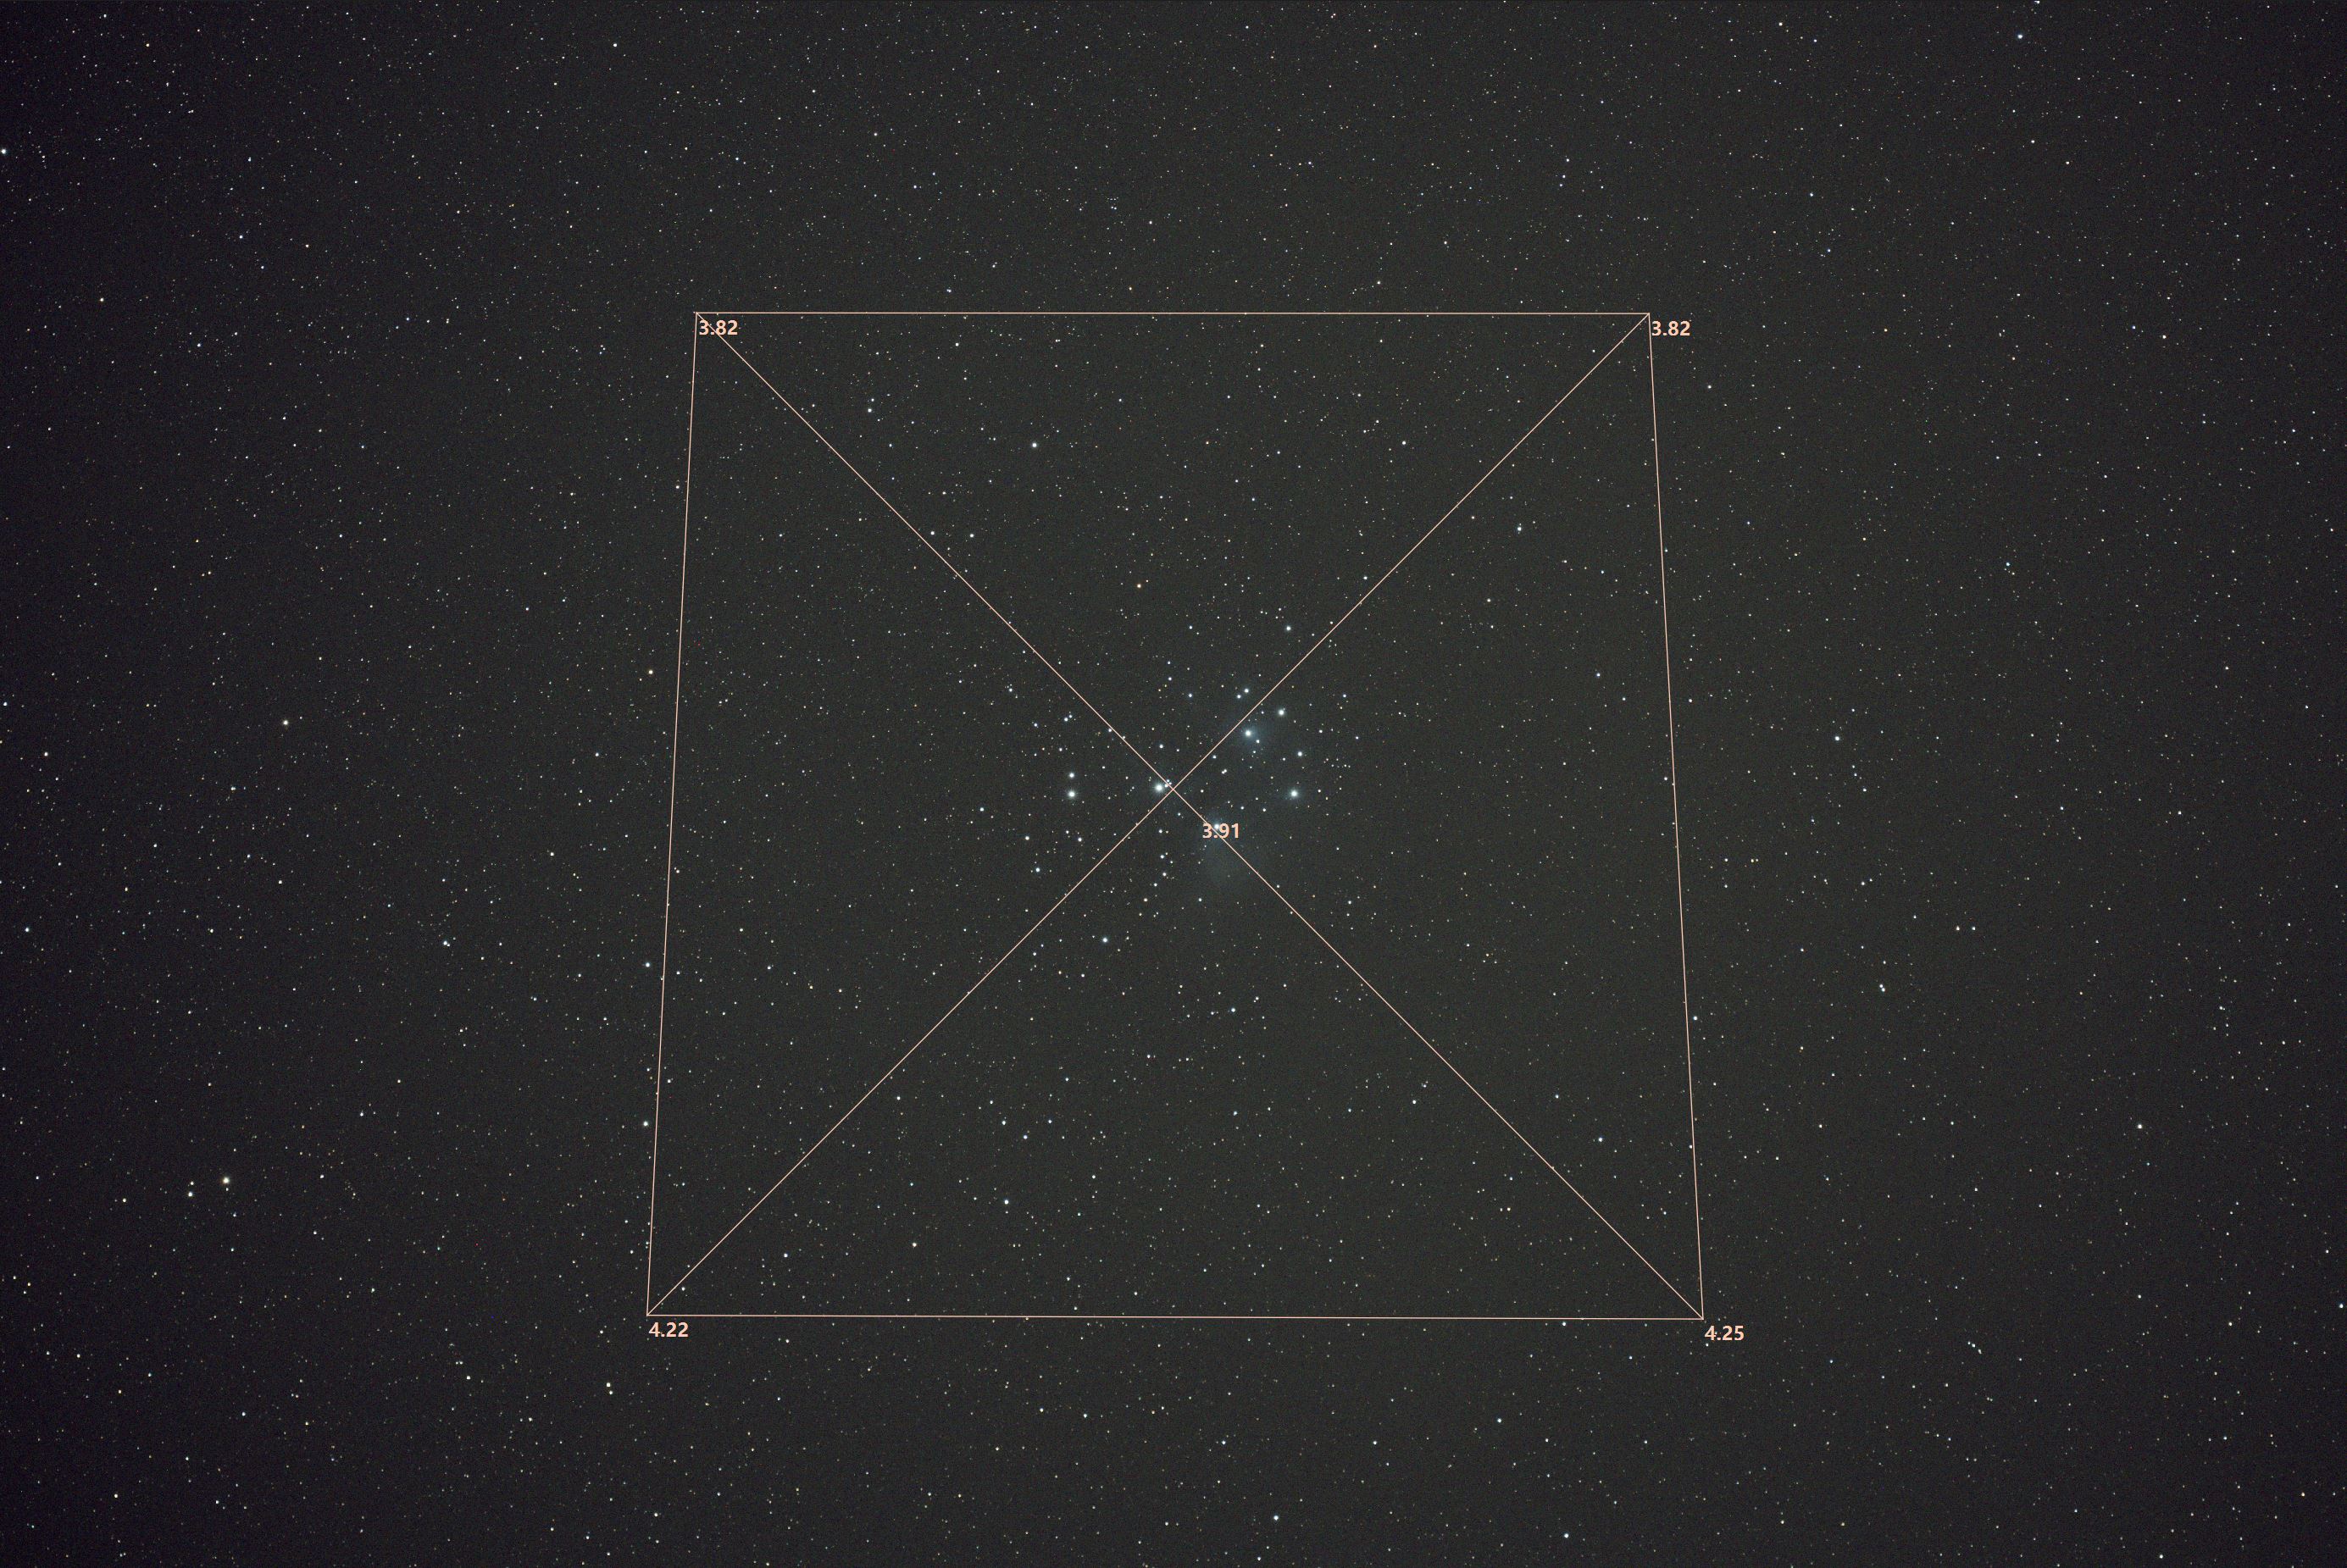
Dear Samy Users and Tilt Experts :-) To enter the world of wide-field astrophotography, and after reading so many positive reviews about this lens, I decided to pull the trigger—along with the Astrodymium kit, where I included the autofocuser and a guiding scope. However, the first lens I received showed a significant issue: two strange spikes extending from bright stars, even at F2.0. Because of this defect, I returned that copy. The second copy performed better in that regard with my Canon 6D. The star shapes looked nice across the full-frame sensor, though I knew the large 6.54µm pixels didn’t tell the whole story. After finally acquiring all the necessary adapters for my QHY268MC (3.76µm), including an additional UV/IR cut filter, I noticed a significant north-south degradation in star shape quality. Based on the following image alone (see also attachment of the whole sub) , is there any way to determine whether this is another bad copy suffering from pinched optics, a misaligned lens, or whatnot or is it simply a case of sensor tilt that I need to address? I think I also noticed that I couldn't achieve perfect focus on the bottom stars, even when using them as a reference. For this image, I stopped down the aperture by just one click to F2.2 or F2.4 (between F2.0 and F2.8 on the scale), but the poor star shapes remain at least until F4. Of course, I could use it at F5.6 or so, but then what’s the point of having such a fast lens!? I will try to investigate further to possibly rule out the tilt issue as soon as the weather clears, but in the meantime, do you have any insights? 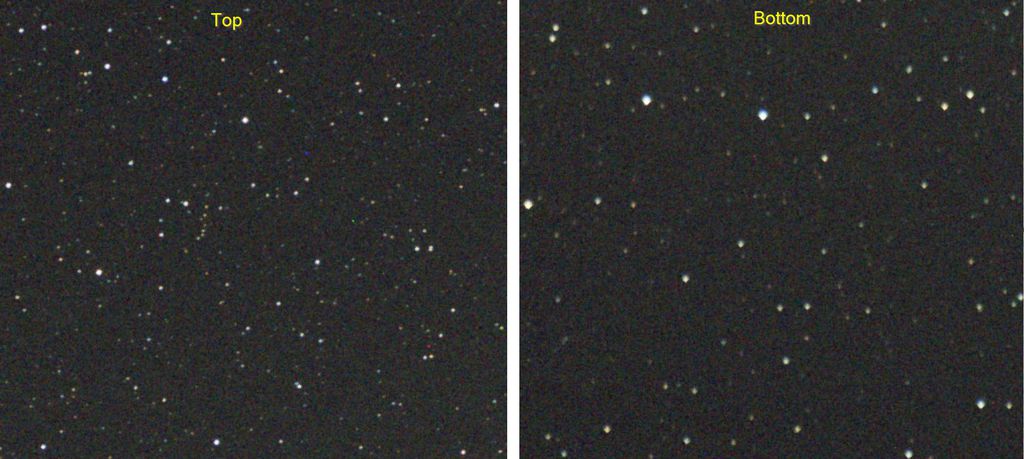 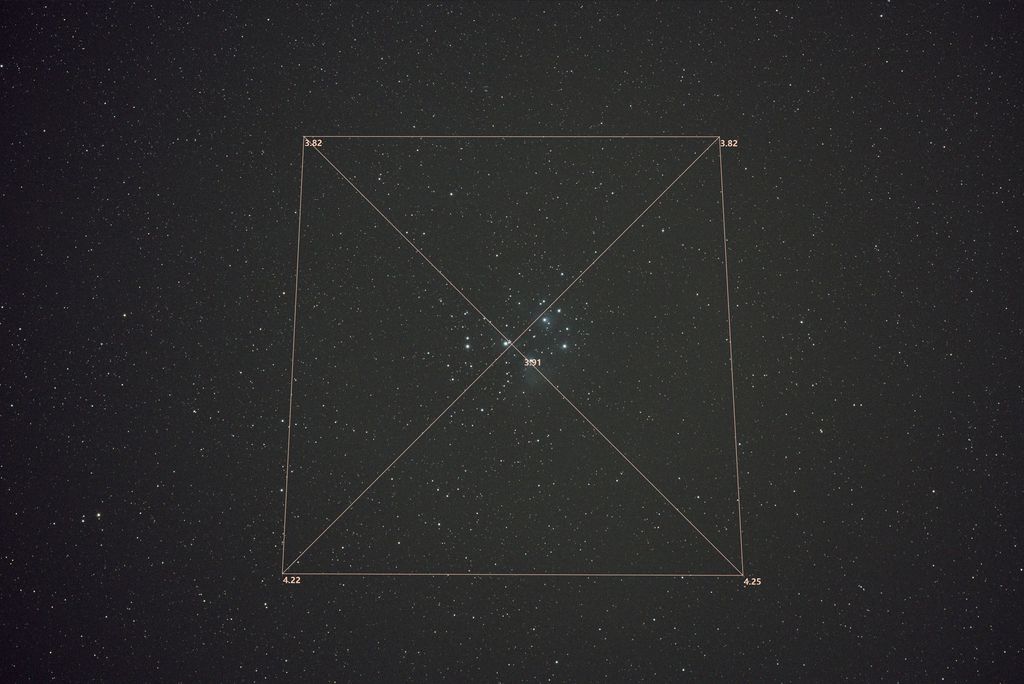 Samyang135_sub.jpg Samyang135_sub.jpg |
You cannot like this item. Reason: "ANONYMOUS".
You cannot remove your like from this item.
Editing a post is only allowed within 24 hours after creating it.
You cannot Like this post because the topic is closed.
Copy the URL below to share a direct link to this post.
This post cannot be edited using the classic forums editor.
To edit this post, please enable the "New forums experience" in your settings.
I had two of this lens, one worse than the other and I returned them both. I didn't keep the images with the coma aberrations, but they were horrific compared to what you have. Nothing you can't easily fix with BlurExterminator, or similar, from what I can see.
|
You cannot like this item. Reason: "ANONYMOUS".
You cannot remove your like from this item.
Editing a post is only allowed within 24 hours after creating it.
You cannot Like this post because the topic is closed.
Copy the URL below to share a direct link to this post.
This post cannot be edited using the classic forums editor.
To edit this post, please enable the "New forums experience" in your settings.
Mine has similar chromatic aberration artifacts at f/2.8. I like the performance overall at that speed so I've found it helps to do a re-registration of the RGB color channels and then star remove before stretching and be very careful with the star stretch. And like Giulio said you can also use starx or other star deconvolution to further tighten them up if you're still not satisfied.
|
You cannot like this item. Reason: "ANONYMOUS".
You cannot remove your like from this item.
Editing a post is only allowed within 24 hours after creating it.
You cannot Like this post because the topic is closed.
Copy the URL below to share a direct link to this post.
This post cannot be edited using the classic forums editor.
To edit this post, please enable the "New forums experience" in your settings.
There is probably some tilt. But all in all, this is about par for the course for this lens. You have to keep in mind the aperture, price point and that it's a photographic lens and not a telescope.
|
You cannot like this item. Reason: "ANONYMOUS".
You cannot remove your like from this item.
Editing a post is only allowed within 24 hours after creating it.
You cannot Like this post because the topic is closed.
Copy the URL below to share a direct link to this post.
This post cannot be edited using the classic forums editor.
To edit this post, please enable the "New forums experience" in your settings.
Fully agree with Giulio and Trevis: it seems to me you have an excellent exemplar in your hands. With such fast focals it is difficult to achieve a better uniformity than yours. BlurX will correct the small aberration!
|
You cannot like this item. Reason: "ANONYMOUS".
You cannot remove your like from this item.
Editing a post is only allowed within 24 hours after creating it.
You cannot Like this post because the topic is closed.
Copy the URL below to share a direct link to this post.
This post cannot be edited using the classic forums editor.
To edit this post, please enable the "New forums experience" in your settings.
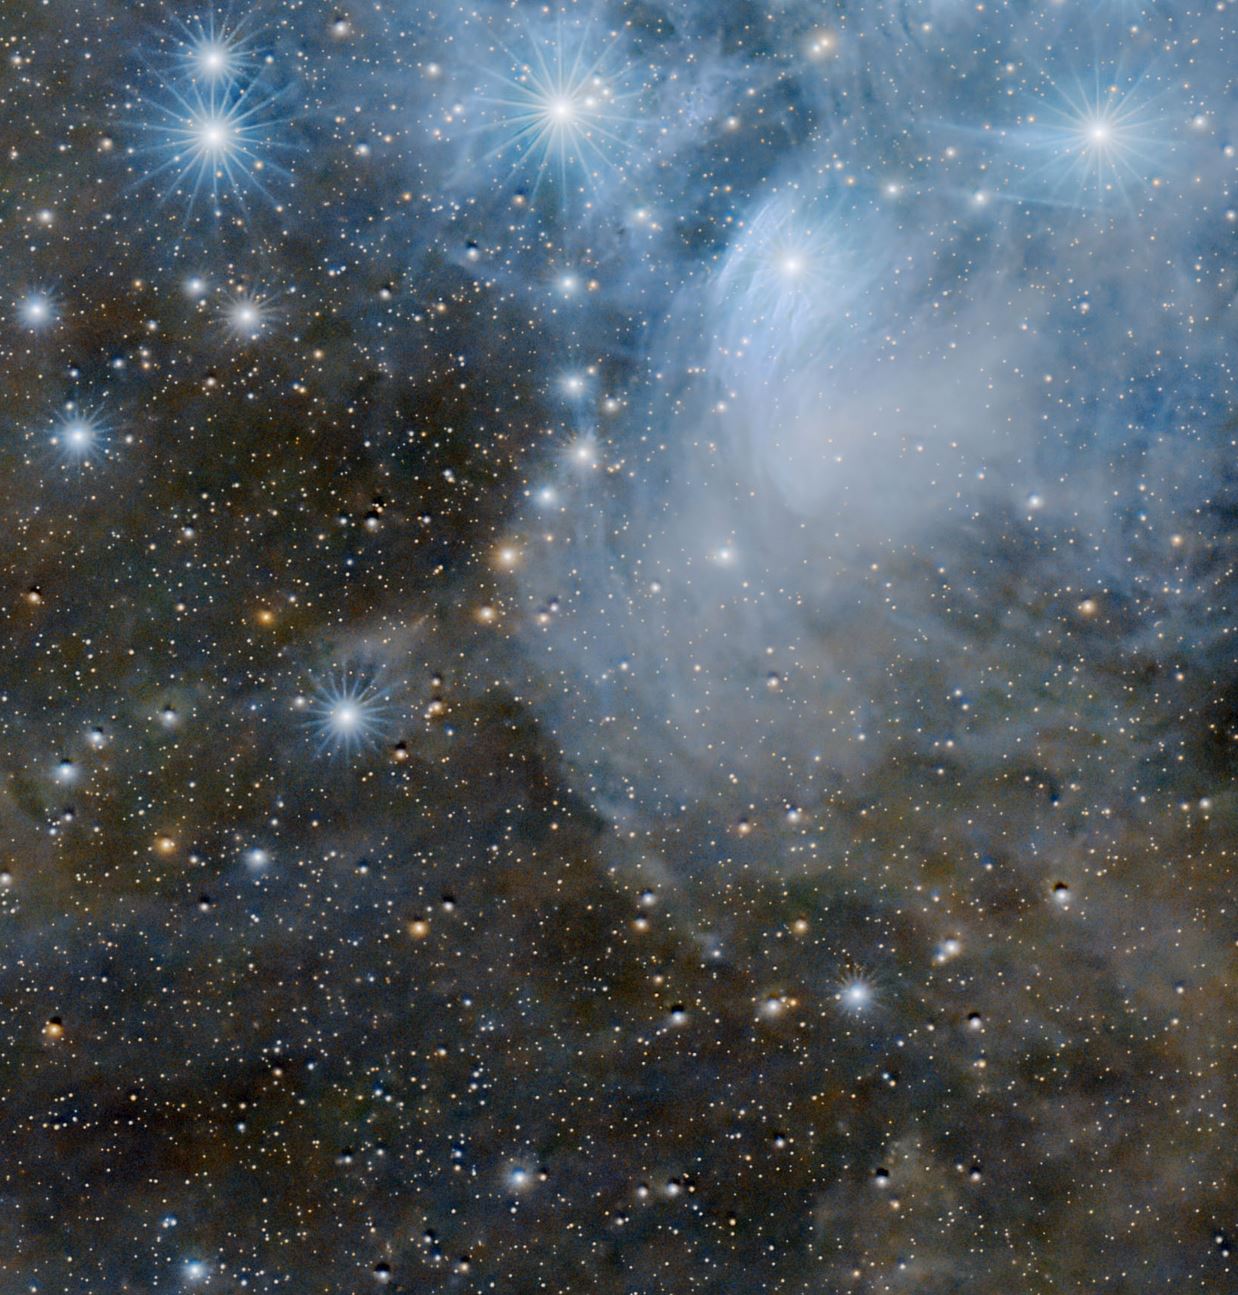
Thank you all for your insights and the pep talk :-) The chromatic aberration didn't really bother me. It's more about the star shapes, which, even after applying BXT, were not satisfying, as they left holes in the image. I know that the following image (crop) is not refined at all, since it might be stretched too much—it was just meant for testing purposes showcasing the result after BXT:  But of course, you most of the time get what you pay for - less than 400 bucks at F2 might be complaining on a high level, though. So, I will try to mitigate things by experimenting with the tilt. Unfortunately, and even more so after what I’ve read here, there’s a risk that the next copy could be far worse than this one, and then when does it stop?…
|
You cannot like this item. Reason: "ANONYMOUS".
You cannot remove your like from this item.
Editing a post is only allowed within 24 hours after creating it.
You cannot Like this post because the topic is closed.
Copy the URL below to share a direct link to this post.
This post cannot be edited using the classic forums editor.
To edit this post, please enable the "New forums experience" in your settings.
Do you use the m48 samyang adapter. Eg from FLO. Folks seem the swear by them to improve tilt.
The other thing to check is the backspacing. There are good treads on this elsewhere on the web but the trick seems to be to make sure that the image plate solve showing a FL of 130mm which is the actual FL of the lens. (Not 135mm)
|
You cannot like this item. Reason: "ANONYMOUS".
You cannot remove your like from this item.
Editing a post is only allowed within 24 hours after creating it.
You cannot Like this post because the topic is closed.
Copy the URL below to share a direct link to this post.
This post cannot be edited using the classic forums editor.
To edit this post, please enable the "New forums experience" in your settings.
Do you use the m48 samyang adapter. Eg from FLO. Folks seem the swear by them to improve tilt.
The other thing to check is the backspacing. There are good treads on this elsewhere on the web but the trick seems to be to make sure that the image plate solve showing a FL of 130mm which is the actual FL of the lens. Does that adapter come with tilt-adjustmet screws? I opted for this solution to also keep the possibility of easily using it on my Canon 6D and kept the EOS adapter ring on the lens. While it may not be the best in terms of flexure, it gives me a very sturdy impression though: 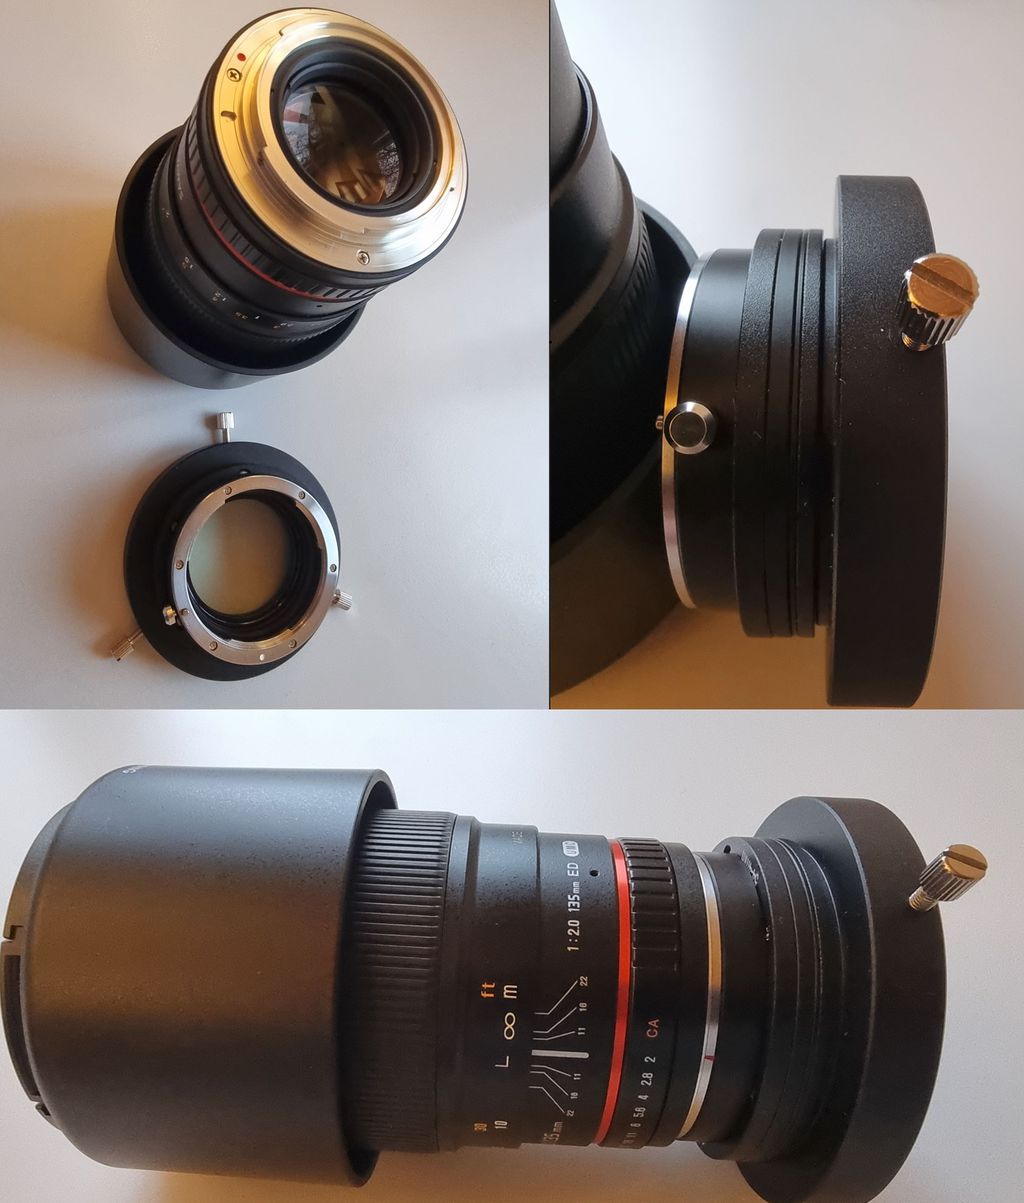 |
You cannot like this item. Reason: "ANONYMOUS".
You cannot remove your like from this item.
Editing a post is only allowed within 24 hours after creating it.
You cannot Like this post because the topic is closed.
Copy the URL below to share a direct link to this post.
This post cannot be edited using the classic forums editor.
To edit this post, please enable the "New forums experience" in your settings.
https://www.firstlightoptics.com/adapters/astro-essentials-samyang-lens-to-m48-adapter.htmlthis is the m48 that replaces the bayonet. You can’t then use on a camera. Unless you put the bayonet back. lots of reviews on SGL and CN this thread helped me lots well worth a read through. https://www.cloudynights.com/topic/937544-tips-and-tricks-on-the-samyangrokinon-135mm-f2/ |
You cannot like this item. Reason: "ANONYMOUS".
You cannot remove your like from this item.
Editing a post is only allowed within 24 hours after creating it.
You cannot Like this post because the topic is closed.
Copy the URL below to share a direct link to this post.
This post cannot be edited using the classic forums editor.
To edit this post, please enable the "New forums experience" in your settings.
Michael E.:
Do you use the m48 samyang adapter. Eg from FLO. Folks seem the swear by them to improve tilt.
The other thing to check is the backspacing. There are good treads on this elsewhere on the web but the trick seems to be to make sure that the image plate solve showing a FL of 130mm which is the actual FL of the lens.
Does that adapter come with tilt-adjustmet screws?
I opted for this solution to also keep the possibility of easily using it on my Canon 6D and kept the EOS adapter ring on the lens. While it may not be the best in terms of flexure, it gives me a very sturdy impression though:
Hello Michael. Problem is not the camera's or sensor's tilt. Is that adapter of yours at speeds bellow f/3. The backfocus need to be super precise, even the switch between filter is enough to change the backfocus and systems to attach the camera such as those, isn't sufficient to keep the optical system free of tilting issues. I'm surprised that you have that tilting ASTAP display too close like above with that system. The solution that I've found so far was screwing from the back of the lens (using the FLO M48 adapter) up to the camera threads with all of the acessories inclusing a tilt plate to fine tunning things. Systems fast as that, if you use the ZWO adapter to T2/M42, the simple fact of using the lens EF mount, that little clip with spring load to stop the lens when attached, is enough to put tilt in the system when he's attached to the adapter, by pressure. Adjusting backfocus and tilt in systems so fast like that, are one of the biggest challenges for guys like me that have hyperstars, RASA's, and other fast systems. We spend a lot of time under the stars just adjusting the optical trains to near perfection. We spend more time adjusting the optical systems, than shooting actually. Regards, Cesar
|
You cannot like this item. Reason: "ANONYMOUS".
You cannot remove your like from this item.
Editing a post is only allowed within 24 hours after creating it.
You cannot Like this post because the topic is closed.
Copy the URL below to share a direct link to this post.
This post cannot be edited using the classic forums editor.
To edit this post, please enable the "New forums experience" in your settings.
Thank you, Cesar.
If I understand you correctly, such a system is even more sensitive to tilting when the backfocus is not perfectly set. The use of the filter definitely altered my backfocus.I might indeed try this FLO M48 adapter, as it also gives me more room for components like a proper tilt plate.However, there is one outcome from a tilt experiment I conducted that bothers me a bit. I intentionally tilted the camera too much (by approximately 0.5mm) in both directions by loosening the dovetail screws and tilting the entire camera. After refocusing for each tilt, I still observed the same issue—the star shapes remained distorted on the same side, although they worsened overall.
But I will definitely redo this experiment to be sure before investing in a new setup with a proper tilt plate.
|
You cannot like this item. Reason: "ANONYMOUS".
You cannot remove your like from this item.
Editing a post is only allowed within 24 hours after creating it.
You cannot Like this post because the topic is closed.
Copy the URL below to share a direct link to this post.
This post cannot be edited using the classic forums editor.
To edit this post, please enable the "New forums experience" in your settings.
Not necessarely Michael. The system is even more sensitive when you go low on the f/ number, to the point where sometimes you don't know if you're having tilt or backfocus problem, or even both. The f/ number is the key player. The tilt even could be from the camera sensor, which is a possibility since they are usually mass produced. I suggest a couple of things. Change the bayonet to the FLO M48 plate insted of using the Canon EF bayonet. Insted of using an attatchable syste, like yours, use screwed rings, a filter drawer, a plate tilt (but from a good manufacture, not one like the ZWO) and using some 0.25mm, 0.5mm and even 1mm spacer rings, and take your time adjusting everything. With the FLO M48 plate you'll need minimum 44mm of back spacing. But that number is very relative, it could be 44.25mm, or 44.5mm, etc. and you need to count also with the filter thickness, which will pull the back spacing even further. Usually the index refraction ir about 1/3 of the filter thickness. For example: a filter of 3mm thickness, will pull further the backspacing about 1mm. A 2mm filter, will be 0.60mm of pulling the backspacing further, etc.. Suggestions for a tilt plate: Gerd Neumman like these: https://www.astroshop.eu/tilting-adaptors/gerd-neumann-jr-camera-tilting-unit-ctu-xt-m48/p,51573Or the Baader one: https://www.astroshop.eu/filter-wheels-filter-sliders/baader-ufc-tilter/p,75225Why one of those? They are super precise with the adjustment's scews, and the are adjustable from the side, not in the front or the back. This will help you a lot. The Gerd Neumman is my choice since they are 11.3mm of thickness in the optical path. Suggesting for the spacer rings: https://www.astroshop.eu/extension-tubes/astoptics-extension-tube-m48-fine-tuning-kit-0-5mm-0-8mm-1mm/p,57847 - I bought for me 4 of 0.5mm and 4 of 1mm of those rings. Some ZWO cameras usually sends with them 0.25mm T2/M42 back plastic of those rings as well 0.5mm. This helps fine tunning things also. That's the FLO M48 Plate: https://www.firstlightoptics.com/adapters/astro-essentials-samyang-lens-to-m48-adapter.htmlThose are the spacer rings that I mentioned above: https://www.astroshop.eu/extension-tubes/explore-scientific-extension-tube-m48-set/p,69009 - But you can find in Amazon more cheaper ones like this: https://www.amazon.es/dp/B0C3ZJWG3B/?coliid=I2841AW6ZNQ03M&colid=FFGC41KBZX3C&psc=1&ref_=list_c_wl_lv_ov_lig_dp_itFor your QHY camera the sensor backfocus is 17.5mm, so from those 44mm minimum, you have 26.5mm, imagine that you use the Gerd Neumman tilt plate (11.3mm) gives you 15.2mm for filling with those spacer rings above or a filter drawer that have the maximum of 15mm thickness. I don't know any that shorten. I use the Altair Astro filter drawers, which are 17mm, but in my case I use ZWO cameras, which I can manage more easy the backspacing regarding the QHY or even playerOne, Touptek, etc. Hope this information helps you achive your results. Keep us posted. Regards, Cesar
|
You cannot like this item. Reason: "ANONYMOUS".
You cannot remove your like from this item.
Editing a post is only allowed within 24 hours after creating it.
You cannot Like this post because the topic is closed.
Copy the URL below to share a direct link to this post.
This post cannot be edited using the classic forums editor.
To edit this post, please enable the "New forums experience" in your settings.
! https://www.firstlightoptics.com/adapters/astro-essentials-samyang-lens-to-m48-adapter.html
this is the m48 that replaces the bayonet. You can’t then use on a camera. Unless you put the bayonet back.
lots of reviews on SGL and CN
this thread helped me lots well worth a read through.
https://www.cloudynights.com/topic/937544-tips-and-tricks-on-the-samyangrokinon-135mm-f2/ Thanks @PedroPierre for the two links. I was not aware of the FLO M48 adapter plate, that is definitively a game changer! Also thank you Cesar @Observatório Astrográfico do Boqueirão for your comprehensive coverage of the topic. The two laterally actionable filters you linked are a gold suggestion. For the owners of Touptek imx571 generation 2 cameras, it is now available a tilter (actionable from the back) which does not steal any optical length because it is mounted in place of the detachable front plate of the camera.
|
You cannot like this item. Reason: "ANONYMOUS".
You cannot remove your like from this item.
Editing a post is only allowed within 24 hours after creating it.
You cannot Like this post because the topic is closed.
Copy the URL below to share a direct link to this post.
This post cannot be edited using the classic forums editor.
To edit this post, please enable the "New forums experience" in your settings.
Do you use the m48 samyang adapter. Eg from FLO. Folks seem the swear by them to improve tilt.
The other thing to check is the backspacing. There are good treads on this elsewhere on the web but the trick seems to be to make sure that the image plate solve showing a FL of 130mm which is the actual FL of the lens. (Not 135mm) I was doing exactlt this but could not fathom why I was a full 5mm off. As my stars weren't too bad I just left it. Delighted to know that the "real FL" should be 130mm. I assume I'm right in thinking that any gap needs to be reversed? e.g. if the platesolved focal length under-reads (say, 129.5mm), then I need to reduce spacing?
|
You cannot like this item. Reason: "ANONYMOUS".
You cannot remove your like from this item.
Editing a post is only allowed within 24 hours after creating it.
You cannot Like this post because the topic is closed.
Copy the URL below to share a direct link to this post.
This post cannot be edited using the classic forums editor.
To edit this post, please enable the "New forums experience" in your settings.
I started to plate solve at 128mm so I added more spacers until I got to 130mm
|
You cannot like this item. Reason: "ANONYMOUS".
You cannot remove your like from this item.
Editing a post is only allowed within 24 hours after creating it.
You cannot Like this post because the topic is closed.
Copy the URL below to share a direct link to this post.
This post cannot be edited using the classic forums editor.
To edit this post, please enable the "New forums experience" in your settings.
Hello John,
I didn’t care very much regarding the FL in the platesolve, since I’ve worked for the shape and quality of the stars, instead of the 135mm of the image.
I’m not sure why it shows like that (the 130mm) instead of the 135mm, but I imagine it’s related with the crop factor, since it’s a full frame lens. But like I said, I’m not sure about this explanation.
Best regard,
Cesar
|
You cannot like this item. Reason: "ANONYMOUS".
You cannot remove your like from this item.
Editing a post is only allowed within 24 hours after creating it.
You cannot Like this post because the topic is closed.
Copy the URL below to share a direct link to this post.
This post cannot be edited using the classic forums editor.
To edit this post, please enable the "New forums experience" in your settings.
In the meantime, I conducted additional tests to further analyze the issues. As you correctly pointed out, the focal length is indeed not the advertised 135mm. After plate solving, I measured a focal length of 129.6mm with my current backfocus setup. Regarding the issue of somewhat distorted star shapes on one side of the frame, I have concluded that this is most likely not caused by tilt or backfocus issues. To reach this conclusion, I performed a series of tests with the lens fixed in terms of rotation and orientation relative to the target. Tests Performed- Rotation of the Camera: Rotated the camera by 90° and 180° while keeping the lens fixed.
- Tilting the Camera: Tilted the camera slightly in both directions (approximately 0.2mm on one side of the dovetail), which caused an unevenly focused image from top to bottom. I then attempted to separately focus on the top and bottom sections.
- Adjusting Backfocus: Varied the backfocus in multiple steps by -1mm, +0.1mm, +0.2mm and +0.3mm and adjusted focus in an attempt to improve the star shapes on the problematic side.
- Changing Aperture: Stopped down the lens to f/2.8.
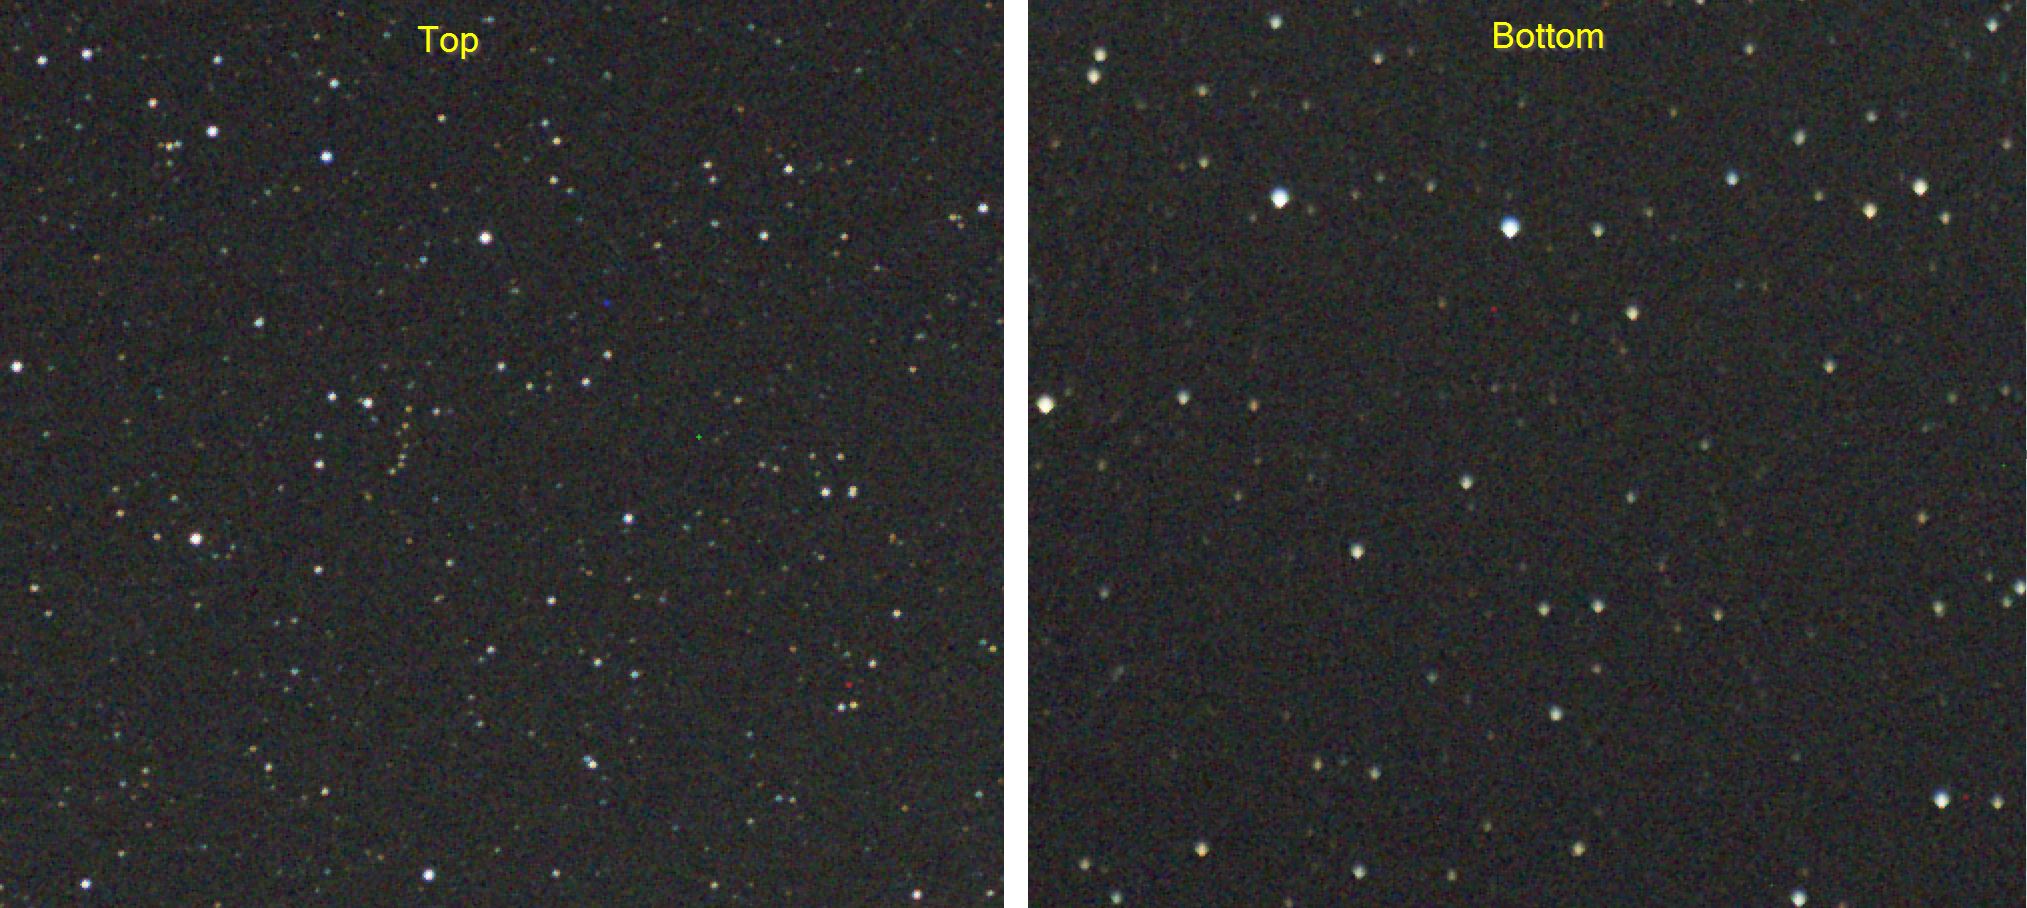
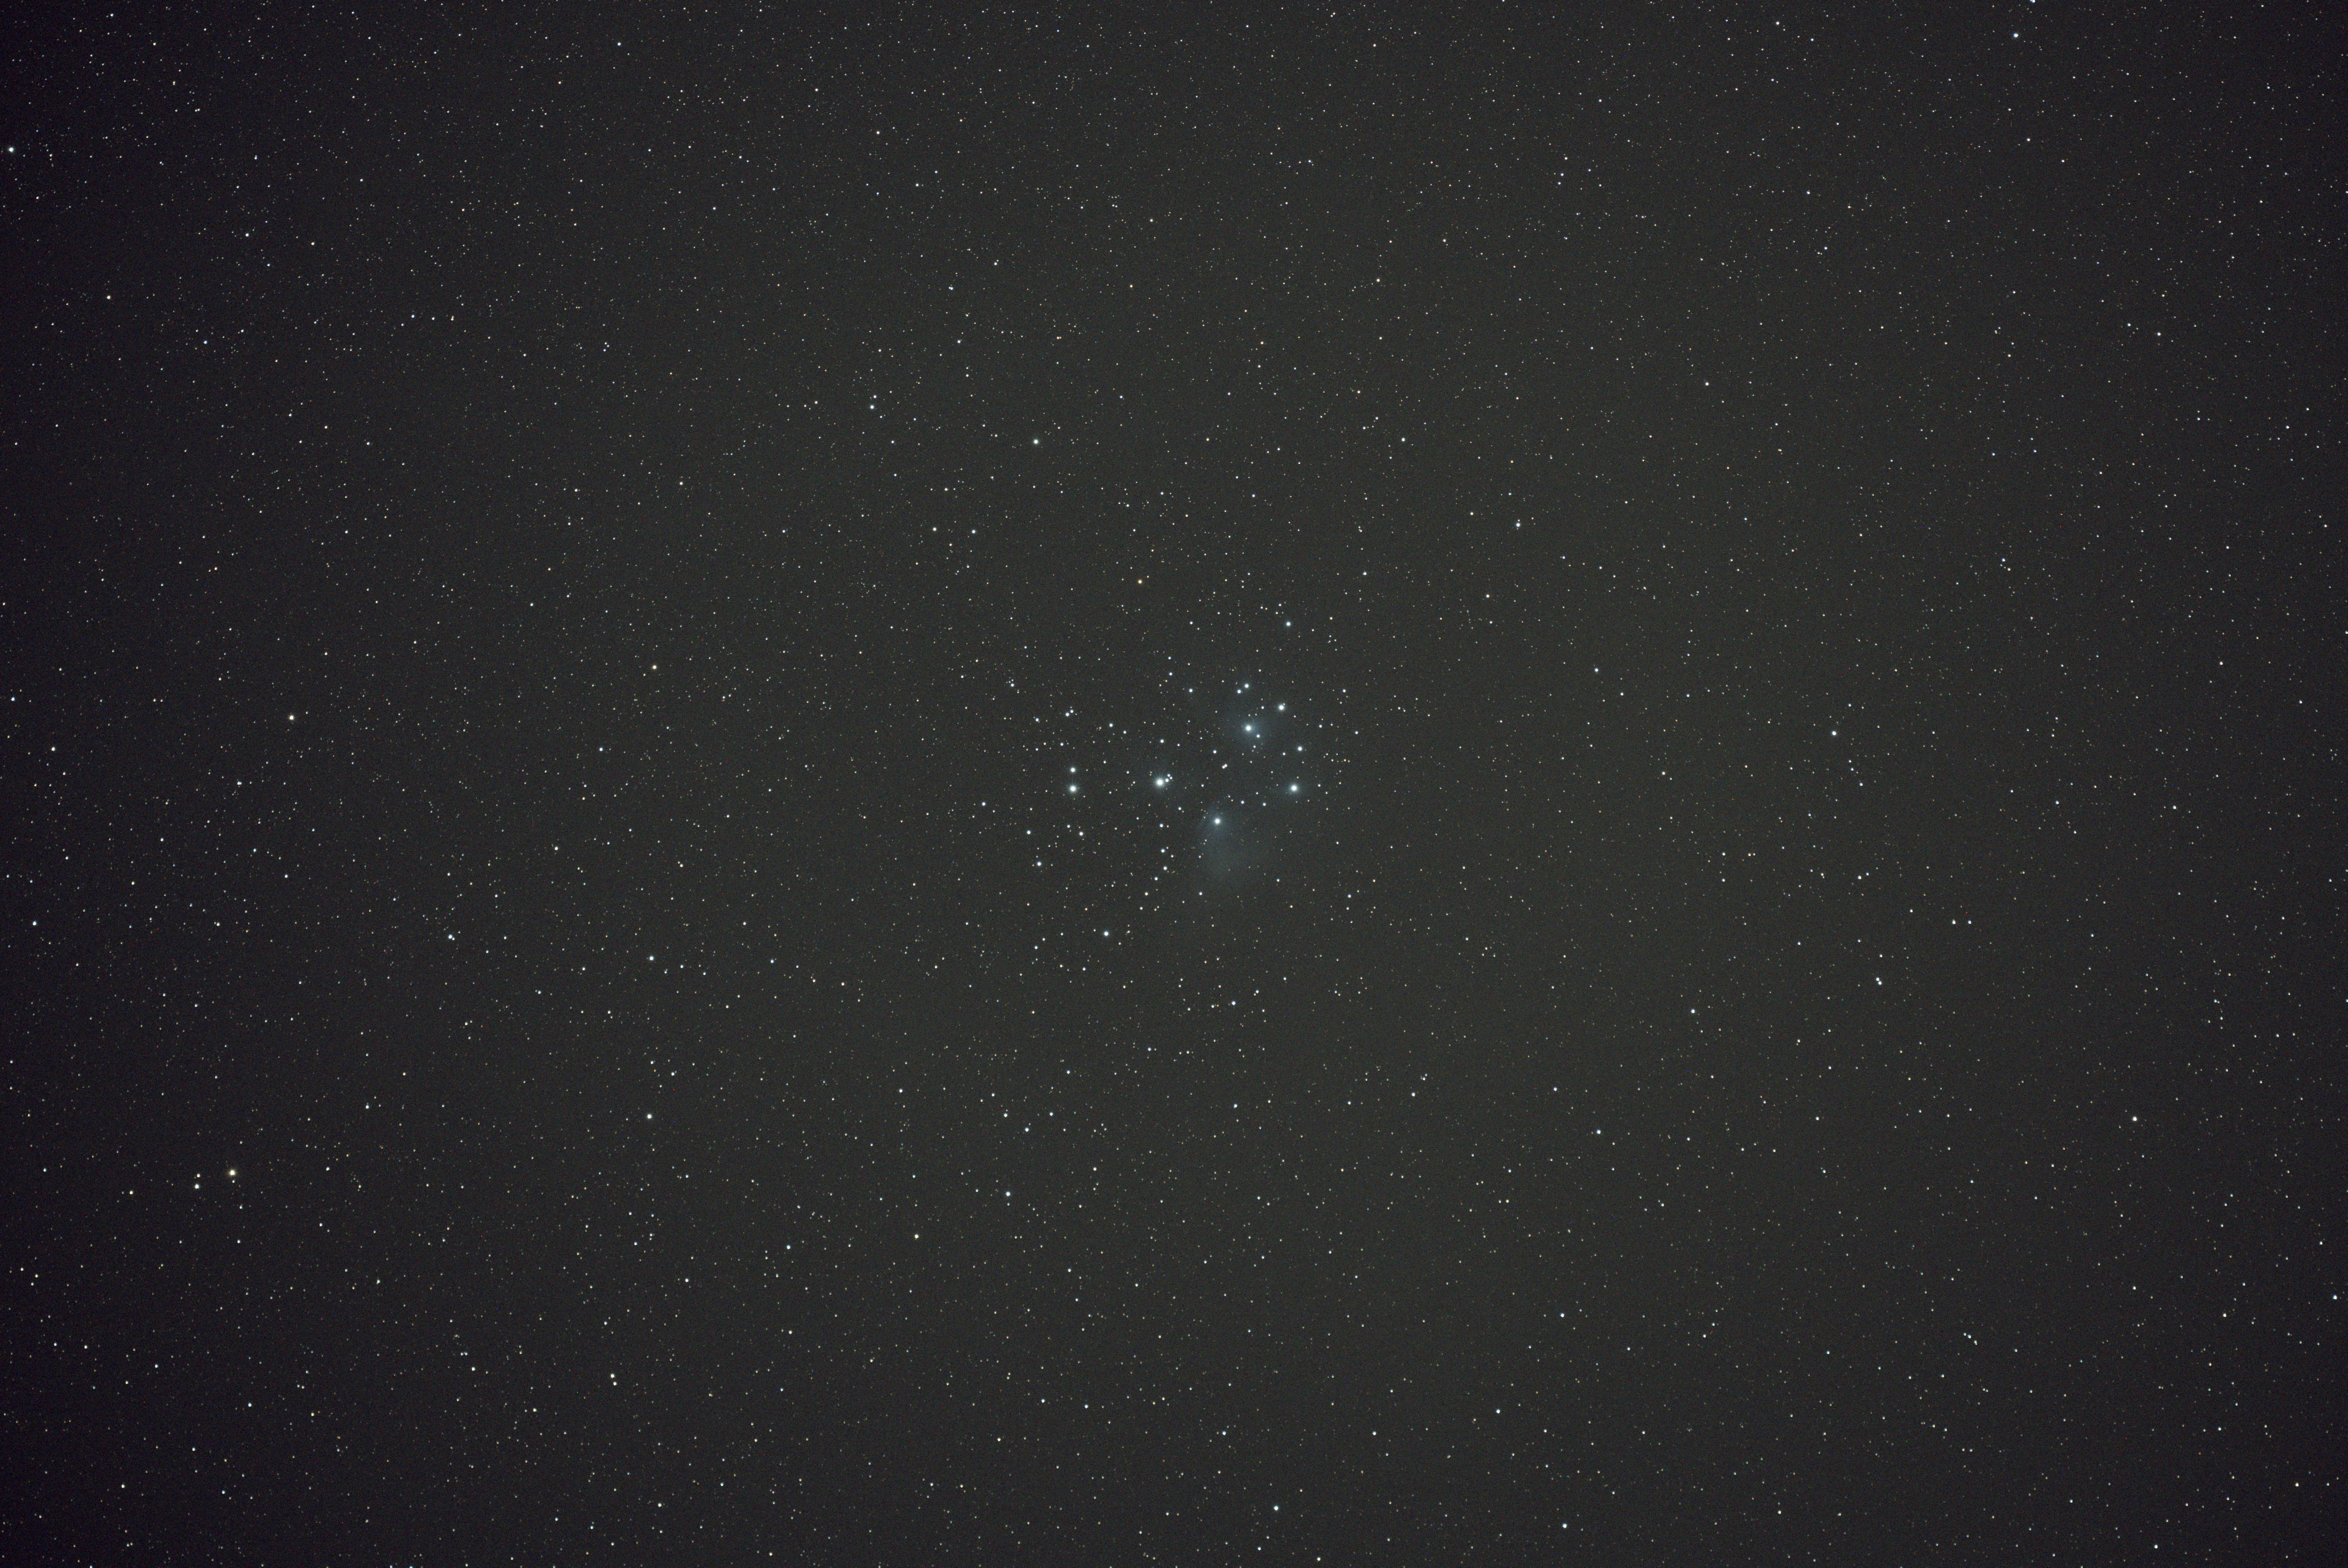
Observationsa) In all cases, the stars with triangular-shaped aberrations remained in the same region of the sky, regardless of the camera or sensor rotation. b) It was not possible to focus the distorted stars in a way that significantly improved their shapes. c) A slight improvement in uniformity was observed with a backfocus adjustment of +0.2mm, but the triangular shapes still persisted. d) At f/2.8, the star shapes became much more acceptable, as expected. This might make it a viable solution if I decide to keep the lens. ConclusionBased on these observations, I am convinced that the issue is not related to tilt or backfocus adjustments and cannot be resolved by addressing these parameters. Instead, the problem is likely caused by a slightly misaligned lens element or some other optical imperfection. I understand that referring to this as a "misalignment" might be an exaggeration, especially when considering the lens's fast aperture of f/2 and the relatively small pixel size of the sensor. Here is single exposure stepped down to F2.8 of my test-target, which is not too shabby :-) SteppedDownToF2.8.jpgRegards, michael
|
You cannot like this item. Reason: "ANONYMOUS".
You cannot remove your like from this item.
Editing a post is only allowed within 24 hours after creating it.
You cannot Like this post because the topic is closed.
Copy the URL below to share a direct link to this post.
This post cannot be edited using the classic forums editor.
To edit this post, please enable the "New forums experience" in your settings.
I'd be happy with that. I really think this corner pixel peeping goes a bit far sometimes. I would be more concerned with how the image presents as a whole and in your case, it presents very well.
|
You cannot like this item. Reason: "ANONYMOUS".
You cannot remove your like from this item.
Editing a post is only allowed within 24 hours after creating it.
You cannot Like this post because the topic is closed.
Copy the URL below to share a direct link to this post.
This post cannot be edited using the classic forums editor.
To edit this post, please enable the "New forums experience" in your settings.
But at 2.8 the aperature is 48mm. Compared to being wide open, you are going to need to double your exposure time for a similar image. It might be worth considering taking a few frames to do a star overlay at 2.8 but the bulk of your imaging session at 2.0 would be the best bang for your buck.
|
You cannot like this item. Reason: "ANONYMOUS".
You cannot remove your like from this item.
Editing a post is only allowed within 24 hours after creating it.
You cannot Like this post because the topic is closed.
Copy the URL below to share a direct link to this post.
This post cannot be edited using the classic forums editor.
To edit this post, please enable the "New forums experience" in your settings.
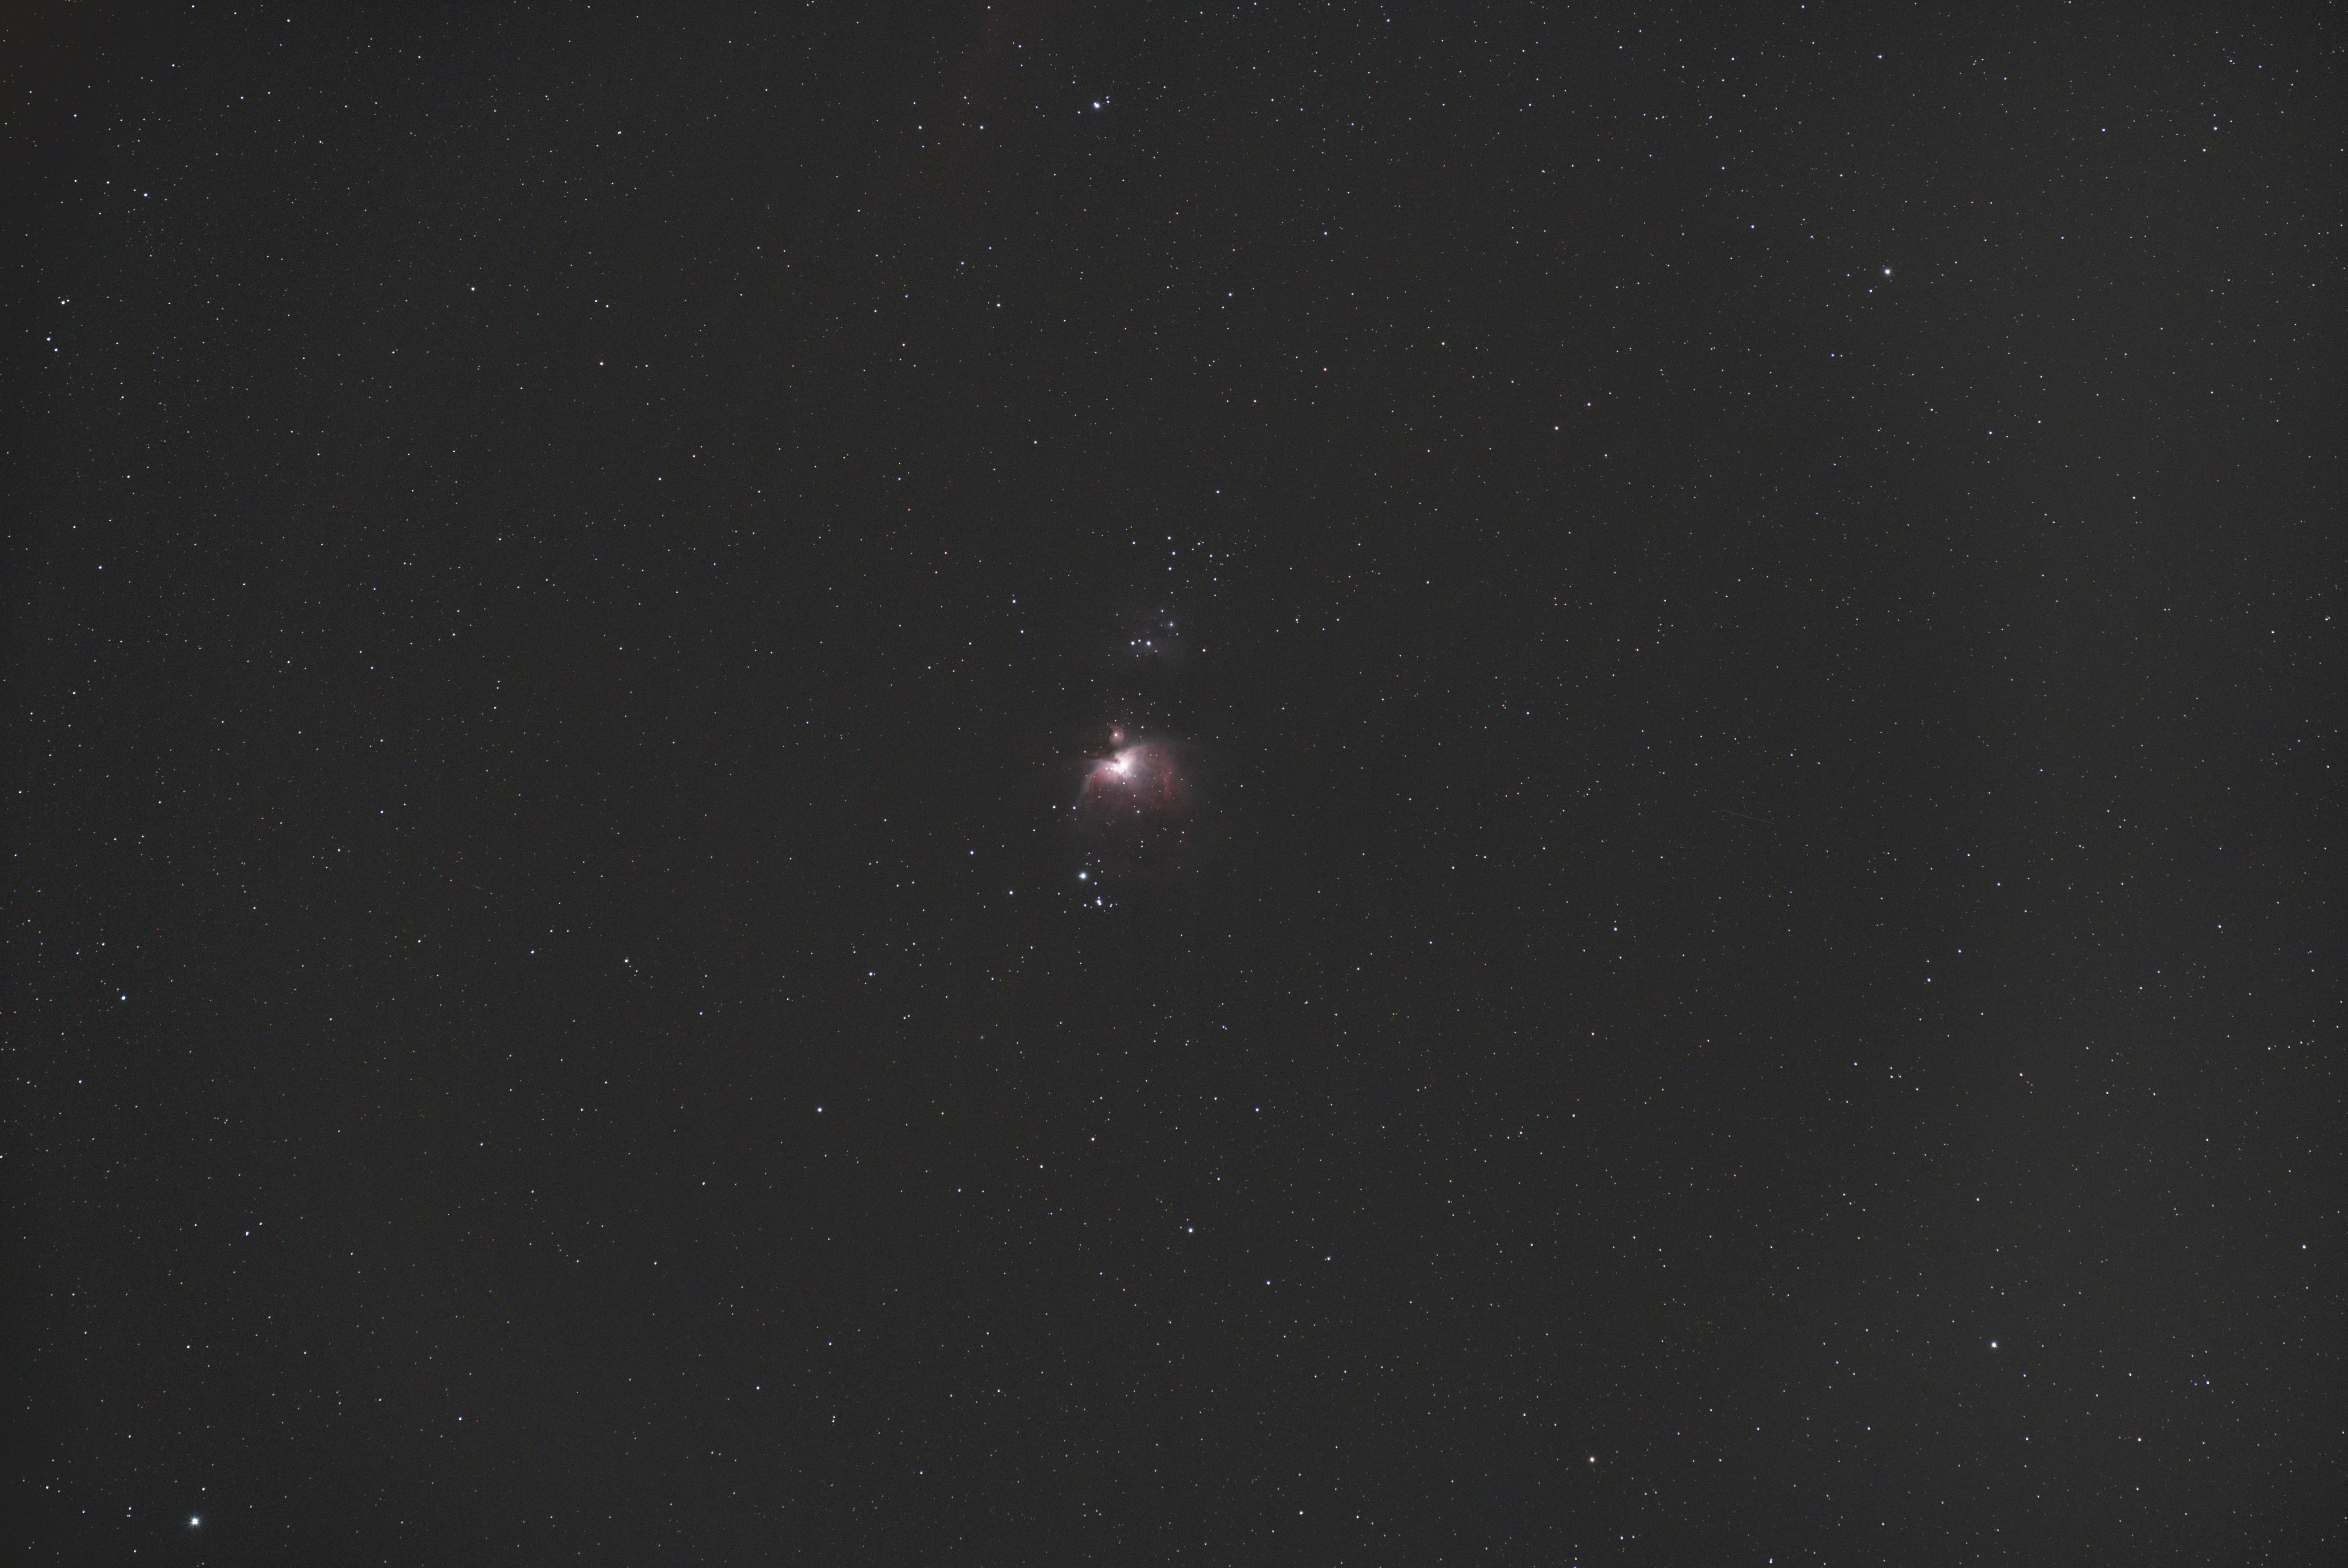
But at 2.8 the aperature is 48mm. Compared to being wide open, you are going to need to double your exposure time for a similar image. It might be worth considering taking a few frames to do a star overlay at 2.8 but the bulk of your imaging session at 2.0 would be the best bang for your buck. Thanks for your advice. You’re correct that at F/2.8, it would require doubling the total integration time to be comparable to F/2.0. If I understand you correctly, you're suggesting using the stars from the F/2.8 integration and the starless image from F/2.0. The point is that BXT has no problem correcting the star shapes per se, but rather struggles with filling the gaps in the starless image. So, I’m afraid this approach won’t help much, especially when there is a lot of nebula present. There is a cropped image shot at F/2.2 illustrating this effect further up. Maybe someone has an idea on how to mitigate this effect other than just dialing the stretch down? Usually my worflow starts with SPCC followed by BXT and SXT (all in lienar state)
|
You cannot like this item. Reason: "ANONYMOUS".
You cannot remove your like from this item.
Editing a post is only allowed within 24 hours after creating it.
You cannot Like this post because the topic is closed.
Copy the URL below to share a direct link to this post.
This post cannot be edited using the classic forums editor.
To edit this post, please enable the "New forums experience" in your settings.
Or image at F2 with a smaller sensor. A square 533 avoids the problem corners.
|
You cannot like this item. Reason: "ANONYMOUS".
You cannot remove your like from this item.
Editing a post is only allowed within 24 hours after creating it.
You cannot Like this post because the topic is closed.
Copy the URL below to share a direct link to this post.
This post cannot be edited using the classic forums editor.
To edit this post, please enable the "New forums experience" in your settings.
I don't know why people stop down the lens rather than using it at native aperture i mean native f, with narrowband i understand about the shifting, but for RGB is that also a case?
|
You cannot like this item. Reason: "ANONYMOUS".
You cannot remove your like from this item.
Editing a post is only allowed within 24 hours after creating it.
You cannot Like this post because the topic is closed.
Copy the URL below to share a direct link to this post.
This post cannot be edited using the classic forums editor.
To edit this post, please enable the "New forums experience" in your settings.
There are plenty of narrowband filters that work well at F2. Either mono or Nbz 2 LPara for OSC.
I agree run it wide open
|
You cannot like this item. Reason: "ANONYMOUS".
You cannot remove your like from this item.
Editing a post is only allowed within 24 hours after creating it.
You cannot Like this post because the topic is closed.
Copy the URL below to share a direct link to this post.
This post cannot be edited using the classic forums editor.
To edit this post, please enable the "New forums experience" in your settings.
Hi Tareq, this is done to increase the f/ (f/ = focal lenght / diameter), thus to reduce/control the size of optical aberrations in the corners.
|
You cannot like this item. Reason: "ANONYMOUS".
You cannot remove your like from this item.
Editing a post is only allowed within 24 hours after creating it.
You cannot Like this post because the topic is closed.
Copy the URL below to share a direct link to this post.
This post cannot be edited using the classic forums editor.
To edit this post, please enable the "New forums experience" in your settings.
Hi Tareq, this is done to increase the f/ (f/ = focal lenght / diameter), thus to reduce/control the size of optical aberrations in the corners. That is why i said narrowbanding, because there are high speed NB filters, while for RGB i didn't see them to be for high-speed optics, which means it is an issue with narrowbanding maybe and not broadbanding, correct me please.
|
You cannot like this item. Reason: "ANONYMOUS".
You cannot remove your like from this item.
Editing a post is only allowed within 24 hours after creating it.
You cannot Like this post because the topic is closed.
Copy the URL below to share a direct link to this post.
This post cannot be edited using the classic forums editor.
To edit this post, please enable the "New forums experience" in your settings.


