First Light for Apertura Carbonstar 6" RC Apertura 6" f/9 Ritchey-Chretien · Dave Ek · ... · 25 · 1328 · 18

PhotonPhanatic 4.53
...
· 
·  5 likes
·  Share link
A couple weeks ago I picked up an Apertura Carbonstar 6" RC from High Point Scientific. Here are my initial impressions.

I bought this scope to give myself a bit more reach focal-length-wise for some of the smaller targets. It's native FL is 1377 mm, and I picked up the matching 0.67x reducer  to cut the FL to about 920 mm. I also picked up the tilt plate for the focuser and the camera rotator ring. I planned to run this rig on both my iOptron mounts--GEM45 and GEM28.

After unboxing the scope I'll admit I was favorably impressed with the build quality given that this is a $700US scope. Mechanically it seemed solid. Even the focuser was beefier than what I imagined. The focuser being a Crayford style, I still had some misgivings about its ability to handle the load I was going to put on it, but that has not been an issue so far. I did install a ZWO EAF on the focuser.

My typical imaging train is a ZWO camera (either the ASI2600MM pro or the ASI533MM pro), a ZWO filter wheel (7-position 36mm or the 8-position 1.25"), and a ZWO OAG with ASI290MM camera. The length of this imaging train from the front of the OAG to the sensor is about 56 mm. It's worth mentioning that I had the focuser tension screw pretty tight to handle this load.

I also bought a Howie Glatter green laser collimator (darn thing cost almost as much as the scope!) in hopes that it would make collimation easier (Cheshire collimators are not friendly to old eyes like mine).

Initially, I set aside the focuser tilt plate and collimated using just the primary and secondary mirror adjustments. It took a bit of figuring but I was able to use the laser collimator to my advantage. That's not to say that collimation was perfect, but I got the focuser/primary mirror centered on the center of the secondary, and then adjusted the secondary so that the laser beam was reflected back on itself. So far so good.

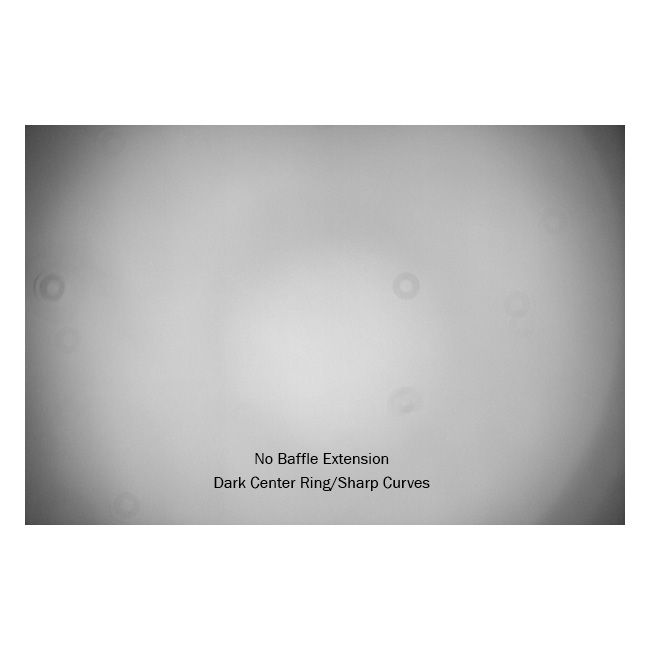
One of the fun parts of putting a new scope into operation is figuring out where it focuses. The instructions that came with the scope indicated that if I was using the camera rotator ring but not the focuser tilt plate, along with a 55mm imaging train, I should install both the 25mm and 50mm spacer rings and then rack the focuser out about 13mm. So that's how I set it up. Turns out it wasn't even close. In order to achieve focus I had to remove the 25mm spacer ring, and then I achieved focus with the focuser racked out to 20 mm. (This was without using the 0.67x reducer.) Even at its best focus it did not seem especially sharp, but I had to remind myself I was shooting with a FL of 1377 mm.

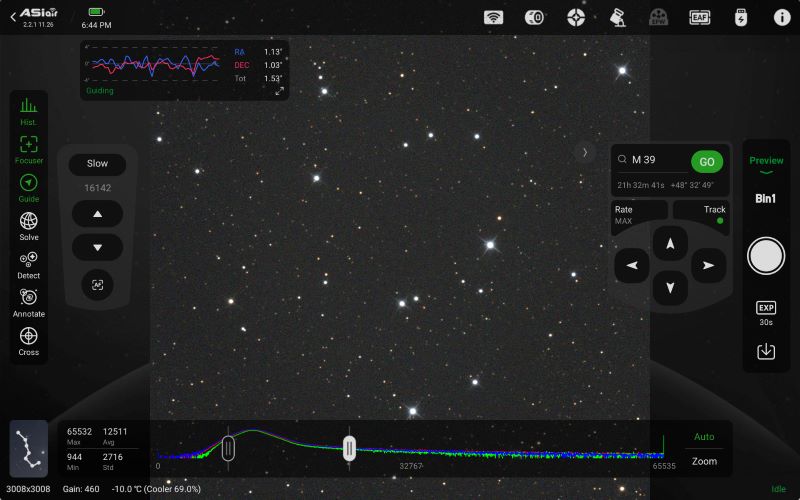
I was using the ASI2600MM Pro camera, which has an APS-C-sized sensor, so I wasn't sure how many guide stars I'd see in the OAG. Turns out my concern was valid. I could only see a couple bright stars in the OAG and they were significantly distorted. It took a bit to get the OAG camera focused properly, but I managed to get it good enough that PHD2 was able to guide for the evening.

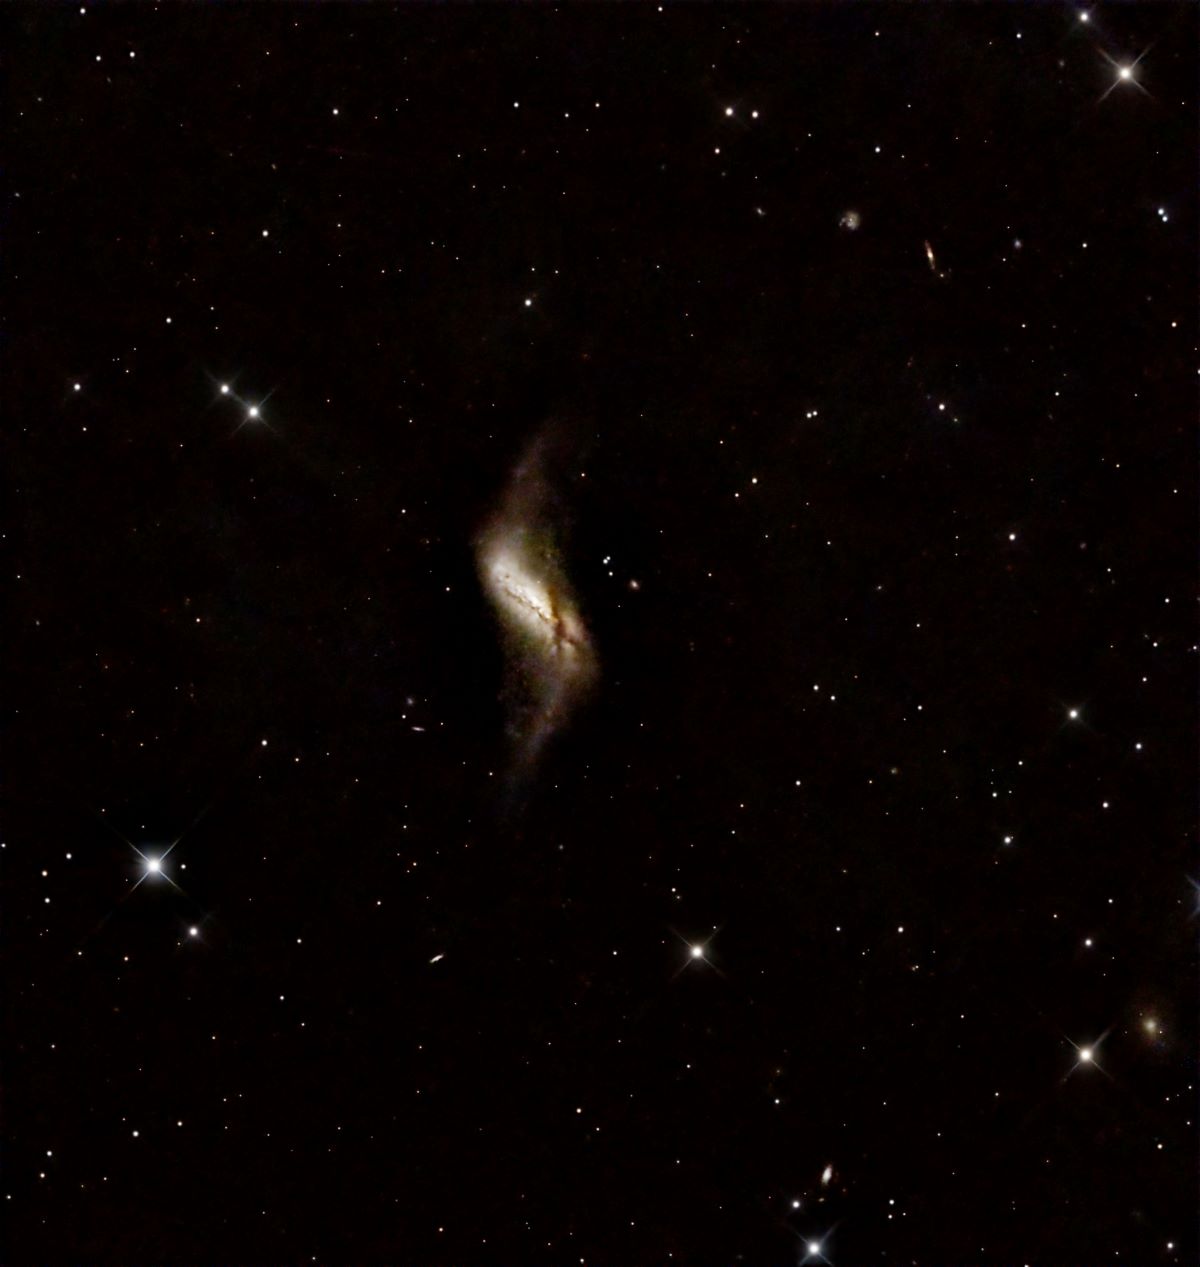
I shot galaxy NGC 891 in LRGB, and the subs didn't seem sharp at all--in fact they appeared kind of bloated and maybe a bit out of focus. My autofocus routine in NINA seemed to be doing a good job of identifying the best focus, so I figured this was a combination of the focal length I was shooting at and a questionable job of collimating on my part. But I let the rig shoot all night, and in the morning I had data to play with. PixInsight did an amazing job of turning unimpressive data into a passable image:


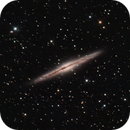
First Light for 6" RC: The Silver Sliver Galaxy


I think there's lots of room for improvement, especially in guiding and collimation. Next time I plan to shoot with my ASI533MM Pro. It has a smaller sensor that allows me to get the OAG prism farther down into the FOV, hopefully improving the number of stars available for guiding. And with improved collimation (including putting the focuser tilt plate into use) the guide stars should look a little better, and the subs should be a bit sharper. I think that the best configuration for this scope might be to use it with the 0.67x reducer, but I haven't yet tried that.
Like
kgeissler 1.91
...
· 
·  4 likes
·  Share link
I got mine about a week ago also.  I am using it with my 533mc pro.  So far I think my collimation is pretty good.  I also captured NGC 891.  This was my first image.  About 7 hours of 5 minute exposures.
7hours 300s.jpg

This was my last one.  NGC660.  About 15 hours of 5 minute exposures

300s 15hours.jpg
Like
PhotonPhanatic 4.53
Topic starter
...
· 
·  Share link
Keith Geissler:
I got mine about a week ago also. I am using it with my 533mc pro. So far I think my collimation is pretty good. I also captured NGC 891. This was my first image. About 7 hours of 5 minute exposures.


Very nice, Keith. Are you using off-axis guiding?

My initial attempts to collimate may have actually made things worse. I've been working through the process this afternoon with the tilt plate installed, and I think it's much better now. Will have to wait a few days for clear skies before I can check it again.
Like
kgeissler 1.91
...
· 
·  Share link
Dave Ek:
Keith Geissler:
I got mine about a week ago also. I am using it with my 533mc pro. So far I think my collimation is pretty good. I also captured NGC 891. This was my first image. About 7 hours of 5 minute exposures.


Very nice, Keith. Are you using off-axis guiding?

My initial attempts to collimate may have actually made things worse. I've been working through the process this afternoon with the tilt plate installed, and I think it's much better now. Will have to wait a few days for clear skies before I can check it again.

I am using an Askar OAG, 174mm mini.   I also have the tilt plate.   However, I am not sure when to adjust that versus the secondary or primary.  Do you know when to adjust each one for collimation?  I used a Cheshire eyepiece for my collimation, then did a "defocused" star test.  I also just got my tri bahtinov mask in the mail today.  I will see if I can fine tune it more.
Like
PhotonPhanatic 4.53
Topic starter
...
· 
·  Share link
Keith Geissler:
I am using an Askar OAG, 174mm mini. I also have the tilt plate. However, I am not sure when to adjust that versus the secondary or primary. Do you know when to adjust each one for collimation? I used a Cheshire eyepiece for my collimation, then did a "defocused" star test. I also just got my tri bahtinov mask in the mail today. I will see if I can fine tune it more.


I'm using a Howie Glatter laser collimator and today I've been following the instructions in this video: https://youtu.be/-iW_OmRDndk?si=55DN_CJyTSQTGGfm

I have a cheshire eyepiece but I have a difficult time with it. I'm not sure how one goes about adjusting the tilt plate using a cheshire eyepiece, but have a look at the video and maybe it'll give you some ideas.

the star test is probably the ultimate indicator of collimation, but that can be difficult as well.
Like
kgeissler 1.91
...
· 
·  1 like
·  Share link
My Tri-Bahtinov mask came in today, and between lots of clouds, I was able to test it out.  My collimation was pretty good, so I only made a few, very minor, adjustments.Screenshot_20241103-183604.jpg

I then took a quick 30 second exposure of M39 (in 20 mph winds) and I thought the stars looked pretty good across the frame.
Screenshot_20241103-184433.jpg

I highly recommend a tri-bahtinov mask.  You can make one yourself with a 3-d printer or buy one, like I did for about $30.
Like
kgeissler 1.91
...
· 
·  Share link
@Dave Ek have you tried taking flats with your Carbonstar yet?  My stacked images, with my flats look like this (this was only 30 minutes of light frames)

Screenshot 2024-11-07 151120.jpg

Not sure what is up with the rings.  I read about older models needing a baffle to prevent stray light.  I thought the new ones didn't need a baffle.  Have you tried taking flats yet?
Edited ...
Like
OlivierPM73 1.20
...
· 
·  Share link
Keith Geissler:
@Dave Ek have you tried taking flats with your Carbonstar yet?  My stacked images, with my flats look like this (this was only 30 minutes of light frames)

Screenshot 2024-11-07 151120.jpg

Not sure what is up with the rings.  I read about older models needing a baffle to prevent stray light.  I thought the new ones didn't need a baffle.  Have you tried taking flats yet?

*** Hi there, I got this kind of circle with my Rc8 and my RC10. After searching for reflexion, bad flat, bad dark and a lot of possible sources  I finally figured out it was due to me doing incorrect setup of gain, offset, exposure time and  that make appears some low ligth and shadow of secondary miror on the sensor. Possibly the source is from ligth polution that was brigther than the skybackground for the gain I choose (circles appeared stronger when i was shooting in direction of the small town nearby).    ***
Like
kgeissler 1.91
...
· 
·  Share link
Olivier Constans:
Keith Geissler:
@Dave Ek have you tried taking flats with your Carbonstar yet?  My stacked images, with my flats look like this (this was only 30 minutes of light frames)

Screenshot 2024-11-07 151120.jpg

Not sure what is up with the rings.  I read about older models needing a baffle to prevent stray light.  I thought the new ones didn't need a baffle.  Have you tried taking flats yet?

*** Hi there, I got this kind of circle with my Rc8 and my RC10. After searching for reflexion, bad flat, bad dark and a lot of possible sources  I finally figured out it was due to me doing incorrect setup of gain, offset, exposure time and  that make appears some low ligth and shadow of secondary miror on the sensor. Possibly the source is from ligth polution that was brigther than the skybackground for the gain I choose (circles appeared stronger when i was shooting in direction of the small town nearby).    ***

What exposure time and gain did you use?  I am using a ASI2600MC Pro
Like
OlivierPM73 1.20
...
· 
·  Share link
Keith Geissler:
Olivier Constans:
Keith Geissler:
@Dave Ek have you tried taking flats with your Carbonstar yet?  My stacked images, with my flats look like this (this was only 30 minutes of light frames)

Screenshot 2024-11-07 151120.jpg

Not sure what is up with the rings.  I read about older models needing a baffle to prevent stray light.  I thought the new ones didn't need a baffle.  Have you tried taking flats yet?

*** Hi there, I got this kind of circle with my Rc8 and my RC10. After searching for reflexion, bad flat, bad dark and a lot of possible sources  I finally figured out it was due to me doing incorrect setup of gain, offset, exposure time and  that make appears some low ligth and shadow of secondary miror on the sensor. Possibly the source is from ligth polution that was brigther than the skybackground for the gain I choose (circles appeared stronger when i was shooting in direction of the small town nearby).    ***

What exposure time and gain did you use?  I am using a ASI2600MC Pro

*** As an exemple I was using unity gain 100, offset 396, exposure 60s (touptek2600mc so same as zwo2600) . Sharpcap suggested me gain 300 (3xunity gain),  offset (blacklevel in Touptek naming)  396, exposure 90s ( this is one specific example because it is calculated from the sky background at the moment i shoot)  and the circles were gone. ***
Edited ...
Like
PhotonPhanatic 4.53
Topic starter
...
· 
·  Share link
Keith Geissler:
@Dave Ek have you tried taking flats with your Carbonstar yet?  My stacked images, with my flats look like this (this was only 30 minutes of light frames)

Screenshot 2024-11-07 151120.jpg

Not sure what is up with the rings.  I read about older models needing a baffle to prevent stray light.  I thought the new ones didn't need a baffle.  Have you tried taking flats yet?

I did shoot flats. I saw some vignetting in the lights and the flats but no rings like you’re seeing.
Like
Amogo 0.00
...
· 
·  Share link
sorry to revive old thread. ive been thinking on one of these. i have a similar imaging set up. wondering if you have had any flexure issues as ive seen mentioned on RCs?
Like
PhotonPhanatic 4.53
Topic starter
...
· 
·  Share link
Andy Morales Gomez:
sorry to revive old thread. ive been thinking on one of these. i have a similar imaging set up. wondering if you have had any flexure issues as ive seen mentioned on RCs?

I haven't noticed any but I haven't used this scope much yet.
Like
rroesch 1.20
...
· 
·  Share link
Hi
I also purchased the Aperture 8”,  so collimated the secondary with the Cheshire, but I want to try the Howei to align the focuser, did you remove the secondary baffle extension?
thank you
Like
jmdl101 1.81
...
· 
·  Share link
I got an RC8 recently and have learned quite a bit so far. 

I needed to use both hands to get the baffle extension off mine. My focuser droops quite a bit with the weight of my imaging gear, imx571, 7x2 filter wheel, oag, and eaf. I was able to remove almost all of the droop by using a hex key to fully tight the focuser tension screw. The moving tension isn't too bad even with it tightened so much, and the droop is very minimal now. 

I ended up buying a TS RCKOLLI and I really like it, basically like a self illuminated Cheshire and lights up everything you need to see. It was very apparent that my focuser tube was not in alignment with the mirrors so I used the tilt plate to align it, which requires removing the whole baffle tube. 

This is the collimation method I followed and my stars look great right now, confirmed with the DSI method also. https://www.ancientphotonsastro.com/post/bench-collimating-a-gso-rc8
Like
dugnsuz 0.00
...
· 
·  Share link
I'm using the 6" GSO branded RC scope available from Testar in Australia - an experimental upgrade from the AstroTech steel tube version.

I have a Nateman_Doo decoupler plate and Baader Steeltrack focuser on the CF RC which help.

Very happy with it so far - getting much better shaped stars on every sub now!

Some recent images using this scope on an AM5N...


NGC 2018, RC6, SHO/HOO ImageBlend


NGC1934, RC6, SHO/HOO/RGB Image Blend
Like
mrkhagol 2.71
...
· 
·  Share link
After seeing comments here and Dave's experience-this looks to be worthwhile to scope to go after.

My newtonian had an accident and it's taken forever get collimation right-which leaves me to have it be used for solar system targets only.

Was thinking about going really high FL scopes SCTs but due to weather dynamics issues-high FL might end up biting me.

Ofc, this scope's high FL is also kind of there but it's not too much.

So  might think about getting it considering the price at least.
Like
maxbaro 1.20
...
· 
·  4 likes
·  Share link
Hi,

For what is worth, I’d like to share my experience with my RC 8″ Carbon, which might be helpful to others. 
I fighted with it for over a year and, in the end, achieved what I consider good results: 

Bubble nebula


Pinpoint stars across an APS-C sensor. Clearly, a smaller sensor makes things easier. If you’re aiming for full-frame, I fear you’ll need at least a 10″ RC.

I went through most of the procedures summarized by others in this thread, including tilt adjustment, rough collimation, and DSI collimation.
Below is a breakdown of what I learned:

Tilt Adjustment and Rough Collimation

1. Tilt Adjustment with a laser:
Use a laser to correct for optical train misalignment. It’s imperative that the laser fits perfectly in the focuser — don’t trust simple 2″ connections; a threaded connection is almost a must. Even a tiny bit of slop can throw everything off.
Insert the laser as far as possible into the optical train. Adjust the tilt plate until the laser points exactly at the center of the secondary mirror. The best approach is to remove the secondary mirror and verify that the laser is pointing at the center of the central hole in the mirror holder. Once aligned, the tilt plate should be left untouched.

Note that on GSO RC6 and RC8 models, the focuser is directly attached to the primary mirror. Thus, adjusting the primary also shifts the entire optical train's axis. Devices like the nateman_doo decoupler (or similar systems) are very helpful here. Without such a decoupler, you’d have to repeat the alignment every time you adjust the primary — a never-ending process if there’s significant misalignment.

2. Rough Collimation with a Cheshire Eyepiece:
After removing the baffle tube, I use a Cheshire eyepiece to alternately adjust the primary and secondary mirrors, ensuring everything is concentric — paying special attention to the image of the secondary holder. Initially, I attached a camera to the Cheshire for a better view, but with experience, I was able to do it by eye.

Precise Collimation (DSI Method)
DSI is King. Star testing is the only way to transition from “near collimated” to collimated. Make sure your scope is properly acclimated before starting; thermal currents inside the tube can create moving plumes in a defocused image. It’s best to wait at least an hour after setup.

1. Primary Collimation:
Center a slightly defocused star (the less defocused, the better) and adjust the primary so that you achieve a concentric image with the small Poisson dot exactly at the center.
It’s crucial to check concentricity with the star positioned at the center of the field.

Adjustment Technique:
The trick is to move the star — by adjusting the primary’s setting screw — toward the opposite side of where the central black dot is skewed.
This becomes more intuitive after a few trials.

2. Secondary Collimation:
As per DSI method, check for the “oblongness” of stars around the center of the field. Adjust until this 'asymmetry' is 'symmetric'. I developed an automated procedure: using a single defocused star, I set up an acquisition sequence that moves the star in a clockwork pattern, taking a picture at each step. I then stack the images and inspect the result. The degree of asymmetry of the stars becomes very subtle as you approach perfect collimation. You might eventually need to check with focused stars.

Adjustment Technique:
The trick here is to “move” the "best" stars toward the center by adjusting the secondary’s control screw.

3. Repeat the primary and secondary adjustments in sequence until you’re satisfied or exhausted. Ultimately, seeing control how precise you can get.

For a more objective approach consider using the SkyWave collimation tool. Although expensive, it helps a lot — especially in the beginning. It also checks for spherical aberration, ensuring the proper distance between the mirrors (which affects both the focal length and backfocus).

Reflections and Artifacts:

I also stumbled on the concentric circles reported by @Keith Geissler  In my case, they resulted from using an APEX-L 0.65 reducer. These artifacts are typically caused by reflections — flat field correction cannot compensate for differences in the geometry of incoming light, i.e., reflections/stray light. In my setup, the last lens of the reducer (which is concave) was reflecting light from the CMOS sensor. The effect depends a lot on light intensity: I observed it with the Lum filter but not with narrowband filters, as the latter let much less light through, reducing the reflections.

This is pretty much all I have learned in almost a year of working with an RC. When everything is dialed in, is exceptional — even though the process can be frustrating at times, there’s always light at the end of the tube :-)

Best
Max
Edited ...
Like
arispopegolf@gmail.com 1.43
...
· 
·  Share link
Keith Geissler:
@Dave Ek have you tried taking flats with your Carbonstar yet?  My stacked images, with my flats look like this (this was only 30 minutes of light frames)

Screenshot 2024-11-07 151120.jpg

Not sure what is up with the rings.  I read about older models needing a baffle to prevent stray light.  I thought the new ones didn't need a baffle.  Have you tried taking flats yet?

Same clone just different paint and carbon fiber
Like
kgeissler 1.91
...
· 
·  Share link
Aris Pope:
Keith Geissler:
@Dave Ek have you tried taking flats with your Carbonstar yet?  My stacked images, with my flats look like this (this was only 30 minutes of light frames)

Screenshot 2024-11-07 151120.jpg

Not sure what is up with the rings.  I read about older models needing a baffle to prevent stray light.  I thought the new ones didn't need a baffle.  Have you tried taking flats yet?

Same clone just different paint and carbon fiber

I finally got flats to work.  Turned out to be light reflections inside the tube.  If I remember right, it was one of the shunt adapter rings .
Like
mrkhagol 2.71
...
· 
·  Share link
Hi,

For what is worth, I’d like to share my experience with my RC 8″ Carbon, which might be helpful to others. 
I fighted with it for over a year and, in the end, achieved what I consider good results: 

Bubble nebula


Pinpoint stars across an APS-C sensor. Clearly, a smaller sensor makes things easier. If you’re aiming for full-frame, I fear you’ll need at least a 10″ RC.

I went through most of the procedures summarized by others in this thread, including tilt adjustment, rough collimation, and DSI collimation.
Below is a breakdown of what I learned:

Tilt Adjustment and Rough Collimation

1. Tilt Adjustment with a laser:
Use a laser to correct for optical train misalignment. It’s imperative that the laser fits perfectly in the focuser — don’t trust simple 2″ connections; a threaded connection is almost a must. Even a tiny bit of slop can throw everything off.
Insert the laser as far as possible into the optical train. Adjust the tilt plate until the laser points exactly at the center of the secondary mirror. The best approach is to remove the secondary mirror and verify that the laser is pointing at the center of the central hole in the mirror holder. Once aligned, the tilt plate should be left untouched.

Note that on GSO RC6 and RC8 models, the focuser is directly attached to the primary mirror. Thus, adjusting the primary also shifts the entire optical train's axis. Devices like the nateman_doo decoupler (or similar systems) are very helpful here. Without such a decoupler, you’d have to repeat the alignment every time you adjust the primary — a never-ending process if there’s significant misalignment.

2. Rough Collimation with a Cheshire Eyepiece:
After removing the baffle tube, I use a Cheshire eyepiece to alternately adjust the primary and secondary mirrors, ensuring everything is concentric — paying special attention to the image of the secondary holder. Initially, I attached a camera to the Cheshire for a better view, but with experience, I was able to do it by eye.

Precise Collimation (DSI Method)
DSI is King. Star testing is the only way to transition from “near collimated” to collimated. Make sure your scope is properly acclimated before starting; thermal currents inside the tube can create moving plumes in a defocused image. It’s best to wait at least an hour after setup.

1. Primary Collimation:
Center a slightly defocused star (the less defocused, the better) and adjust the primary so that you achieve a concentric image with the small Poisson dot exactly at the center.
It’s crucial to check concentricity with the star positioned at the center of the field.

Adjustment Technique:
The trick is to move the star — by adjusting the primary’s setting screw — toward the opposite side of where the central black dot is skewed.
This becomes more intuitive after a few trials.

2. Secondary Collimation:
As per DSI method, check for the “oblongness” of stars around the center of the field. Adjust until this 'asymmetry' is 'symmetric'. I developed an automated procedure: using a single defocused star, I set up an acquisition sequence that moves the star in a clockwork pattern, taking a picture at each step. I then stack the images and inspect the result. The degree of asymmetry of the stars becomes very subtle as you approach perfect collimation. You might eventually need to check with focused stars.

Adjustment Technique:
The trick here is to “move” the "best" stars toward the center by adjusting the secondary’s control screw.

3. Repeat the primary and secondary adjustments in sequence until you’re satisfied or exhausted. Ultimately, seeing control how precise you can get.

For a more objective approach consider using the SkyWave collimation tool. Although expensive, it helps a lot — especially in the beginning. It also checks for spherical aberration, ensuring the proper distance between the mirrors (which affects both the focal length and backfocus).

Reflections and Artifacts:

I also stumbled on the concentric circles reported by @Keith Geissler  In my case, they resulted from using an APEX-L 0.65 reducer. These artifacts are typically caused by reflections — flat field correction cannot compensate for differences in the geometry of incoming light, i.e., reflections/stray light. In my setup, the last lens of the reducer (which is concave) was reflecting light from the CMOS sensor. The effect depends a lot on light intensity: I observed it with the Lum filter but not with narrowband filters, as the latter let much less light through, reducing the reflections.

This is pretty much all I have learned in almost a year of working with an RC. When everything is dialed in, is exceptional — even though the process can be frustrating at times, there’s always light at the end of the tube :-)

Best
Max

does the size of secondary help with full frame camera by going with bigger 10" or some other reason?
Like
maxbaro 1.20
...
· 
·  1 like
·  Share link
@Niraj for what I know the 10" has a natively flatter field, it's simply a function of the diameter for what I understand.
Like
arispopegolf@gmail.com 1.43
...
· 
·  Share link
Keith Geissler:
Aris Pope:
Keith Geissler:
@Dave Ek have you tried taking flats with your Carbonstar yet?  My stacked images, with my flats look like this (this was only 30 minutes of light frames)

Screenshot 2024-11-07 151120.jpg

Not sure what is up with the rings.  I read about older models needing a baffle to prevent stray light.  I thought the new ones didn't need a baffle.  Have you tried taking flats yet?

Same clone just different paint and carbon fiber

I finally got flats to work.  Turned out to be light reflections inside the tube.  If I remember right, it was one of the shunt adapter rings .

Looks similar to the pattern you get when you don't have one of these.

https://agenaastro.com/buckeyestargazer-baffle-extensions-gso-rc-telescopes.html#

Edited ...
Like
frankszabo75 1.20
...
· 
·  Share link
I've been using one for years, if you got any questions, don't be afraid to ask: 

Here is my gallery taken with the RC 6

This is not all, I have a lot more, plus some of the galaxies are repeating

https://app.astrobin.com/u/frankszabo75?collection=53438
Edited ...
Like
 
Register or login to create to post a reply.