I'm just getting into serious tilt adjustment and commonly see it advised to do adjustment, at least initial adjustment, on rich Milky Way star fields. Is there any way to do this during galaxy season in the northern hemisphere when there aren't any rich star fields? Can I just increase the subexposure time on my AF runs? Or are there any particularly good regions I should target? I would prefer not to have to wait until the summer, if possible.
|
You cannot like this item. Reason: "ANONYMOUS".
You cannot remove your like from this item.
Editing a post is only allowed within 24 hours after creating it.
You cannot Like this post because the topic is closed.
Copy the URL below to share a direct link to this post.
This post cannot be edited using the classic forums editor.
To edit this post, please enable the "New forums experience" in your settings.
At this time of the year, you still can get some milky way imaging till 23:00 above 30°. Isn't that sufficient ?
|
You cannot like this item. Reason: "ANONYMOUS".
You cannot remove your like from this item.
Editing a post is only allowed within 24 hours after creating it.
You cannot Like this post because the topic is closed.
Copy the URL below to share a direct link to this post.
This post cannot be edited using the classic forums editor.
To edit this post, please enable the "New forums experience" in your settings.
I haven't tried it, but I've heard about a tool to adjust tilt (at least on the camera side) that don't rely on stars. https://www.youtube.com/watch?v=jP0knv4C0CI |
You cannot like this item. Reason: "ANONYMOUS".
You cannot remove your like from this item.
Editing a post is only allowed within 24 hours after creating it.
You cannot Like this post because the topic is closed.
Copy the URL below to share a direct link to this post.
This post cannot be edited using the classic forums editor.
To edit this post, please enable the "New forums experience" in your settings.
Médéric Hébert:
I haven't tried it, but I've heard about a tool to adjust tilt (at least on the camera side) that don't rely on stars.
https://www.youtube.com/watch?v=jP0knv4C0CI no reason to buy that, you can make a jig for like $40 or less and the camera side tilt is really the only type the OP should fix; tilt caused by focuser droop is not fixable if you plan to image on both sides of meridian (at least, with a tilter) put 4 boards into a square, make a 2" diameter hole at what you want to be the top board, then add a large flat square piece of wood on top of the bottom board, tape a white sheet of paper on it find a laser, attach it to the bottom board at a steep enough angle so that it's beam goes through the 2" hole, preferably passing through in the middle of the hole; attach it with glue or something, or make a hole so that it sits inside the board, then glue it (or find a part online made for holding lasers); when you need to use the laser, add a piece of tape around the button so it stays on now, add any spare 2" EP holder on top of the 2" hole (preferably one with compression ring), glue it add M48 spacers to the scope side of your image train, if you don't have already insert your image stack into the EP holder, tighten just enough so that it can rotate in the holder turn on laser rotate image train, observe; one of the laser points cannot move in the path of a circle (forgot which one exactly, still learning), adjust your tilter (assuming you have one already), so that that laser point reduces from the circle to a single point, which doesn't move no matter the rotation of your imaging train; at this point, your tilt is removed. there is a whole video about making something like this on Astroshed, I think this knowledge is extremely valuable save your money people, I think that 250 euro laser tilt jig is severely overpriced.
|
You cannot like this item. Reason: "ANONYMOUS".
You cannot remove your like from this item.
Editing a post is only allowed within 24 hours after creating it.
You cannot Like this post because the topic is closed.
Copy the URL below to share a direct link to this post.
This post cannot be edited using the classic forums editor.
To edit this post, please enable the "New forums experience" in your settings.
Oscar:
Médéric Hébert:
I haven't tried it, but I've heard about a tool to adjust tilt (at least on the camera side) that don't rely on stars.
https://www.youtube.com/watch?v=jP0knv4C0CI
no reason to buy that, you can make a jig for like $40 or less
and the camera side tilt is really the only type the OP should fix; tilt caused by focuser droop is not fixable if you plan to image on both sides of meridian (at least, with a tilter)
put 4 boards into a square, make a 2" diameter hole at what you want to be the top board, then add a large flat square piece of wood on top of the bottom board, tape a white sheet of paper on it
find a laser, attach it to the bottom board at a steep enough angle so that it's beam goes through the 2" hole, preferably passing through in the middle of the hole; attach it with glue or something, or make a hole so that it sits inside the board, then glue it (or find a part online made for holding lasers); when you need to use the laser, add a piece of tape around the button so it stays on
now, add any spare 2" EP holder on top of the 2" hole (preferably one with compression ring), glue it
add M48 spacers to the scope side of your image train, if you don't have already
insert your image stack into the EP holder, tighten just enough so that it can rotate in the holder
turn on laser
rotate image train, observe; one of the laser points cannot move in the path of a circle (forgot which one exactly, still learning), adjust your tilter (assuming you have one already), so that that laser point reduces from the circle to a single point, which doesn't move no matter the rotation of your imaging train; at this point, your tilt is removed.
there is a whole video about making something like this on Astroshed, I think this knowledge is extremely valuable
save your money people, I think that 250 euro laser tilt jig is severely overpriced. For those interested, I managed to find the video Oscar mentionned https://www.youtube.com/watch?v=Gw2oTwb4GjY |
You cannot like this item. Reason: "ANONYMOUS".
You cannot remove your like from this item.
Editing a post is only allowed within 24 hours after creating it.
You cannot Like this post because the topic is closed.
Copy the URL below to share a direct link to this post.
This post cannot be edited using the classic forums editor.
To edit this post, please enable the "New forums experience" in your settings.
Dan,
I prefer to avoid the milky way for tilt analysis. It's just too busy. You dont need a million stars to do this, just a nice distribution across the entire image. ASTAP and NINA are just using HFD and HFR respectively as a proxy for tilt, so if you have well exposed stars across the image without any mount tracking error… thats all you need. I recommend 10 second exposures at a minimum. As I get very close and want to refine things even more I use longer exposures, up to 30 seconds. The analysis must recognize the stars as stars, or it doesnt include them. You will get more consistent results (less variability between runs) if you use longer exposures. When I do all my tilt work, I dont even worry about where I'm pointing with a widefield setup as long as it is at a pretty high altitude. (Over 65 degrees is ideal, but you just want to get above the point where atmospheric refraction can distort stars). As your field of view gets smaller with either longer focal length or smaller sensor, then you might need to pay a little more attention…
|
You cannot like this item. Reason: "ANONYMOUS".
You cannot remove your like from this item.
Editing a post is only allowed within 24 hours after creating it.
You cannot Like this post because the topic is closed.
Copy the URL below to share a direct link to this post.
This post cannot be edited using the classic forums editor.
To edit this post, please enable the "New forums experience" in your settings.
Chris White- Overcast Observatory:
Dan,
I prefer to avoid the milky way for tilt analysis. It's just too busy. You dont need a million stars to do this, just a nice distribution across the entire image. ASTAP and NINA are just using HFD and HFR respectively as a proxy for tilt, so if you have well exposed stars across the image without any mount tracking error... thats all you need. I recommend 10 second exposures at a minimum. As I get very close and want to refine things even more I use longer exposures, up to 30 seconds. The analysis must recognize the stars as stars, or it doesnt include them. You will get more consistent results (less variability between runs) if you use longer exposures. When I do all my tilt work, I dont even worry about where I'm pointing with a widefield setup as long as it is at a pretty high altitude. (Over 65 degrees is ideal, but you just want to get above the point where atmospheric refraction can distort stars). As your field of view gets smaller with either longer focal length or smaller sensor, then you might need to pay a little more attention... Thanks, Chris. Very helpful. I would not have thought to use subs that long but it makes sense. I was getting inconsistent results with HF and it was likely because it was not finding enough stars with my very short subs.
|
You cannot like this item. Reason: "ANONYMOUS".
You cannot remove your like from this item.
Editing a post is only allowed within 24 hours after creating it.
You cannot Like this post because the topic is closed.
Copy the URL below to share a direct link to this post.
This post cannot be edited using the classic forums editor.
To edit this post, please enable the "New forums experience" in your settings.
Dan H. M.:
Chris White- Overcast Observatory:
Dan,
I prefer to avoid the milky way for tilt analysis. It's just too busy. You dont need a million stars to do this, just a nice distribution across the entire image. ASTAP and NINA are just using HFD and HFR respectively as a proxy for tilt, so if you have well exposed stars across the image without any mount tracking error... thats all you need. I recommend 10 second exposures at a minimum. As I get very close and want to refine things even more I use longer exposures, up to 30 seconds. The analysis must recognize the stars as stars, or it doesnt include them. You will get more consistent results (less variability between runs) if you use longer exposures. When I do all my tilt work, I dont even worry about where I'm pointing with a widefield setup as long as it is at a pretty high altitude. (Over 65 degrees is ideal, but you just want to get above the point where atmospheric refraction can distort stars). As your field of view gets smaller with either longer focal length or smaller sensor, then you might need to pay a little more attention...
Thanks, Chris. Very helpful. I would not have thought to use subs that long but it makes sense. I was getting inconsistent results with HF and it was likely because it was not finding enough stars with my very short subs. It's a balancing act depending on how much you trust your tracking. With an OAG you can't really guide while you're going in/out of focus, so you'll want to be unguided. You can't use a longer exposure than whatever length will result in the stars getting too eccentric because of the lack of guiding.
|
You cannot like this item. Reason: "ANONYMOUS".
You cannot remove your like from this item.
Editing a post is only allowed within 24 hours after creating it.
You cannot Like this post because the topic is closed.
Copy the URL below to share a direct link to this post.
This post cannot be edited using the classic forums editor.
To edit this post, please enable the "New forums experience" in your settings.
Kyle Goodwin:
Dan H. M.:
Chris White- Overcast Observatory:
Dan,
I prefer to avoid the milky way for tilt analysis. It's just too busy. You dont need a million stars to do this, just a nice distribution across the entire image. ASTAP and NINA are just using HFD and HFR respectively as a proxy for tilt, so if you have well exposed stars across the image without any mount tracking error... thats all you need. I recommend 10 second exposures at a minimum. As I get very close and want to refine things even more I use longer exposures, up to 30 seconds. The analysis must recognize the stars as stars, or it doesnt include them. You will get more consistent results (less variability between runs) if you use longer exposures. When I do all my tilt work, I dont even worry about where I'm pointing with a widefield setup as long as it is at a pretty high altitude. (Over 65 degrees is ideal, but you just want to get above the point where atmospheric refraction can distort stars). As your field of view gets smaller with either longer focal length or smaller sensor, then you might need to pay a little more attention...
Thanks, Chris. Very helpful. I would not have thought to use subs that long but it makes sense. I was getting inconsistent results with HF and it was likely because it was not finding enough stars with my very short subs.
It's a balancing act depending on how much you trust your tracking. With an OAG you can't really guide while you're going in/out of focus, so you'll want to be unguided. You can't use a longer exposure than whatever length will result in the stars getting too eccentric because of the lack of guiding. Yeah I use a guidescope and all my setups are widefield. Although couldn’t you just point at Polaris and not worry about that even with a longer fl or OAG?
|
You cannot like this item. Reason: "ANONYMOUS".
You cannot remove your like from this item.
Editing a post is only allowed within 24 hours after creating it.
You cannot Like this post because the topic is closed.
Copy the URL below to share a direct link to this post.
This post cannot be edited using the classic forums editor.
To edit this post, please enable the "New forums experience" in your settings.
Depending on where you are in the world that might be lower in the sky than you’d ideally want for adjusting tilt.
|
You cannot like this item. Reason: "ANONYMOUS".
You cannot remove your like from this item.
Editing a post is only allowed within 24 hours after creating it.
You cannot Like this post because the topic is closed.
Copy the URL below to share a direct link to this post.
This post cannot be edited using the classic forums editor.
To edit this post, please enable the "New forums experience" in your settings.
Chris White- Overcast Observatory:
STAP and NINA are just using HFD and HFR respectively as a proxy for tilt, so if you have well exposed stars across the image without any mount tracking error... thats all you need. I recommend 10 second exposures at a minimum. As I get very close and want to refine things even more I use longer exposures, up to 30 seconds. Hi Chris, very helpful advise. For clarification: Does that mean that you also use fairly long exposures when you focus with NINA/HocusFocus? Matthias
|
You cannot like this item. Reason: "ANONYMOUS".
You cannot remove your like from this item.
Editing a post is only allowed within 24 hours after creating it.
You cannot Like this post because the topic is closed.
Copy the URL below to share a direct link to this post.
This post cannot be edited using the classic forums editor.
To edit this post, please enable the "New forums experience" in your settings.
Kyle Goodwin:
Dan H. M.:
Chris White- Overcast Observatory:
Dan,
I prefer to avoid the milky way for tilt analysis. It's just too busy. You dont need a million stars to do this, just a nice distribution across the entire image. ASTAP and NINA are just using HFD and HFR respectively as a proxy for tilt, so if you have well exposed stars across the image without any mount tracking error... thats all you need. I recommend 10 second exposures at a minimum. As I get very close and want to refine things even more I use longer exposures, up to 30 seconds. The analysis must recognize the stars as stars, or it doesnt include them. You will get more consistent results (less variability between runs) if you use longer exposures. When I do all my tilt work, I dont even worry about where I'm pointing with a widefield setup as long as it is at a pretty high altitude. (Over 65 degrees is ideal, but you just want to get above the point where atmospheric refraction can distort stars). As your field of view gets smaller with either longer focal length or smaller sensor, then you might need to pay a little more attention...
Thanks, Chris. Very helpful. I would not have thought to use subs that long but it makes sense. I was getting inconsistent results with HF and it was likely because it was not finding enough stars with my very short subs.
It's a balancing act depending on how much you trust your tracking. With an OAG you can't really guide while you're going in/out of focus, so you'll want to be unguided. You can't use a longer exposure than whatever length will result in the stars getting too eccentric because of the lack of guiding. Yes, I mentioned tracking error. If your mount can't track for 10 seconds and you use an oag, id recommend investing in a cheap guidescope to use when dialing out tilt. There is no way around that you get more consistent results with tilt analysis when you use longer exposures. So that should be a goal when doing this kind of work.
|
You cannot like this item. Reason: "ANONYMOUS".
You cannot remove your like from this item.
Editing a post is only allowed within 24 hours after creating it.
You cannot Like this post because the topic is closed.
Copy the URL below to share a direct link to this post.
This post cannot be edited using the classic forums editor.
To edit this post, please enable the "New forums experience" in your settings.
Chris White- Overcast Observatory:
STAP and NINA are just using HFD and HFR respectively as a proxy for tilt, so if you have well exposed stars across the image without any mount tracking error... thats all you need. I recommend 10 second exposures at a minimum. As I get very close and want to refine things even more I use longer exposures, up to 30 seconds.
Hi Chris, very helpful advise. For clarification: Does that mean that you also use fairly long exposures when you focus with NINA/HocusFocus?
Matthias
I primarily use a single star for focusing when imaging, but if I do a full field routine, yes, I use 10 to 15 second exposures. stars only get measured if they look like stars.
|
You cannot like this item. Reason: "ANONYMOUS".
You cannot remove your like from this item.
Editing a post is only allowed within 24 hours after creating it.
You cannot Like this post because the topic is closed.
Copy the URL below to share a direct link to this post.
This post cannot be edited using the classic forums editor.
To edit this post, please enable the "New forums experience" in your settings.
I use 6 seconds normally on my CDK and it works well (for normal autofocusing) with HocusFocus. The CFZ is pretty large at f/8.
|
You cannot like this item. Reason: "ANONYMOUS".
You cannot remove your like from this item.
Editing a post is only allowed within 24 hours after creating it.
You cannot Like this post because the topic is closed.
Copy the URL below to share a direct link to this post.
This post cannot be edited using the classic forums editor.
To edit this post, please enable the "New forums experience" in your settings.
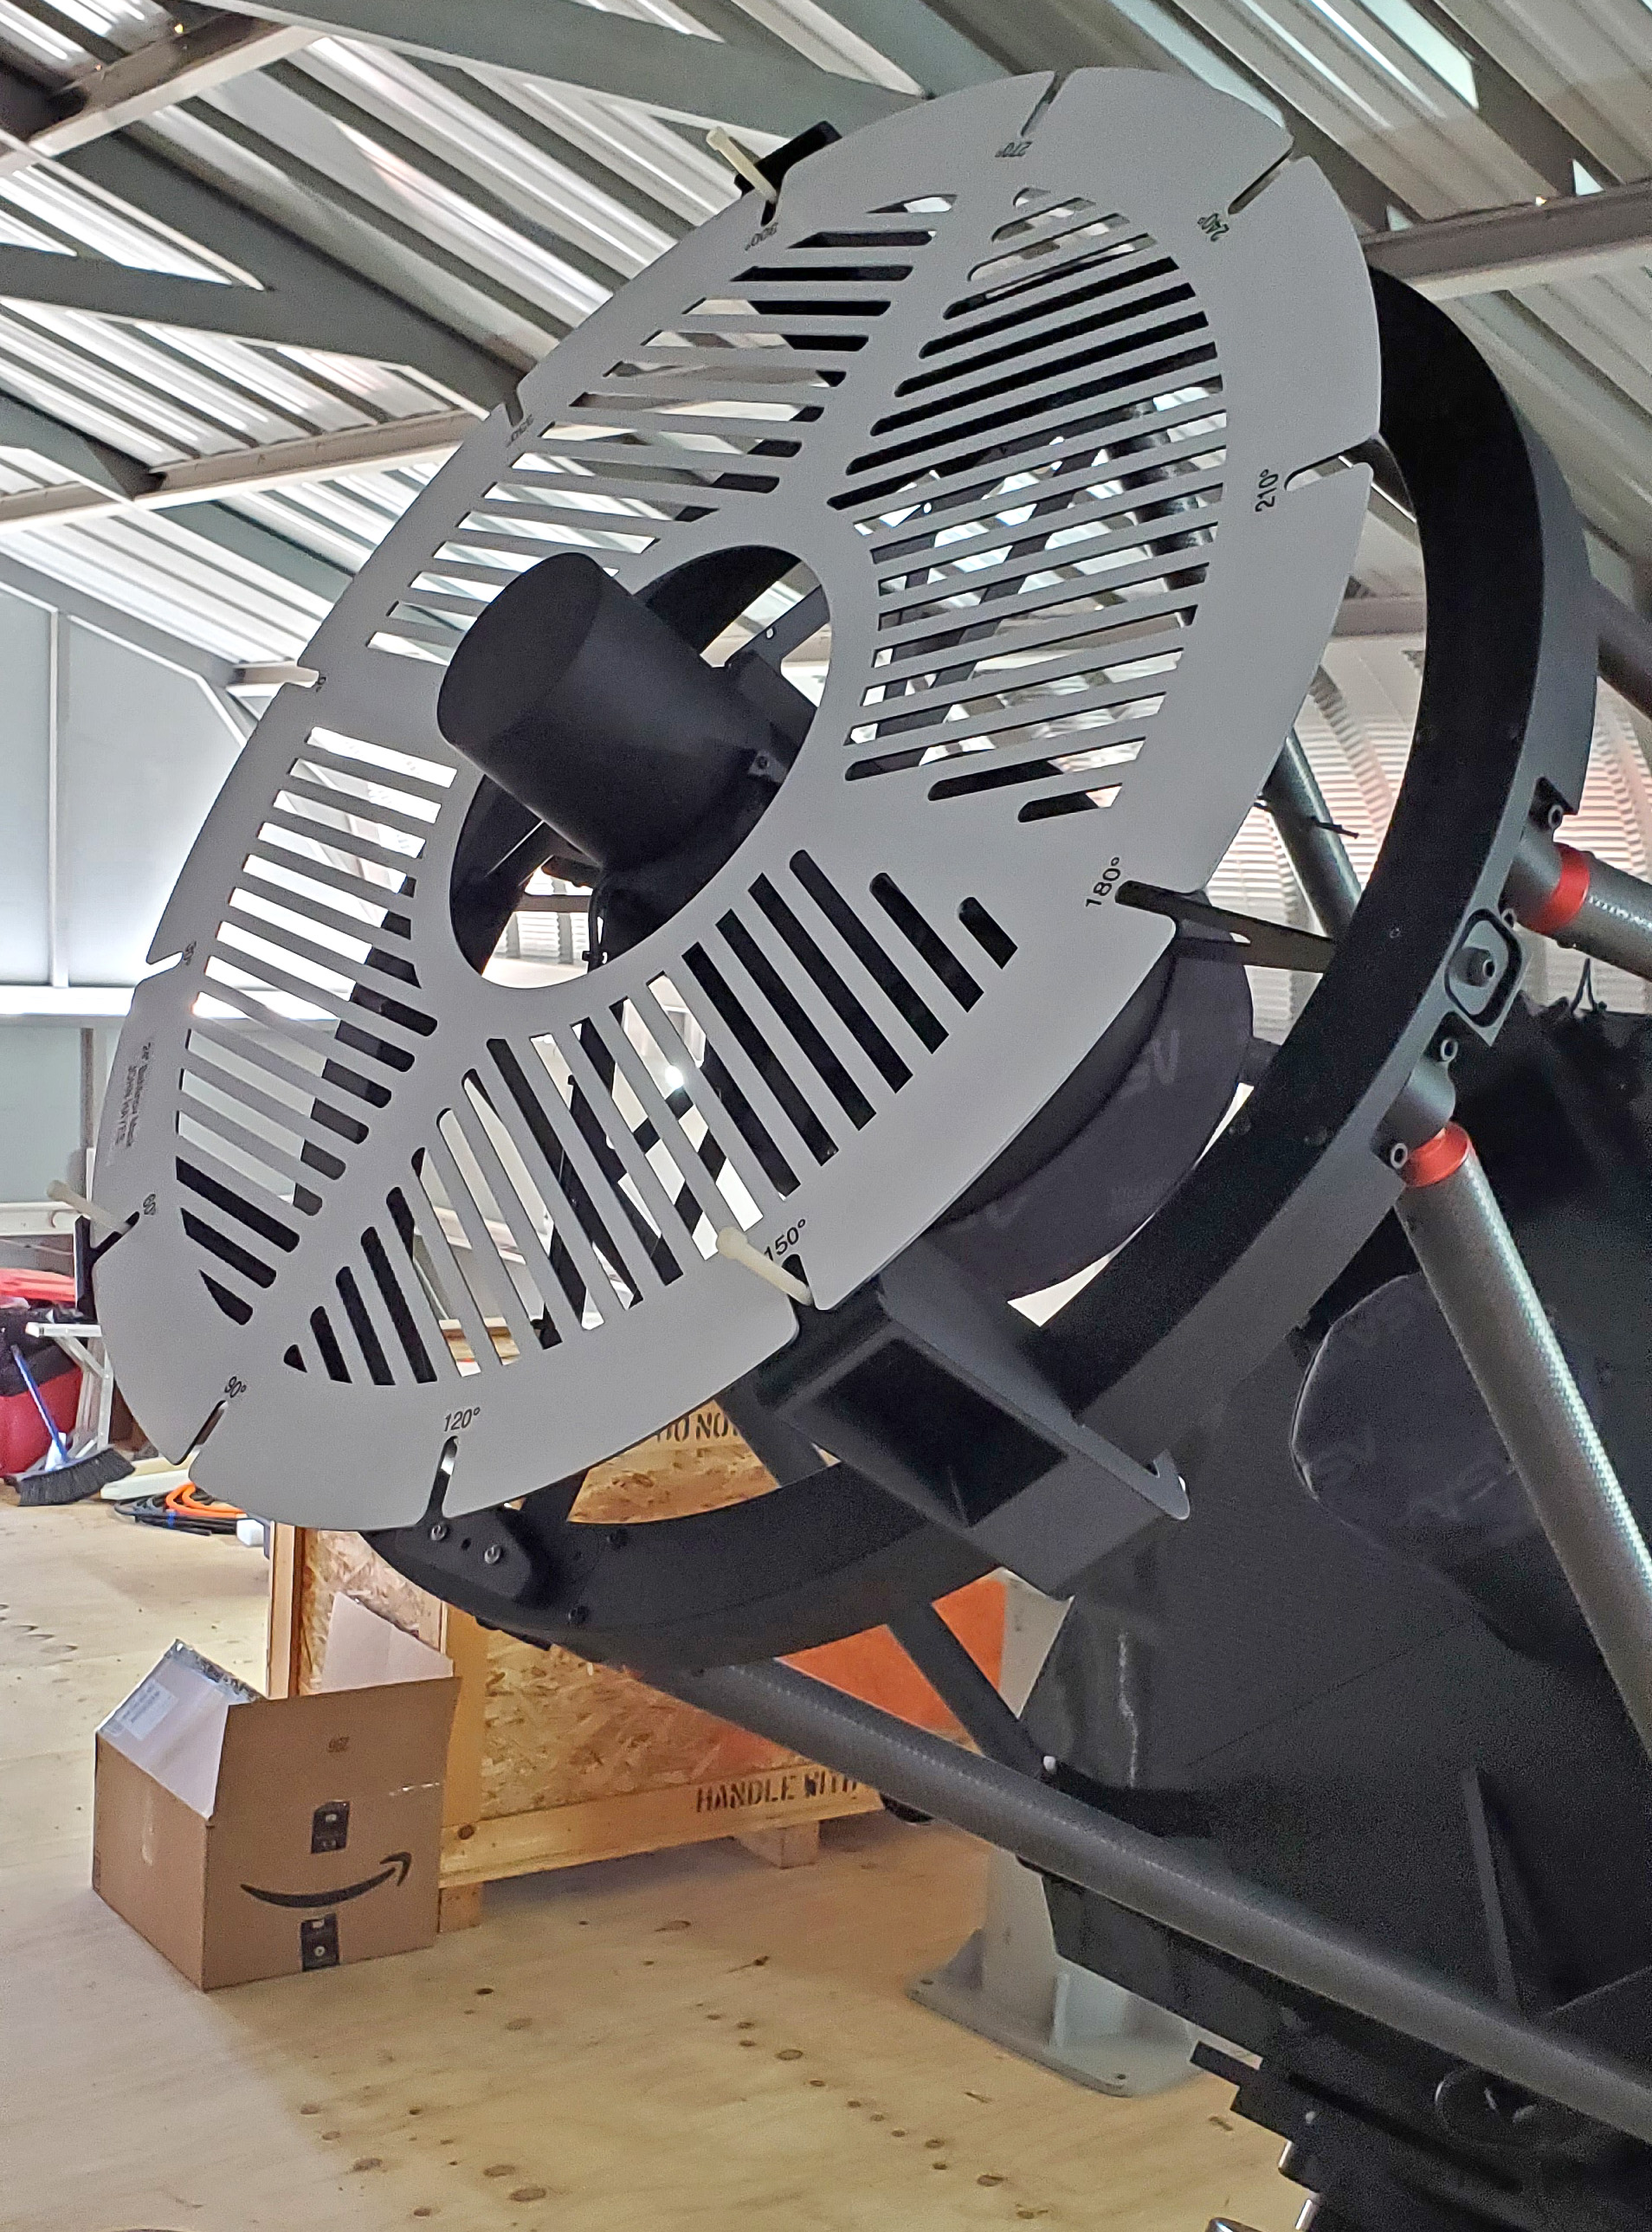
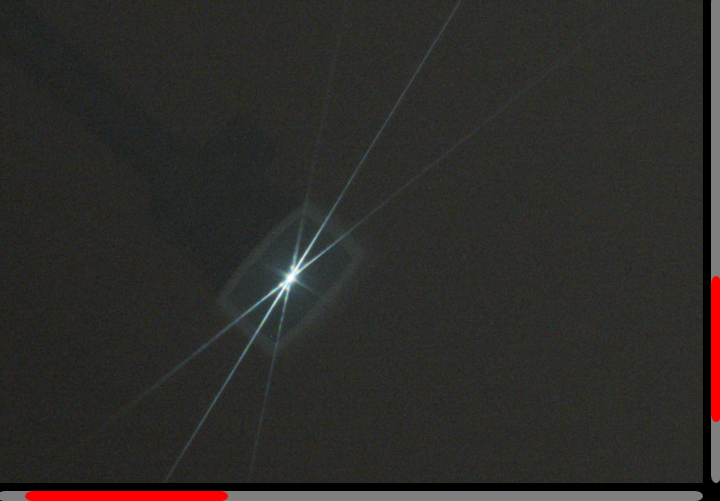
I put my 24" on an open cluster and used a B-mask to dial out the sensor tilt in my system. I didn't need any software and it turned out to be pretty easy. I did it using shims but it would be way easier with an adjustable tilt plate like and Octopus.  The mage below shows that it's not quite perfect. I later dialed it out more carefully but I don't have that data with me at the moment. Still, this illustrates the idea. 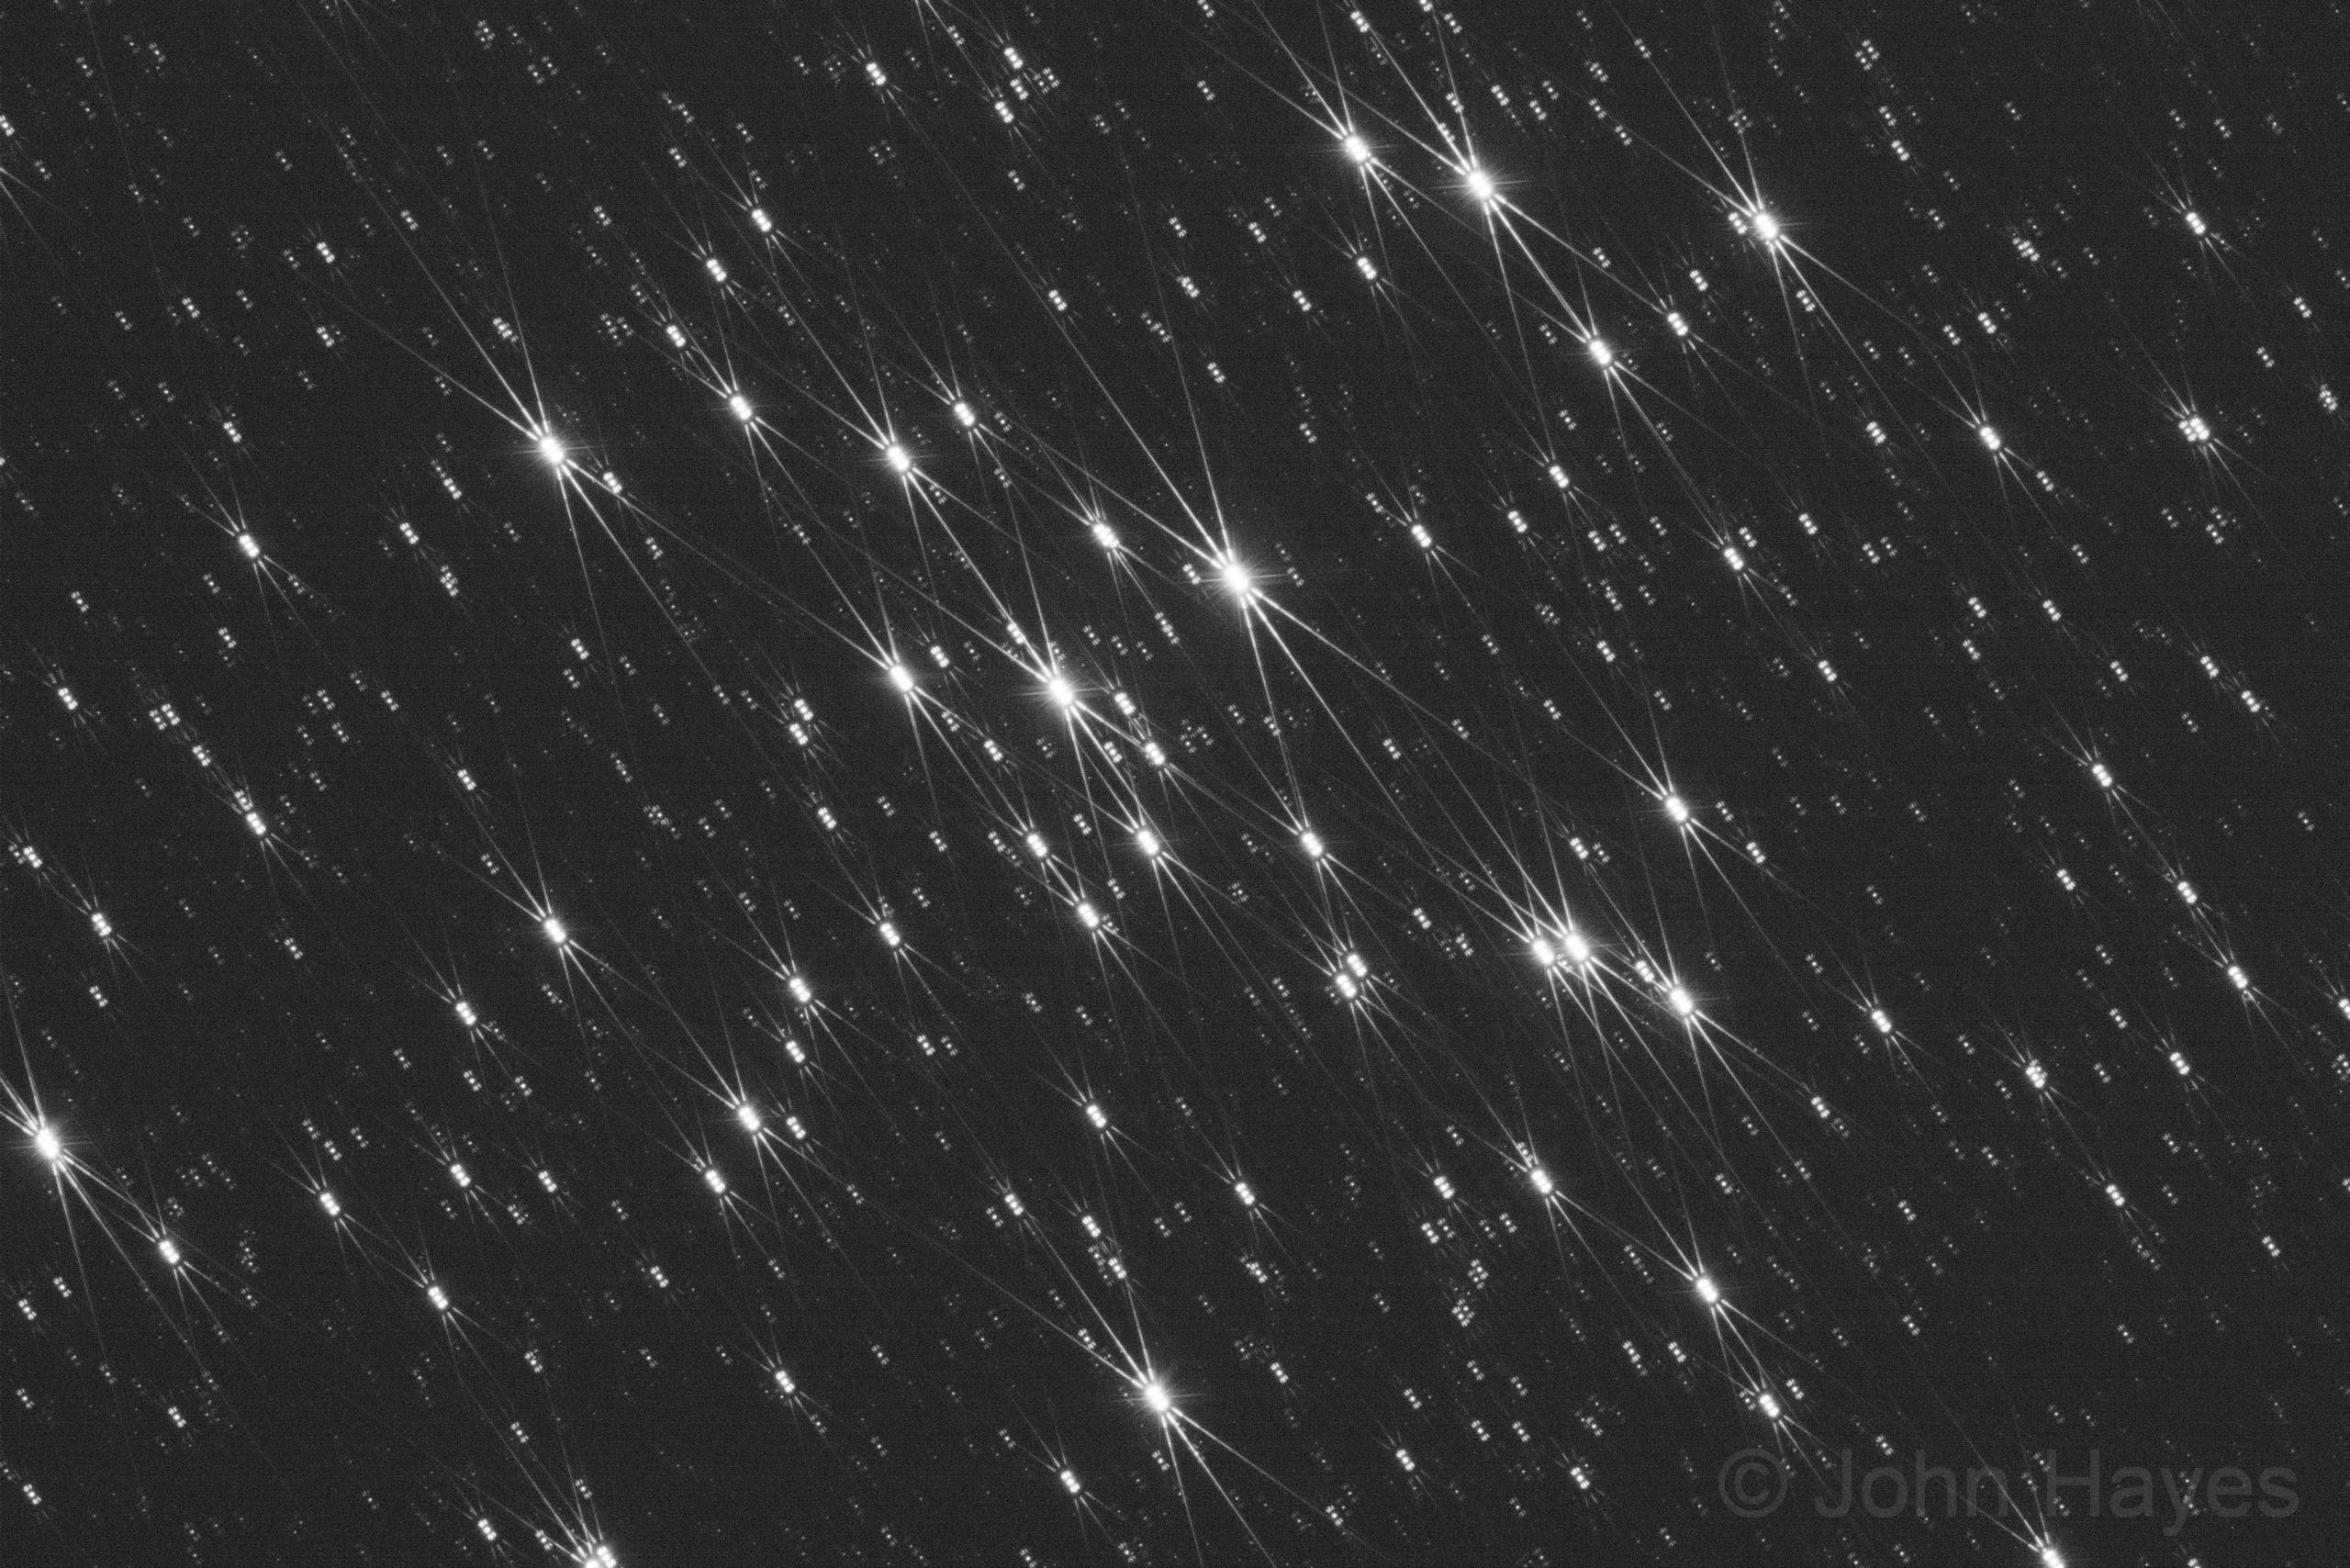 John
|
You cannot like this item. Reason: "ANONYMOUS".
You cannot remove your like from this item.
Editing a post is only allowed within 24 hours after creating it.
You cannot Like this post because the topic is closed.
Copy the URL below to share a direct link to this post.
This post cannot be edited using the classic forums editor.
To edit this post, please enable the "New forums experience" in your settings.
Kyle Goodwin:
I use 6 seconds normally on my CDK and it works well (for normal autofocusing) with HocusFocus. The CFZ is pretty large at f/8. Yeah, id love a cdk. Those scopes have such a large flat field. with my refracters the corrected field barely fits a full frame chip, so you get field curvature compounding with tilt despite having a similar cfz. (I'm at f7). At f5 with my 110 or f3.3 with the epsilon i used to use it was much more tedious. I definitely agree that it's not one size fits all approach for all systems and my advice is more of a general best practice that works for most systems.
|
You cannot like this item. Reason: "ANONYMOUS".
You cannot remove your like from this item.
Editing a post is only allowed within 24 hours after creating it.
You cannot Like this post because the topic is closed.
Copy the URL below to share a direct link to this post.
This post cannot be edited using the classic forums editor.
To edit this post, please enable the "New forums experience" in your settings.
John Hayes:
The mage below shows that it's not quite perfect. I later dialed it out more carefully but I don't have that data with me at the moment. Still, this illustrates the idea. John, could you describe how to interpret your image for tilt and how to know when it's fixed?
|
You cannot like this item. Reason: "ANONYMOUS".
You cannot remove your like from this item.
Editing a post is only allowed within 24 hours after creating it.
You cannot Like this post because the topic is closed.
Copy the URL below to share a direct link to this post.
This post cannot be edited using the classic forums editor.
To edit this post, please enable the "New forums experience" in your settings.
John Stone:
John Hayes:
The mage below shows that it's not quite perfect. I later dialed it out more carefully but I don't have that data with me at the moment. Still, this illustrates the idea.
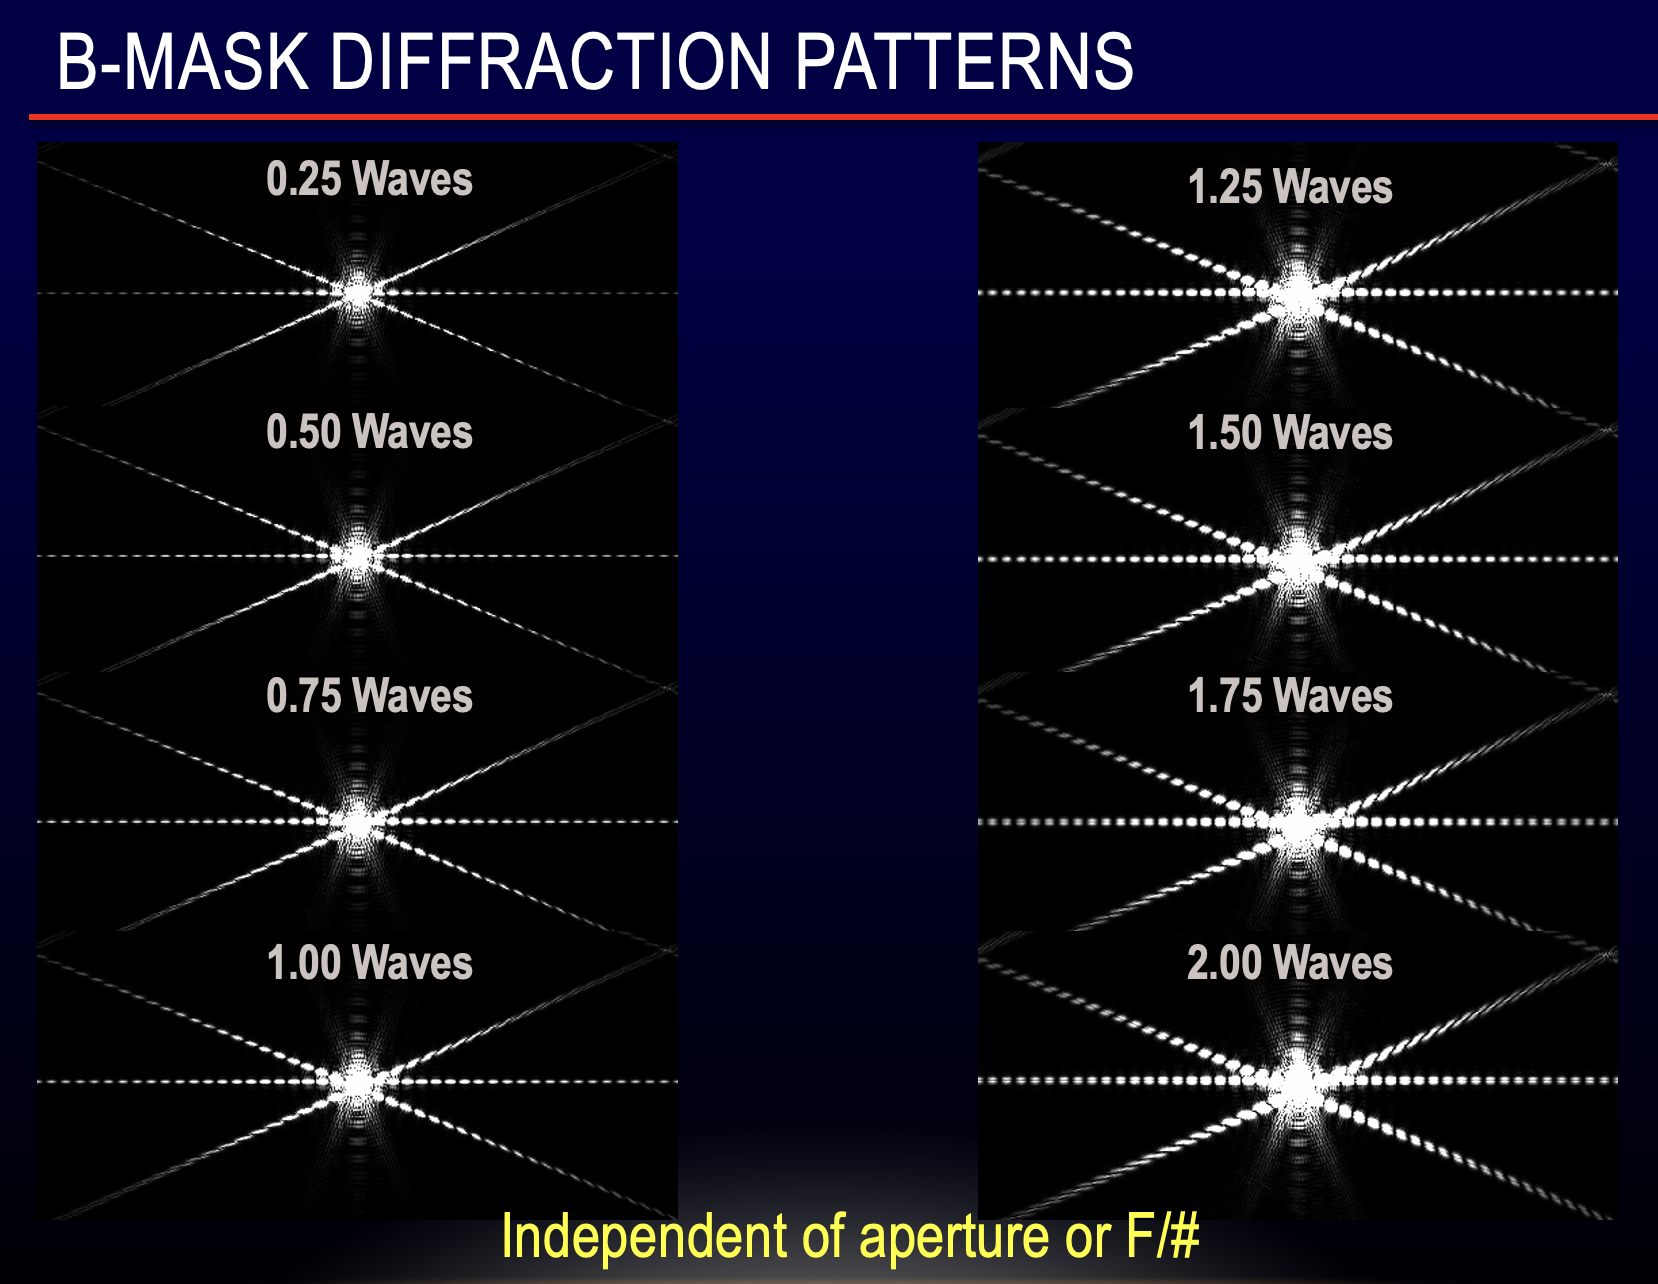
John, could you describe how to interpret your image for tilt and how to know when it's fixed? A star is in perfect focus when the B-mask pattern is perfectly centered. The diagram below shows the pattern for various stages of defocus. All you have to do is adjust the tilt to zero out the defocus over the entire image. If you look carefully at the patterns in the lower right side of the the image that I posted, you can see that the stars are slightly defocused, which indicates a bit of residual tilt. The trick is that you have to know which screw to turn to affect that corner but that's not that hard to figure out with just a little experimenting. You also have to figure out which way to turn the screw, but again that's easy in real time. If you are careful, it doesn't take long to dial out the tilt so that all of the stars across the image are in perfect focus. It's also a good idea before you finish up to rotate the mask just to confirm that everything looks the same. A B-mask can be fooled by astigmatism so rotating the mask confirms that you don't have any astigmatic errors. John  |
You cannot like this item. Reason: "ANONYMOUS".
You cannot remove your like from this item.
Editing a post is only allowed within 24 hours after creating it.
You cannot Like this post because the topic is closed.
Copy the URL below to share a direct link to this post.
This post cannot be edited using the classic forums editor.
To edit this post, please enable the "New forums experience" in your settings.
I used @John Hayes ’s method to diagnose a problematic Tak FCT-65D that I have. Since we’ve had weeks straight of cloudy skies I set up an artificial star indoors and used a Photon Cage to try to adjust tilt. Since the focal length of this tak with the 0.65x reducer is very short it worked well indoors. The corners of this reducer have been giving me a lot of problems. I suspected the issue was inherent to the reducer but wanted to confirm it was not just sensor tilt. With pretty simple adjustments I was able to get the Bahtinov pattern in the lower left corner to be in focus.  The issue in this corner remained after removing the mask, confirming it is not simply from tilt:  The indoor method is a bit tedious in that you have to slew back and forth between the center and the corner you want to adjust, focusing the center and then making the tilt adjustment in the offending corner. But, if you don’t want to waste time under clear skies it can maybe be useful. I do want to try the Bahtinov method under an actual star field to see how it compares to Hocus Focus. I think it may actually be faster and simpler. Unfortunately this scope has far bigger problems so I’m not sure tilt adjustment is going to get me far anyway.
|
You cannot like this item. Reason: "ANONYMOUS".
You cannot remove your like from this item.
Editing a post is only allowed within 24 hours after creating it.
You cannot Like this post because the topic is closed.
Copy the URL below to share a direct link to this post.
This post cannot be edited using the classic forums editor.
To edit this post, please enable the "New forums experience" in your settings.