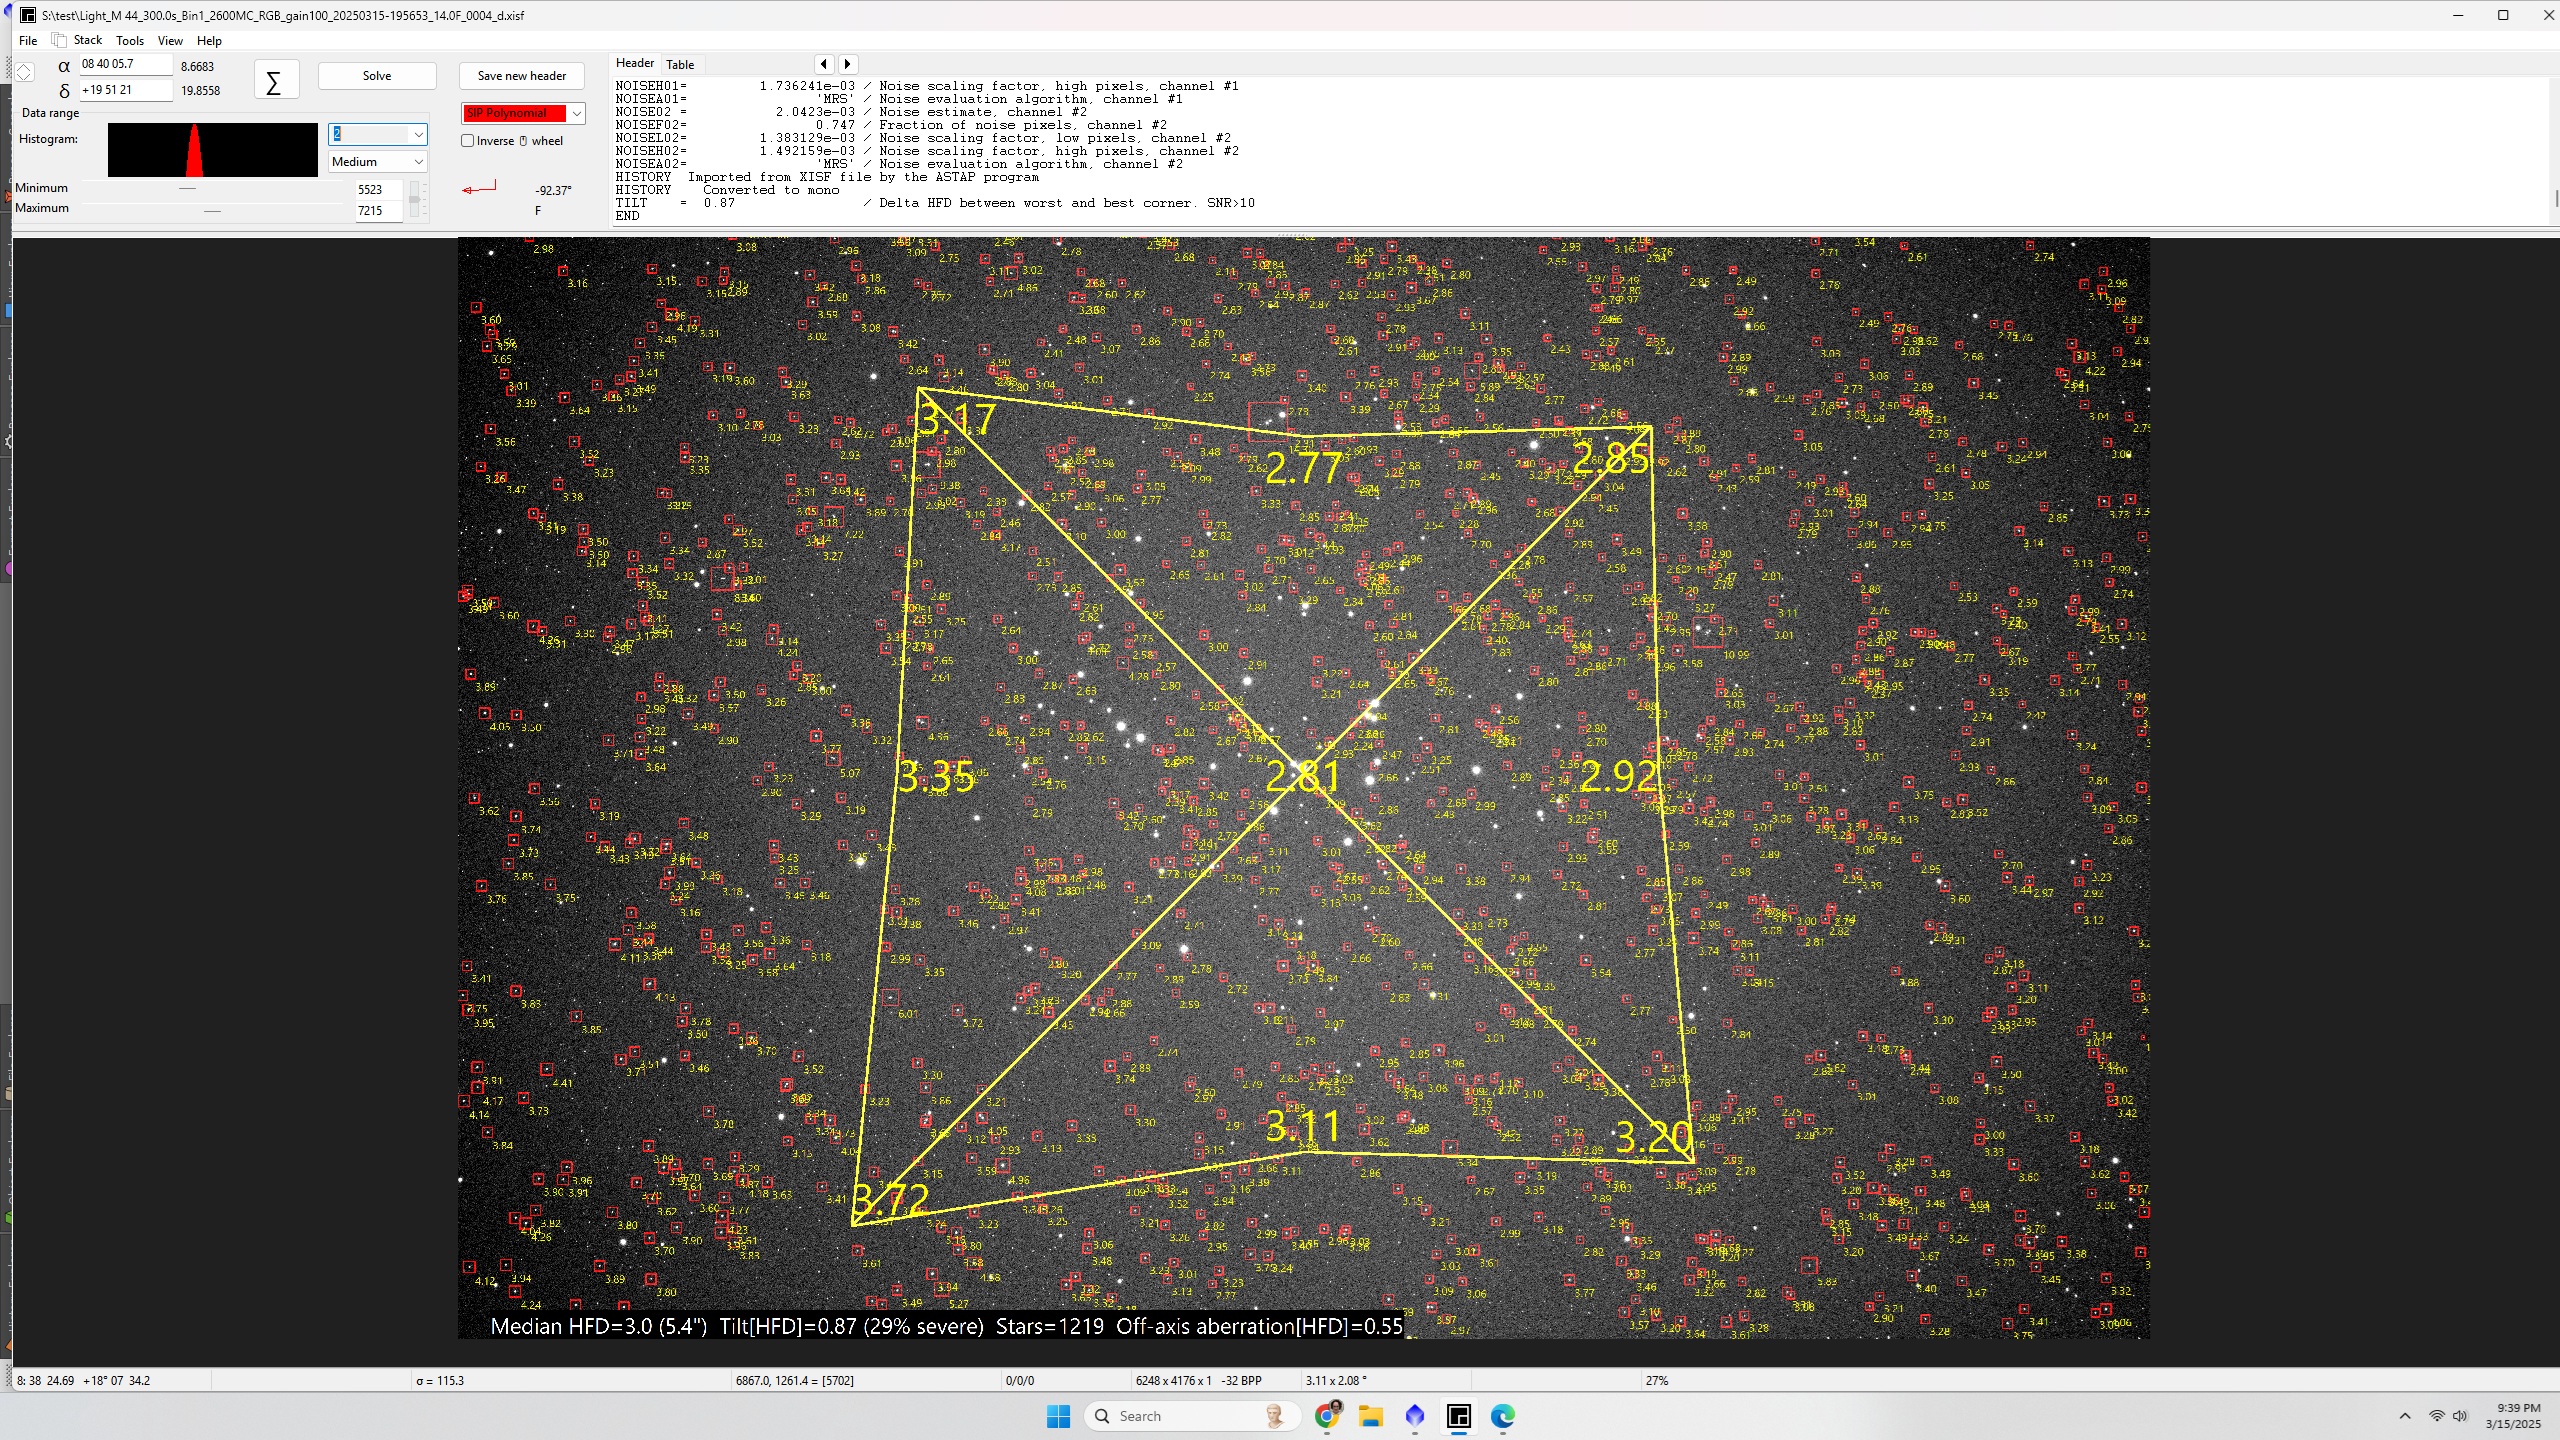
I have sensor tilt and trying to get rid of it. I am really unsure of how to physically adjust my camera (ASI2600MC) to fix it. The good news I think is tilt is right where the adjuster bolt is. I have taken 5 images of M44 and shared a picture of what my tilt looks like. All 5 photos when analyzed all basically say the same thing. It looks like my lower left screw needs to be adjusted as I believe the sensor is too close? So my questions are, what way does the sensor need to be adjusted? Is it too close or too far? How do I physically adjust that screw? Does it just screw in or do I need to loosen the tilt adjuster to camera housing bolts and then adjust or how does that work? Any help is greatly appreciated 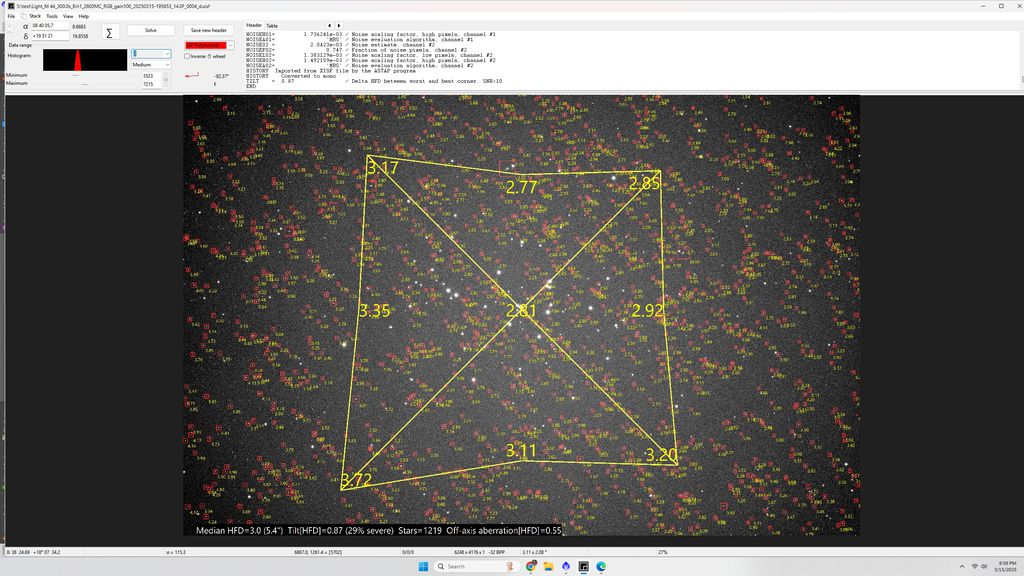 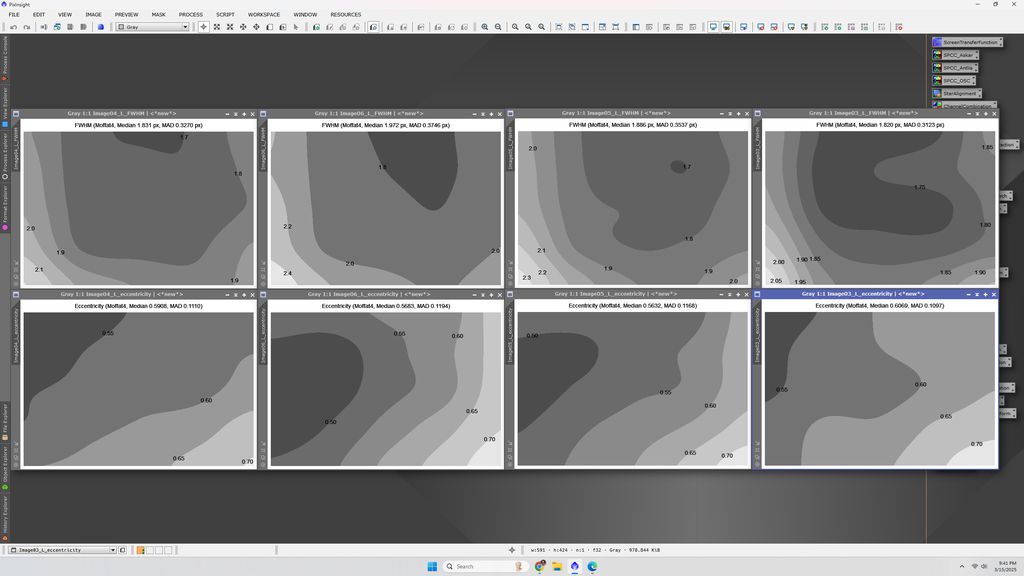 |
You cannot like this item. Reason: "ANONYMOUS".
You cannot remove your like from this item.
Editing a post is only allowed within 24 hours after creating it.
You cannot Like this post because the topic is closed.
Copy the URL below to share a direct link to this post.
This post cannot be edited using the classic forums editor.
To edit this post, please enable the "New forums experience" in your settings.
My 2600mc had bad tilt. The upper left corner had stars out of focus passing the focal point and the lower right corner had stars out of focus before focal point while the center of the image was in focus. So I built something very similar to what is in this link and it took only 20 min. to fix the tilt. Now I have round stars from corner to corner in my RASA 8. In my case, I just screwed a guiding ring to a board and then I put the RC focuser on that. You can just buy a PVC fitting also and attach that. You shine a laser, like your regular collimation laser to the sensor of the camera and mark the reflecting dot away from laser while your rotate the camera, once you form a circle, then move the dot to the center of the circle using the tilt plate, most of the time is only one screw you need to adjust https://www.macobservatory.com/blog/2021/11/28/how-to-remove-sensor-tilt-from-your-astrophotography-camera-while-indoors |
You cannot like this item. Reason: "ANONYMOUS".
You cannot remove your like from this item.
Editing a post is only allowed within 24 hours after creating it.
You cannot Like this post because the topic is closed.
Copy the URL below to share a direct link to this post.
This post cannot be edited using the classic forums editor.
To edit this post, please enable the "New forums experience" in your settings.
AstroShed (StewartWilliam)
Looks like you need one of these, and quick..👍🏻
https://youtu.be/iyH7vsAqcDA?si=Ovhelyh9OJwAY22A This is awesome! Ordered
|
You cannot like this item. Reason: "ANONYMOUS".
You cannot remove your like from this item.
Editing a post is only allowed within 24 hours after creating it.
You cannot Like this post because the topic is closed.
Copy the URL below to share a direct link to this post.
This post cannot be edited using the classic forums editor.
To edit this post, please enable the "New forums experience" in your settings.
Rodrigo Roesch:
My 2600mc had bad tilt. The upper left corner had stars out of focus passing the focal point and the lower right corner had stars out of focus before focal point while the center of the image was in focus. So I built something very similar to what is in this link and it took only 20 min. to fix the tilt. Now I have round stars from corner to corner in my RASA 8. In my case, I just screwed a guiding ring to a board and then I put the RC focuser on that. You can just buy a PVC fitting also and attach that. You shine a laser, like your regular collimation laser to the sensor of the camera and mark the reflecting dot away from laser while your rotate the camera, once you form a circle, then move the dot to the center of the circle using the tilt plate, most of the time is only one screw you need to adjust
https://www.macobservatory.com/blog/2021/11/28/how-to-remove-sensor-tilt-from-your-astrophotography-camera-while-indoors That's a really great approach as it limits the work to the camera. With the long imaging trains we have today it may not completely solve the problem but at least you can eliminate one of the variables. I would hold off on buying anything fancy until you know exactly where the issues are.
|
You cannot like this item. Reason: "ANONYMOUS".
You cannot remove your like from this item.
Editing a post is only allowed within 24 hours after creating it.
You cannot Like this post because the topic is closed.
Copy the URL below to share a direct link to this post.
This post cannot be edited using the classic forums editor.
To edit this post, please enable the "New forums experience" in your settings.
Thomas Rider:
AstroShed (StewartWilliam)
Looks like you need one of these, and quick..👍🏻
https://youtu.be/iyH7vsAqcDA?si=Ovhelyh9OJwAY22A
This is awesome! Ordered Yes, it’s an excellent tool, and takes all the hard work out of tilt, especially when trying to fix out in the dark and cold.. I built my own version of this a couple of years ago and it worked well, but this tool is on another level, and sooooooo much easier..
|
You cannot like this item. Reason: "ANONYMOUS".
You cannot remove your like from this item.
Editing a post is only allowed within 24 hours after creating it.
You cannot Like this post because the topic is closed.
Copy the URL below to share a direct link to this post.
This post cannot be edited using the classic forums editor.
To edit this post, please enable the "New forums experience" in your settings.
Hi Oscar, I am Erik from Astroprecision the European company that delivers the TiltAdjuster. Yes we had problems with delivery, we got to much orders on just a few days but we are now on track. We will delver what is ordered yesterday this week. That is for an M54 extension. We delivers now instruments for M48, M54 and M68. We have also desinged a holder that makes adjustment from the "end" side of the camera easier. We will update our website with holder as a product later this week.
|
You cannot like this item. Reason: "ANONYMOUS".
You cannot remove your like from this item.
Editing a post is only allowed within 24 hours after creating it.
You cannot Like this post because the topic is closed.
Copy the URL below to share a direct link to this post.
This post cannot be edited using the classic forums editor.
To edit this post, please enable the "New forums experience" in your settings.
Erik Guneriussen:
Hi Oscar, I am Erik from Astroprecision the European company that delivers the TiltAdjuster. Yes we had problems with delivery, we got to much orders on just a few days but we are now on track. We will delver what is ordered yesterday this week. That is for an M54 extension. We delivers now instruments for M48, M54 and M68. We have also desinged a holder that makes adjustment from the "end" side of the camera easier. We will update our website with holder as a product later this week. Thank you. I'll likely have to save up and buy the product.
|
You cannot like this item. Reason: "ANONYMOUS".
You cannot remove your like from this item.
Editing a post is only allowed within 24 hours after creating it.
You cannot Like this post because the topic is closed.
Copy the URL below to share a direct link to this post.
This post cannot be edited using the classic forums editor.
To edit this post, please enable the "New forums experience" in your settings.
AstroShed:
Thomas Rider:
AstroShed (StewartWilliam)
Looks like you need one of these, and quick..👍🏻
https://youtu.be/iyH7vsAqcDA?si=Ovhelyh9OJwAY22A
This is awesome! Ordered
Yes, it’s an excellent tool, and takes all the hard work out of tilt, especially when trying to fix out in the dark and cold..
I built my own version of this a couple of years ago and it worked well, but this tool is on another level, and sooooooo much easier.. Order came in and messed with my tilt. The tool and program is extremely easy to use and found my camera had really bad tilt and was able to get it nearly perfect fairly easy. Took me a like an hour or two as I never adjusted tilt before in my life and it was a lot of trial and error. I cannot imagine trying to do that outside by taking images and guessing from there.
|
You cannot like this item. Reason: "ANONYMOUS".
You cannot remove your like from this item.
Editing a post is only allowed within 24 hours after creating it.
You cannot Like this post because the topic is closed.
Copy the URL below to share a direct link to this post.
This post cannot be edited using the classic forums editor.
To edit this post, please enable the "New forums experience" in your settings.
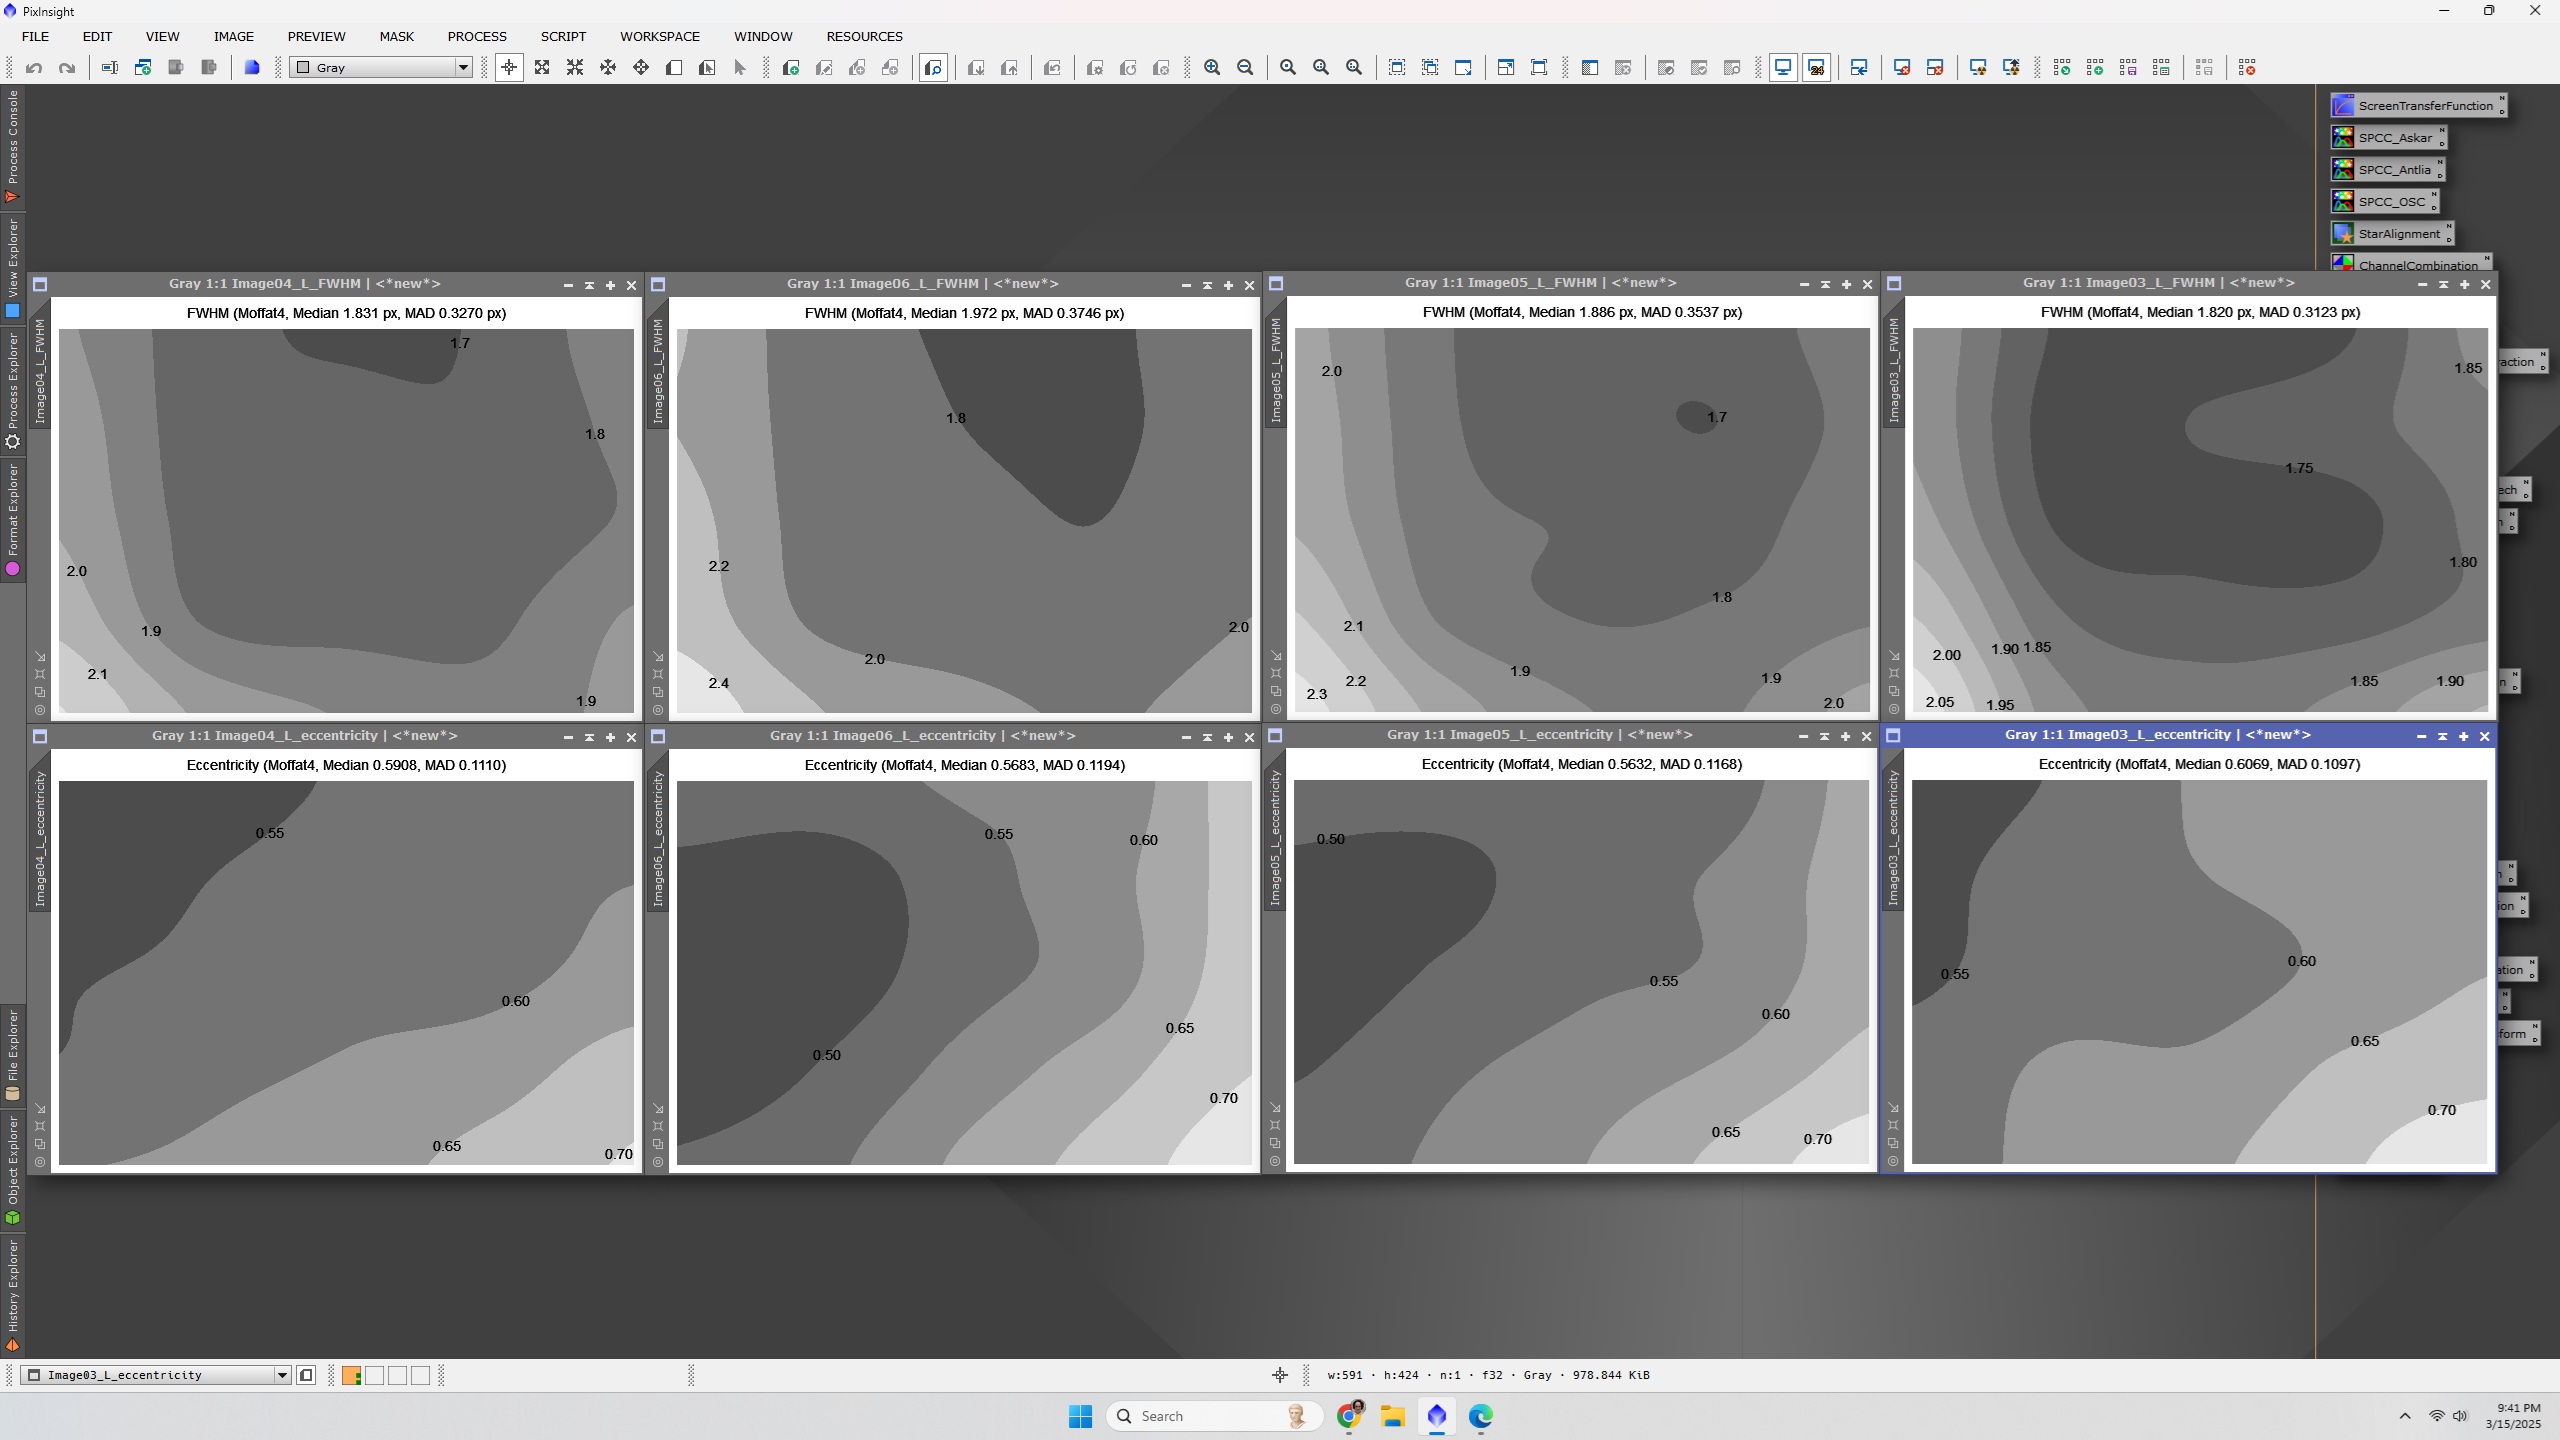
Any optical system can have tilt. But, in my experience, it's critical to manage it in fast systems like RASA. For my Rasa 8, I bought the Octopi hoping to resolve a bad case of tilt with the asi2600. Initially, I was playing with the screws, trying to improve the star's shape, with mixed results. I was not happy with my images.
NINA Hocus Focus plugin gave me a methodological approach and delivered better and faster results.
|
You cannot like this item. Reason: "ANONYMOUS".
You cannot remove your like from this item.
Editing a post is only allowed within 24 hours after creating it.
You cannot Like this post because the topic is closed.
Copy the URL below to share a direct link to this post.
This post cannot be edited using the classic forums editor.
To edit this post, please enable the "New forums experience" in your settings.
Nicolas Molina:
Any optical system can have tilt. But, in my experience, it's critical to manage it in fast systems like RASA. For my Rasa 8, I bought the Octopi hoping to resolve a bad case of tilt with the asi2600. Initially, I was playing with the screws, trying to improve the star's shape, with mixed results. I was not happy with my images.
NINA Hocus Focus plugin gave me a methodological approach and delivered better and faster results. With my redcat 71 I saw lots of chromatic aberrations as well as star shapes in corners were pretty bad. I saw the tilt but with BlurXterminator it would fix it to ok levels. With my new FLT91 with Ultraflat 91 field flattener it makes the optics vastly better corrected than my Redcat could ever hope to be. While chromatic aberrations are much better they are still there as are the terrible star shapes. With the tilt tool listed above I found indeed my camera had severe tilt. While the focuser may have tilt, I trust the camera does not. I just want to make sure my camera is as good as it can be so I can just process the focuser tilt problems out instead of focuser with obviously bad camera tilt
|
You cannot like this item. Reason: "ANONYMOUS".
You cannot remove your like from this item.
Editing a post is only allowed within 24 hours after creating it.
You cannot Like this post because the topic is closed.
Copy the URL below to share a direct link to this post.
This post cannot be edited using the classic forums editor.
To edit this post, please enable the "New forums experience" in your settings.
I recommend you to use NINA Hocus Focus. It's easy to understand what you have to adjust and it's free.
|
You cannot like this item. Reason: "ANONYMOUS".
You cannot remove your like from this item.
Editing a post is only allowed within 24 hours after creating it.
You cannot Like this post because the topic is closed.
Copy the URL below to share a direct link to this post.
This post cannot be edited using the classic forums editor.
To edit this post, please enable the "New forums experience" in your settings.
Thomas Rider:
Nicolas Molina:
Any optical system can have tilt. But, in my experience, it's critical to manage it in fast systems like RASA. For my Rasa 8, I bought the Octopi hoping to resolve a bad case of tilt with the asi2600. Initially, I was playing with the screws, trying to improve the star's shape, with mixed results. I was not happy with my images.
NINA Hocus Focus plugin gave me a methodological approach and delivered better and faster results.
With my redcat 71 I saw lots of chromatic aberrations as well as star shapes in corners were pretty bad. I saw the tilt but with BlurXterminator it would fix it to ok levels. With my new FLT91 with Ultraflat 91 field flattener it makes the optics vastly better corrected than my Redcat could ever hope to be. While chromatic aberrations are much better they are still there as are the terrible star shapes. With the tilt tool listed above I found indeed my camera had severe tilt. While the focuser may have tilt, I trust the camera does not. I just want to make sure my camera is as good as it can be so I can just process the focuser tilt problems out instead of focuser with obviously bad camera tilt This sounds like a great approach. The benefit of the AstroPrecision tool is that you address tilt in the camera separate from tilt in the system (focuser, spacers, adapters, etc). Tilt in the rest of the system is often changing through the night, depending on position of the scope, before/after meridian flip, etc. It never hurts to try to eliminate it all, but BlurXTerminator is so powerful these days, chasing the last bit of tilt may not be worth the effort for many. This is the first time I heard from the tool, but it looks great. I did the manual approach a while back using the old-fashioned way with a laser pointer. As long as you leave the CTU on the camera you never have to adjust anymore.
|
You cannot like this item. Reason: "ANONYMOUS".
You cannot remove your like from this item.
Editing a post is only allowed within 24 hours after creating it.
You cannot Like this post because the topic is closed.
Copy the URL below to share a direct link to this post.
This post cannot be edited using the classic forums editor.
To edit this post, please enable the "New forums experience" in your settings.
Thomas Rider:
AstroShed:
Thomas Rider:
AstroShed (StewartWilliam)
Looks like you need one of these, and quick..👍🏻
https://youtu.be/iyH7vsAqcDA?si=Ovhelyh9OJwAY22A
This is awesome! Ordered
Yes, it’s an excellent tool, and takes all the hard work out of tilt, especially when trying to fix out in the dark and cold..
I built my own version of this a couple of years ago and it worked well, but this tool is on another level, and sooooooo much easier..
Order came in and messed with my tilt. The tool and program is extremely easy to use and found my camera had really bad tilt and was able to get it nearly perfect fairly easy. Took me a like an hour or two as I never adjusted tilt before in my life and it was a lot of trial and error. I cannot imagine trying to do that outside by taking images and guessing from there. Glad you got it sorted, but why did it take so long with the tool, 2 hours, that is a long time when it can be done in a few mins ?
|
You cannot like this item. Reason: "ANONYMOUS".
You cannot remove your like from this item.
Editing a post is only allowed within 24 hours after creating it.
You cannot Like this post because the topic is closed.
Copy the URL below to share a direct link to this post.
This post cannot be edited using the classic forums editor.
To edit this post, please enable the "New forums experience" in your settings.
AstroShed:
Thomas Rider:
AstroShed:
Thomas Rider:
AstroShed (StewartWilliam)
Looks like you need one of these, and quick..👍🏻
https://youtu.be/iyH7vsAqcDA?si=Ovhelyh9OJwAY22A
This is awesome! Ordered
Yes, it’s an excellent tool, and takes all the hard work out of tilt, especially when trying to fix out in the dark and cold..
I built my own version of this a couple of years ago and it worked well, but this tool is on another level, and sooooooo much easier..
Order came in and messed with my tilt. The tool and program is extremely easy to use and found my camera had really bad tilt and was able to get it nearly perfect fairly easy. Took me a like an hour or two as I never adjusted tilt before in my life and it was a lot of trial and error. I cannot imagine trying to do that outside by taking images and guessing from there.
Glad you got it sorted, but why did it take so long with the tool, 2 hours, that is a long time when it can be done in a few mins ? So originally spent some time but the software was not working and spent a few hours with nothing to show for it. Emailed Erik and he released an updated version that fixed the issue I had the next day. I found with my sensor had so much tilt at certain spots the red laser would barely be visible. Because of this I would lose the adjustment crosshair mid tilt adjustment. I exited the procedure and turned the exposure time all the way up and it worked ok after that. I also found that the software would read different depending on how I rotated the unit on the camera. I found I could take measurements and it would get a different reading every time. So I found if I firmly pushed the unit towards my camera as I rotate, let it sit for like 5 seconds then take a reading I could get very close results to previous reading. When I was done I checked the numbers 3 times and my Critical focus zone actually would be about 2-3 microns below the theoretical. Same with new critical focus zone. However depending on how I rotated it, it would be anywhere from 2 microns different to 15-18 different. It fit great on my M54 adapter so not sure what the story is, but took a while to work though the issues. I kept adjusting because I would be at like 10 microns away and do a adjustment and then be like 18 microns away. Once I learned to firmly pushed towards camera during rotation it was super consistent. It was one step forward two steps back until I found how to rotate. Now when I am at the main screen after hooking up the adapter and I rotate the adjuster in a 360 the red dot barely moves at all showing my sensor is tilt free. Before it made a huge circle. I have unit number 84 I believe. I feel the customers are a bit of the beta testers for it but honestly they were super responsive to my problems and questions and now that I know how to make it work (maybe just in my case) I could adjust tilt on any camera in a matter of minutes I am sure
|
You cannot like this item. Reason: "ANONYMOUS".
You cannot remove your like from this item.
Editing a post is only allowed within 24 hours after creating it.
You cannot Like this post because the topic is closed.
Copy the URL below to share a direct link to this post.
This post cannot be edited using the classic forums editor.
To edit this post, please enable the "New forums experience" in your settings.
Thomas Rider:
AstroShed:
Thomas Rider:
AstroShed:
Thomas Rider:
AstroShed (StewartWilliam)
Looks like you need one of these, and quick..👍🏻
https://youtu.be/iyH7vsAqcDA?si=Ovhelyh9OJwAY22A
This is awesome! Ordered
Yes, it’s an excellent tool, and takes all the hard work out of tilt, especially when trying to fix out in the dark and cold..
I built my own version of this a couple of years ago and it worked well, but this tool is on another level, and sooooooo much easier..
Order came in and messed with my tilt. The tool and program is extremely easy to use and found my camera had really bad tilt and was able to get it nearly perfect fairly easy. Took me a like an hour or two as I never adjusted tilt before in my life and it was a lot of trial and error. I cannot imagine trying to do that outside by taking images and guessing from there.
Glad you got it sorted, but why did it take so long with the tool, 2 hours, that is a long time when it can be done in a few mins ?
So originally spent some time but the software was not working and spent a few hours with nothing to show for it. Emailed Erik and he released an updated version that fixed the issue I had the next day. I found with my sensor had so much tilt at certain spots the red laser would barely be visible. Because of this I would lose the adjustment crosshair mid tilt adjustment. I exited the procedure and turned the exposure time all the way up and it worked ok after that.
I also found that the software would read different depending on how I rotated the unit on the camera. I found I could take measurements and it would get a different reading every time. So I found if I firmly pushed the unit towards my camera as I rotate, let it sit for like 5 seconds then take a reading I could get very close results to previous reading. When I was done I checked the numbers 3 times and my Critical focus zone actually would be about 2-3 microns below the theoretical. Same with new critical focus zone. However depending on how I rotated it, it would be anywhere from 2 microns different to 15-18 different. It fit great on my M54 adapter so not sure what the story is, but took a while to work though the issues. I kept adjusting because I would be at like 10 microns away and do a adjustment and then be like 18 microns away. Once I learned to firmly pushed towards camera during rotation it was super consistent. It was one step forward two steps back until I found how to rotate.
Now when I am at the main screen after hooking up the adapter and I rotate the adjuster in a 360 the red dot barely moves at all showing my sensor is tilt free. Before it made a huge circle.
I have unit number 84 I believe. I feel the customers are a bit of the beta testers for it but honestly they were super responsive to my problems and questions and now that I know how to make it work (maybe just in my case) I could adjust tilt on any camera in a matter of minutes I am sure This really makes me wonder why the camera manufactures don't do this as a matter of course? It could be a big advertising bullet point "sensor tilt < x microns".
|
You cannot like this item. Reason: "ANONYMOUS".
You cannot remove your like from this item.
Editing a post is only allowed within 24 hours after creating it.
You cannot Like this post because the topic is closed.
Copy the URL below to share a direct link to this post.
This post cannot be edited using the classic forums editor.
To edit this post, please enable the "New forums experience" in your settings.
Tony Gondola:
Thomas Rider:
AstroShed:
Thomas Rider:
AstroShed:
Thomas Rider:
AstroShed (StewartWilliam)
Looks like you need one of these, and quick..👍🏻
https://youtu.be/iyH7vsAqcDA?si=Ovhelyh9OJwAY22A
This is awesome! Ordered
Yes, it’s an excellent tool, and takes all the hard work out of tilt, especially when trying to fix out in the dark and cold..
I built my own version of this a couple of years ago and it worked well, but this tool is on another level, and sooooooo much easier..
Order came in and messed with my tilt. The tool and program is extremely easy to use and found my camera had really bad tilt and was able to get it nearly perfect fairly easy. Took me a like an hour or two as I never adjusted tilt before in my life and it was a lot of trial and error. I cannot imagine trying to do that outside by taking images and guessing from there.
Glad you got it sorted, but why did it take so long with the tool, 2 hours, that is a long time when it can be done in a few mins ?
So originally spent some time but the software was not working and spent a few hours with nothing to show for it. Emailed Erik and he released an updated version that fixed the issue I had the next day. I found with my sensor had so much tilt at certain spots the red laser would barely be visible. Because of this I would lose the adjustment crosshair mid tilt adjustment. I exited the procedure and turned the exposure time all the way up and it worked ok after that.
I also found that the software would read different depending on how I rotated the unit on the camera. I found I could take measurements and it would get a different reading every time. So I found if I firmly pushed the unit towards my camera as I rotate, let it sit for like 5 seconds then take a reading I could get very close results to previous reading. When I was done I checked the numbers 3 times and my Critical focus zone actually would be about 2-3 microns below the theoretical. Same with new critical focus zone. However depending on how I rotated it, it would be anywhere from 2 microns different to 15-18 different. It fit great on my M54 adapter so not sure what the story is, but took a while to work though the issues. I kept adjusting because I would be at like 10 microns away and do a adjustment and then be like 18 microns away. Once I learned to firmly pushed towards camera during rotation it was super consistent. It was one step forward two steps back until I found how to rotate.
Now when I am at the main screen after hooking up the adapter and I rotate the adjuster in a 360 the red dot barely moves at all showing my sensor is tilt free. Before it made a huge circle.
I have unit number 84 I believe. I feel the customers are a bit of the beta testers for it but honestly they were super responsive to my problems and questions and now that I know how to make it work (maybe just in my case) I could adjust tilt on any camera in a matter of minutes I am sure
This really makes me wonder why the camera manufactures don't do this as a matter of course? It could be a big advertising bullet point "sensor tilt < x microns". My guess is cost. My sensor was pretty bad in my opinion. However I bet a lot of people dont even care just roll with it
|
You cannot like this item. Reason: "ANONYMOUS".
You cannot remove your like from this item.
Editing a post is only allowed within 24 hours after creating it.
You cannot Like this post because the topic is closed.
Copy the URL below to share a direct link to this post.
This post cannot be edited using the classic forums editor.
To edit this post, please enable the "New forums experience" in your settings.
Thomas Rider:
Tony Gondola:
Thomas Rider:
AstroShed:
Thomas Rider:
AstroShed:
Thomas Rider:
AstroShed (StewartWilliam)
Looks like you need one of these, and quick..👍🏻
https://youtu.be/iyH7vsAqcDA?si=Ovhelyh9OJwAY22A
This is awesome! Ordered
Yes, it’s an excellent tool, and takes all the hard work out of tilt, especially when trying to fix out in the dark and cold..
I built my own version of this a couple of years ago and it worked well, but this tool is on another level, and sooooooo much easier..
Order came in and messed with my tilt. The tool and program is extremely easy to use and found my camera had really bad tilt and was able to get it nearly perfect fairly easy. Took me a like an hour or two as I never adjusted tilt before in my life and it was a lot of trial and error. I cannot imagine trying to do that outside by taking images and guessing from there.
Glad you got it sorted, but why did it take so long with the tool, 2 hours, that is a long time when it can be done in a few mins ?
So originally spent some time but the software was not working and spent a few hours with nothing to show for it. Emailed Erik and he released an updated version that fixed the issue I had the next day. I found with my sensor had so much tilt at certain spots the red laser would barely be visible. Because of this I would lose the adjustment crosshair mid tilt adjustment. I exited the procedure and turned the exposure time all the way up and it worked ok after that.
I also found that the software would read different depending on how I rotated the unit on the camera. I found I could take measurements and it would get a different reading every time. So I found if I firmly pushed the unit towards my camera as I rotate, let it sit for like 5 seconds then take a reading I could get very close results to previous reading. When I was done I checked the numbers 3 times and my Critical focus zone actually would be about 2-3 microns below the theoretical. Same with new critical focus zone. However depending on how I rotated it, it would be anywhere from 2 microns different to 15-18 different. It fit great on my M54 adapter so not sure what the story is, but took a while to work though the issues. I kept adjusting because I would be at like 10 microns away and do a adjustment and then be like 18 microns away. Once I learned to firmly pushed towards camera during rotation it was super consistent. It was one step forward two steps back until I found how to rotate.
Now when I am at the main screen after hooking up the adapter and I rotate the adjuster in a 360 the red dot barely moves at all showing my sensor is tilt free. Before it made a huge circle.
I have unit number 84 I believe. I feel the customers are a bit of the beta testers for it but honestly they were super responsive to my problems and questions and now that I know how to make it work (maybe just in my case) I could adjust tilt on any camera in a matter of minutes I am sure
This really makes me wonder why the camera manufactures don't do this as a matter of course? It could be a big advertising bullet point "sensor tilt < x microns".
My guess is cost. My sensor was pretty bad in my opinion. However I bet a lot of people dont even care just roll with it It would be interesting to know if some brands are worse than others. None of these things are sold in the kind of numbers where a bit more care couldn't be taken with QC. If not by the manufactures, then if it's so easy to test, the resellers. Seems a shame to drop a couple of hundred bucks on a tester that might only be used once.
|
You cannot like this item. Reason: "ANONYMOUS".
You cannot remove your like from this item.
Editing a post is only allowed within 24 hours after creating it.
You cannot Like this post because the topic is closed.
Copy the URL below to share a direct link to this post.
This post cannot be edited using the classic forums editor.
To edit this post, please enable the "New forums experience" in your settings.
Tony Gondola:
Thomas Rider:
My guess is cost. My sensor was pretty bad in my opinion. However I bet a lot of people dont even care just roll with it
It would be interesting to know if some brands are worse than others. None of these things are sold in the kind of numbers where a bit more care couldn't be taken with QC. If not by the manufactures, then if it's so easy to test, the resellers. Seems a shame to drop a couple of hundred bucks on a tester that might only be used once. I have plans to use this tester on a full frame ASI6200 once I can afford to go that route. I agree it does suck for something I may not use more than once though. You can always do the free NINA plug in but honestly I bet that is a pain to do. This was easy to do once I figured out the tricks to it. If I had to wait for a clear night and spend hours taking subs to try to correct it would be a week long process for me. This purchase for me was a "more money than brains" sort of moment. I dont have money and surely dont have brains either but I wanted to fix it
|
You cannot like this item. Reason: "ANONYMOUS".
You cannot remove your like from this item.
Editing a post is only allowed within 24 hours after creating it.
You cannot Like this post because the topic is closed.
Copy the URL below to share a direct link to this post.
This post cannot be edited using the classic forums editor.
To edit this post, please enable the "New forums experience" in your settings.
Hi, this is Erik from AstroPrecision, one of the developers behind the TiltAdjuster instrument.
May my post her is on the edge of what is allowed, if so I assume that it will be deleted.
Tilt is often discussed in relation to the sensor, and while sensor tilt is a factor, the rest of the imaging setup can also introduce tilt. Our goal is to include as much of the optical train as possible, meaning all components behind the telescope should be included in the calibration process.
With the calibration and adjustment methods used in TiltAdjuster, we believe that reducing additional tilt—such as in the focuser—will be fast and precise.
Not all achive the same but one of our customer reported this :
A very successful 1st use of your product – I had my camera dialed in
to a few microns within 20 minutes of opening the box …
As comments above mention, we have had/has some issues which I think is normal for new products. We strive to improve the software, though we may have pushed out recent updates a bit too quickly. To ensure more stable releases moving forward, we will be establishing a beta testing group. Additionally, there have been some installation issues, which we aim to resolve in the next release.
Erik
|
You cannot like this item. Reason: "ANONYMOUS".
You cannot remove your like from this item.
Editing a post is only allowed within 24 hours after creating it.
You cannot Like this post because the topic is closed.
Copy the URL below to share a direct link to this post.
This post cannot be edited using the classic forums editor.
To edit this post, please enable the "New forums experience" in your settings.
Erik Guneriussen:
Hi, this is Erik from AstroPrecision, one of the developers behind the TiltAdjuster instrument.
May my post her is on the edge of what is allowed, if so I assume that it will be deleted.
Tilt is often discussed in relation to the sensor, and while sensor tilt is a factor, the rest of the imaging setup can also introduce tilt. Our goal is to include as much of the optical train as possible, meaning all components behind the telescope should be included in the calibration process.
With the calibration and adjustment methods used in TiltAdjuster, we believe that reducing additional tilt—such as in the focuser—will be fast and precise.
Not all achive the same but one of our customer reported this :
A very successful 1st use of your product – I had my camera dialed in
to a few microns within 20 minutes of opening the box …
As comments above mention, we have had/has some issues which I think is normal for new products. We strive to improve the software, though we may have pushed out recent updates a bit too quickly. To ensure more stable releases moving forward, we will be establishing a beta testing group. Additionally, there have been some installation issues, which we aim to resolve in the next release.
Erik I think despite my problems (which may be limited to just me) its a fantastic product with a lot of potential. I am grateful for you guys, your efforts and awesome customer service! I would recommend your product to anyone on the fence about it.
|
You cannot like this item. Reason: "ANONYMOUS".
You cannot remove your like from this item.
Editing a post is only allowed within 24 hours after creating it.
You cannot Like this post because the topic is closed.
Copy the URL below to share a direct link to this post.
This post cannot be edited using the classic forums editor.
To edit this post, please enable the "New forums experience" in your settings.
Tony Gondola:
This really makes me wonder why the camera manufactures don't do this as a matter of course? It could be a big advertising bullet point "sensor tilt < x microns". QHY guarantees sensors to have less then 20um of tilt. But... keep in mind that the sensor is the LEAST likely source of tilt in an image train. The adapters and all the accessories are far more likely to contribute than the camera sensor. I once measured a ZWO tilt plate and found that the variability of thickness was 100um! The QHY spacers included with my Qhy 600 all had between 50 and 80um or tilt. When mitigating tilt, you will most likely need to do it with the entire image train assembled, and adjust to fix the error no matter the source, be it an adapter, accessory or camera sensor.
|
You cannot like this item. Reason: "ANONYMOUS".
You cannot remove your like from this item.
Editing a post is only allowed within 24 hours after creating it.
You cannot Like this post because the topic is closed.
Copy the URL below to share a direct link to this post.
This post cannot be edited using the classic forums editor.
To edit this post, please enable the "New forums experience" in your settings.
Chris White- Overcast Observatory:
Tony Gondola:
This really makes me wonder why the camera manufactures don't do this as a matter of course? It could be a big advertising bullet point "sensor tilt < x microns".
QHY guarantees sensors to have less then 20um of tilt.
But... keep in mind that the sensor is the LEAST likely source of tilt in an image train. The adapters and all the accessories are far more likely to contribute than the camera sensor. I once measured a ZWO tilt plate and found that the variability of thickness was 100um! The QHY spacers included with my Qhy 600 all had between 50 and 80um or tilt.
When mitigating tilt, you will most likely need to do it with the entire image train assembled, and adjust to fix the error no matter the source, be it an adapter, accessory or camera sensor. So really the problem is everything in the imaging train needs to be machined to a higher degree of accuracy and it all has to be held in place so that nothing changes with different orientations. I suspect the last part of that is the hardest to effect.
|
You cannot like this item. Reason: "ANONYMOUS".
You cannot remove your like from this item.
Editing a post is only allowed within 24 hours after creating it.
You cannot Like this post because the topic is closed.
Copy the URL below to share a direct link to this post.
This post cannot be edited using the classic forums editor.
To edit this post, please enable the "New forums experience" in your settings.
 0.00
0.00

 5.21
5.21
 1.20
1.20
 8.11
8.11
 7.22
7.22
 14.17
14.17
 2.41
2.41
 0.90
0.90
 6.78
6.78
 19.90
19.90
