Recently, I noticed that some wrap their dew heaters around the dew shield of their refractor. I've always wrapped mine around the OTA itself, as near the 'scope's end element as I can. I am working on the principle that this is the most efficient method of raising the end element's surface tempeature above the dew point, without actually heating the element itself directly. Wrapping the heater around the dew shield appears to be aimed at heating the air within the shield above the dew point. As air has poor thermal conductivity, I would see this as less efficient than my method, with the attendant problem of losing the heating through convection of the warmed air, especially as the OTA points upwards most of the time.
What are your thoughts/practices?
Note 1: I am aware that heating the OTA will also heat the air within the OTA, but I have not found any discernable effect of this - is this an issue that is blown out of proportion? Is this any different to heating the air within the dew shield?
Note 2: in really heavy dew conditions I additionally wrap cloth around the dew heater to reduce heat loss to the atmosphere. This seems to work reasonably well.
CS
Paul.
|
You cannot like this item. Reason: "ANONYMOUS".
You cannot remove your like from this item.
Editing a post is only allowed within 24 hours after creating it.
You cannot Like this post because the topic is closed.
Copy the URL below to share a direct link to this post.
This post cannot be edited using the classic forums editor.
To edit this post, please enable the "New forums experience" in your settings.
Paul Lloyd:
I am working on the principle that this is the most efficient method of raising the end element's surface tempeature above the dew point, without actually heating the element itself. what's wrong if the element heats up? not only did I wrap my dew heater specifically over the place where the element is, but I also wrapped aluminum foil all around to concentrate the heat there I saw my AF best focus position didn't look focused; after removing the foil, my focus is better; was there a relationship? I'm interested in knowing where I should place my dew heater
|
You cannot like this item. Reason: "ANONYMOUS".
You cannot remove your like from this item.
Editing a post is only allowed within 24 hours after creating it.
You cannot Like this post because the topic is closed.
Copy the URL below to share a direct link to this post.
This post cannot be edited using the classic forums editor.
To edit this post, please enable the "New forums experience" in your settings.
Great question Paul.
I don’t know the best method, but I have always wrapped my dew heater band around the dew shield in both my scopes (61mm and 102mm refractors) with very good results.
I remember when I started out about 6 years ago, I searched the internet and didn’t find a definitive answer. It will be interesting to see other responses to your question. Thanks!
|
You cannot like this item. Reason: "ANONYMOUS".
You cannot remove your like from this item.
Editing a post is only allowed within 24 hours after creating it.
You cannot Like this post because the topic is closed.
Copy the URL below to share a direct link to this post.
This post cannot be edited using the classic forums editor.
To edit this post, please enable the "New forums experience" in your settings.
Now, that's an interesting observation! The only problem I have found with AF is with my 2800mm f/16 refractor configuration and using a H-II+S-II narrowband filter (it seems to be OK-enough without a filter, and with a H-I+O-III filter). With this combination, I'm running short of exposure times in my ASiar+ to get a decent set of stars. When the seeing is less than average, I have to resort to manual focusing. I'll have to try your with & without test to see if things improve.
Your observation is definitely worth thinking about, and testing. Thanks for your input, Oscar.
Paul.
|
You cannot like this item. Reason: "ANONYMOUS".
You cannot remove your like from this item.
Editing a post is only allowed within 24 hours after creating it.
You cannot Like this post because the topic is closed.
Copy the URL below to share a direct link to this post.
This post cannot be edited using the classic forums editor.
To edit this post, please enable the "New forums experience" in your settings.
I believe best practice is to wrap the external element of the OTA. If it’s warmer than ambient, it can’t dew up.
I have done so for nearly 20 years.
I have also used a variable power source which applies additional heat depending on the ambient temp compared to the temp probe on the OTA. Such as a Pegasus unit.
|
You cannot like this item. Reason: "ANONYMOUS".
You cannot remove your like from this item.
Editing a post is only allowed within 24 hours after creating it.
You cannot Like this post because the topic is closed.
Copy the URL below to share a direct link to this post.
This post cannot be edited using the classic forums editor.
To edit this post, please enable the "New forums experience" in your settings.
Jim Raskett:
Great question Paul.
I don’t know the best method, but I have always wrapped my dew heater band around the dew shield in both my scopes (61mm and 102mm refractors) with very good results.
I remember when I started out about 6 years ago, I searched the internet and didn’t find a definitive answer. It will be interesting to see other responses to your question. Thanks! I wouldn't mind betting, Jim, that there is no definitive answer. I would consider my OTA-end element method makes better use of the power in the dew heater, though. That makes it a better option for battery operation, as you could run it at lower power than the dew shield method. But, let's see what others have to say. Paul.
|
You cannot like this item. Reason: "ANONYMOUS".
You cannot remove your like from this item.
Editing a post is only allowed within 24 hours after creating it.
You cannot Like this post because the topic is closed.
Copy the URL below to share a direct link to this post.
This post cannot be edited using the classic forums editor.
To edit this post, please enable the "New forums experience" in your settings.
Barry Schellenberg:
I believe best practice is to wrap the external element of the OTA. If it’s warmer than ambient, it can’t dew up.
I have done so for nearly 20 years.
I have also used a variable power source which applies additional heat depending on the ambient temp compared to the temp probe on the OTA. Such as a Pegasus unit. Thanks, Barry. I must admit that I haven't tried the "high tech" way with temperature probes - I've always just winged it, and it hasn't always worked when it was a heavy dew night. It's the method used by Celestron with their EdgeHD and RASA heaters - these are mounted around the outside edge of the end element with a temperature probe to maintain the element's temperature above ambient by a degree or two. I'll have to look into this "high tech" approach, although it might prove costly with 4 OTAs to equip. What do you use as a temperature probe, and how do you mount such a device without impairing the image? Paul.
|
You cannot like this item. Reason: "ANONYMOUS".
You cannot remove your like from this item.
Editing a post is only allowed within 24 hours after creating it.
You cannot Like this post because the topic is closed.
Copy the URL below to share a direct link to this post.
This post cannot be edited using the classic forums editor.
To edit this post, please enable the "New forums experience" in your settings.
Hi Paul,
The Pegasus unit comes with the temperature probes and the one on the OTA is taped to the outside of the scope. It isn't an exact measurement of the element, but it is close. You can pick up their entry level device for about $225. They also sell on the used market, but go quickly.
Hope this helps.
|
You cannot like this item. Reason: "ANONYMOUS".
You cannot remove your like from this item.
Editing a post is only allowed within 24 hours after creating it.
You cannot Like this post because the topic is closed.
Copy the URL below to share a direct link to this post.
This post cannot be edited using the classic forums editor.
To edit this post, please enable the "New forums experience" in your settings.
Thanks for your info, Barry. I'll look into it further, but I suspect that used models are very thin on the ground down here in Aussieland. A Pegasus Pocket Powerbox Advance retails here for AU$535 - that's about US$365 at the moment. I'm not sure how a temp probe works with it, yet, but I'll investigate. The ASiair+ has voltage controls on its power ports (4 of them), but no temperature input to regulate them. I'm typically running these in the 50-80% range, depending on the anticipated weather conditions; it's a set and forget scenario, that hasn't worried me, yet.
CS
Paul.
Update: I have found one 2nd-hand unit for AU$440 - US$300. I'll do my homework first, as I'm sure others will come on the market in the future.
|
You cannot like this item. Reason: "ANONYMOUS".
You cannot remove your like from this item.
Editing a post is only allowed within 24 hours after creating it.
You cannot Like this post because the topic is closed.
Copy the URL below to share a direct link to this post.
This post cannot be edited using the classic forums editor.
To edit this post, please enable the "New forums experience" in your settings.
The lens of a refractor dews up because of radiative cooling. It is exposed essentially to the night sky whose black body temperature is significantly below the temperature of the air. In the absence of air currents, the boundary layer of air above the lens basically acts as an insulator preventing the atmospheric air from heating the glass. This will cause the temperature of the lens to fall below the surrounding air temperature and the dew point, which causes it to dew up. Radiation transfer keeps happening, since the air is transparent to radiation. This, incidentally, is the reason why surfaces don't dew up when it is cloudy out or they are under a cover of some kind. The radiative exchange is with a much warmer object.
Dew shields work by blocking exposure to the cold night sky from the side. By themselves, they will delay the formation of dew, but not prevent it. Heating the dew shield provides a warmer surface for radiative heat exchange. That's why dew heaters around the dew shield are effective. Of course, heating the lens itself will work, but may run into problems around non uniform expansion of the glass since the heating is from the edge. Conductive heating of a thick glass element that has low thermal conductivity may not also be very effective.
|
You cannot like this item. Reason: "ANONYMOUS".
You cannot remove your like from this item.
Editing a post is only allowed within 24 hours after creating it.
You cannot Like this post because the topic is closed.
Copy the URL below to share a direct link to this post.
This post cannot be edited using the classic forums editor.
To edit this post, please enable the "New forums experience" in your settings.
Thank you, Arun. I now have a reason for why dew shield heating is effective. So, radiative heat loss to colder surfaces/objects is a/the major contributor to cooling of the 'scope's end element, and providing a warmer surface near the lens reduces/eliminates this effect. I'm surprised that a narrow heating tape is all that effective: while the metal shield will allow heat to transfer along its length, it will also allow for decent heat loss, also. Additional thermal insulation around the shield looks a good bet.
So, we seem to be deciding between the effectiveness of conductive warming of the lens via OTA heating vs radiative warming via heating of the dew shield. Wow! Who's in the interesting position of having identical gear to test these two methods side-by-side? And would the results be transferrable between different kits? I guess, for us average users, we have to decide on one method and see when it is less than satisfactory, then try the other to see if it is more effective. For myself, I haven't noticed any effects of differential glass expansion, but I have seen the centre of large lenses (100+ mm) not achieving/maintaining their temperatures above dew point (more glass = more heating required via conduction). Mind you, the centres of lenses are still the vulnerable part with dew shield heating for the same reason.
After this explanation, I'm certainly willing to give dew shield heating a try. Unfortunately, we're entering the summer season here in Aussieland and dewing is becoming less of a problem, even here at humid coastal 32deg south.
CS,
Paul.
|
You cannot like this item. Reason: "ANONYMOUS".
You cannot remove your like from this item.
Editing a post is only allowed within 24 hours after creating it.
You cannot Like this post because the topic is closed.
Copy the URL below to share a direct link to this post.
This post cannot be edited using the classic forums editor.
To edit this post, please enable the "New forums experience" in your settings.
Arun dialed it in perfectly! I am preparing an Astro-Imaging Channel Presentation that will go over all of the gory aspects of dew prevention. In it I'll show exactly how a dew shield works and how much of a temperature difference is required to prevent dew as a function of shield aspect ratio. If you assume that the front glass surface is at the bottom of the dew shield, the goal is to balance heat loss to the sky with radiative heating from the dew shield itself. That way you minimize the amount of heat you have to apply, which will also maximize image quality. Without going into all the details of the calculation, here's a preview. Again, we assume the the front glass surface is at the bottom of the dew shield--as for a refractor or SCT. This plot shows how much you need to raise the temperature of the shield to balance heat loss to the sky as a function of shield aspect ratio for a range of ambient air temperatures. As you can see, the ambient air temperature doesn't make a huge difference. For a common aspect ratio of 1.5, you only have to raise the temperature of the shield by roughly 3C to prevent dew under all conditions. 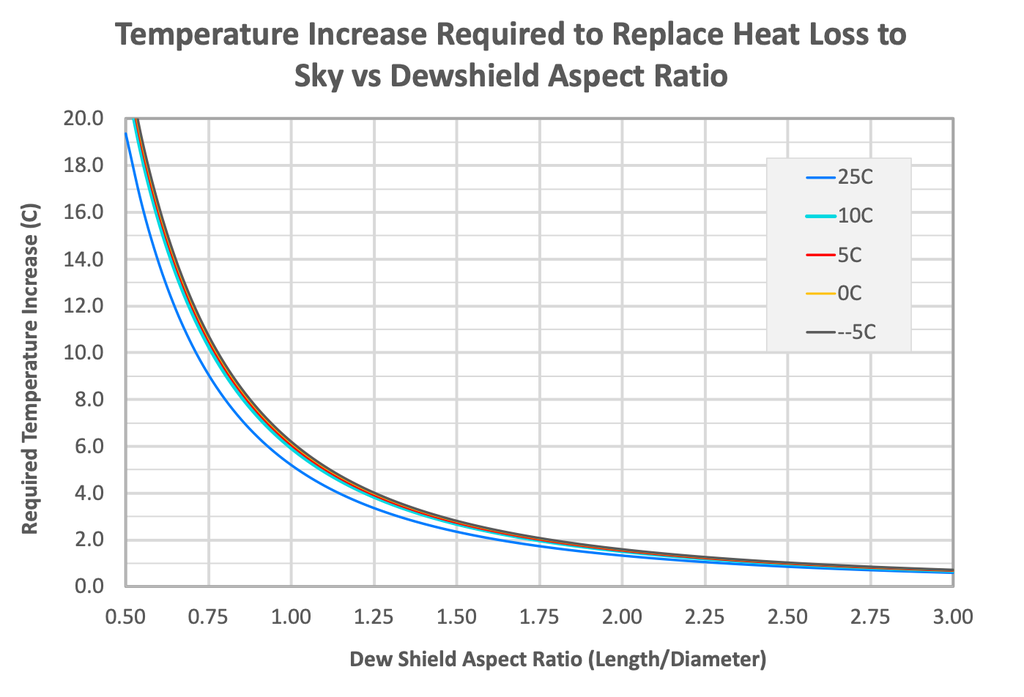 As some have mentioned, you can also apply heat directly to the edge of the objective lens (or corrector plate) --and that works; however, it is a poor way to prevent dew because it relies on thermal conduction rather than radiative heat transfer. When you use conduction, you have to apply a lot of heat around the edges of the optics to get enough thermal conduction to keep the center of the optics above the dew point. That can cause a lot of thermal convection at the front surface, which reduces image quality. You won't have dew but you also may not produce a very sharp image either. There are sometimes good reasons to heat the OTA but I'll go more into that in my presentation. For now, your best bet is to heat the dew shield. John
|
You cannot like this item. Reason: "ANONYMOUS".
You cannot remove your like from this item.
Editing a post is only allowed within 24 hours after creating it.
You cannot Like this post because the topic is closed.
Copy the URL below to share a direct link to this post.
This post cannot be edited using the classic forums editor.
To edit this post, please enable the "New forums experience" in your settings.
John,
Many thanks for your cogent explanation. That about clinches it for me. I'll be moving my heaters to their dew shields. It goes to show that sometimes the intuitive solution (direct warming of the lens by conduction) is not the right/effective solution. Also, the amount of heating required to achieve +3deg shoulldn't be too draining on battery power, especially if some thermal insulation covers the heating tape and much of the shield.
I think that your explanation, along with Arun's, pretty well sorts this issue out, unless someone has some real and objective problem with it.
Thank you, everyone, for your inputs. I'll look forward to that presentation of yours, John, and would appreciate notice of it.
CS,
Paul.
|
You cannot like this item. Reason: "ANONYMOUS".
You cannot remove your like from this item.
Editing a post is only allowed within 24 hours after creating it.
You cannot Like this post because the topic is closed.
Copy the URL below to share a direct link to this post.
This post cannot be edited using the classic forums editor.
To edit this post, please enable the "New forums experience" in your settings.
Excellent information contributed here!!!! Guess that I just got lucky on my decision to place my dew strap on the dew shield!
Looking very much to your presentation on the Astro Imaging Channel John.
Maybe it isn't directly related, but I have found that the only time that I had an issue with dew using the dew strap on the dew shield was when I later discovered that I had a accumulated a good layer of dust on the objective. Guess that there were nearby fires (or something creating an abnormal amount of dust) that settled on the glass following the first night of imaging.
Outstanding information shared on this thread! Thanks everyone, and especially Paul, for starting it!
|
You cannot like this item. Reason: "ANONYMOUS".
You cannot remove your like from this item.
Editing a post is only allowed within 24 hours after creating it.
You cannot Like this post because the topic is closed.
Copy the URL below to share a direct link to this post.
This post cannot be edited using the classic forums editor.
To edit this post, please enable the "New forums experience" in your settings.
Incidentally - John's graph also explains why, for something like a reflector, the secondary mirror dews up very quickly whereas it is much harder for the primary to do so.
|
You cannot like this item. Reason: "ANONYMOUS".
You cannot remove your like from this item.
Editing a post is only allowed within 24 hours after creating it.
You cannot Like this post because the topic is closed.
Copy the URL below to share a direct link to this post.
This post cannot be edited using the classic forums editor.
To edit this post, please enable the "New forums experience" in your settings.
Great question and a great answer!
So far I've always heated close to the objective. However, this makes the focus point of my refractor very dependent on power setting of the dew band. So my default procedure has always been to set dew heating to a certain percentage, based on humidity (eyeballing), and let the system stabilise. Then focus changes linear to ambient temperature.
I have always been reluctant to turn on this dynamic dew heating worked, as then you'd need to re-focus after either ambient temperature or humidity (dew band temperature) changes.
Heating the shield would probably have much less effect on focus. So apart from the better dew prevention, it also allows the automatic dew control to be turned on.
Guess my dew bands will shift to the front of the shield!
|
You cannot like this item. Reason: "ANONYMOUS".
You cannot remove your like from this item.
Editing a post is only allowed within 24 hours after creating it.
You cannot Like this post because the topic is closed.
Copy the URL below to share a direct link to this post.
This post cannot be edited using the classic forums editor.
To edit this post, please enable the "New forums experience" in your settings.
Interesting question, I always put mine directly over the element or just behind it if the objective is there. I also have started wrapping the dew heater with insulation so I can keep the power output lower and direct the heat where it's needed. I also don't make it any warmer than needed for a given night.
|
You cannot like this item. Reason: "ANONYMOUS".
You cannot remove your like from this item.
Editing a post is only allowed within 24 hours after creating it.
You cannot Like this post because the topic is closed.
Copy the URL below to share a direct link to this post.
This post cannot be edited using the classic forums editor.
To edit this post, please enable the "New forums experience" in your settings.
One of the assumptions inherent in the calculation that I posted is that the dew shield is at a constant temperature. That's why I used to use three equally spaced heater straps on my Celestron and now on my refractor dew shield. If you only use a single heater strap, you won't get a very uniform temperature and you'll need a higher temperature. Given that you want a uniform temperature, it's also beneficial to use a dew shield made of metal rather than a plastic or other non-conducting material. A metal shield is better at heat conduction so you'll get a more uniform temperature. Next, it's a good idea to insulate the outside of the shield. Attach your straps and then wrap the shield in Reflectix to help reduce heat loss from convection with the air–and radiative loss to the sky. Finally, I use use a DewBuster temperature controller. It has a very nice feature that allows actually measuring the difference in temperature between the strap and the surrounding air. You can simply set the temperature difference to be 3C or 4C and forget about it.
Of course, this isn't the only way to control dew and I think that that's why there is often a lot of controversy that swirls around this topic. My CDK20 (and all Planewave telescopes) have heaters built into the telescope directly under each of the mirrors, which provides a means of carefully controlling the temperature of the optical surfaces. Conversely, my ASA600 has NO heaters anywhere and yet it never gets dew! They use an alternative method of dealing with heat loss. Rather than rely on balancing heat loss to the sky with heaters (either conductively or radiatively), they rely on convective heat control. It turns out that the coefficient of convective heat exchange depend heavily on air velocity. In a strong air flow, the coefficient of heat exchange can vary by a factor of two or even three orders of magnitude. So in the ASA system, they kill two birds with one stone by using fans to disrupt static boundary layer convection at the mirror surface–and to greatly increase the coefficient of convective heat exchange at the surface of the mirror. That effectively keeps the primary mirror surface very close to the ambient air temperature preventing dew formation. Frankly, I wish that the scope also had heaters but so far, so good…I haven't seen evidence of dew formation. So it seems to work.
John
|
You cannot like this item. Reason: "ANONYMOUS".
You cannot remove your like from this item.
Editing a post is only allowed within 24 hours after creating it.
You cannot Like this post because the topic is closed.
Copy the URL below to share a direct link to this post.
This post cannot be edited using the classic forums editor.
To edit this post, please enable the "New forums experience" in your settings.
Re temperature, isn’t being above the dew point rather than ambient the only thing necessary?
it saves power and reduces air turbulence due to excessive heat.
re dew controller, I understand Pegasus has a temperature & humidity sensor to measure and calculate the dew point but no temperature monitoring under the dew strap area to provide feedback in order to control power to the strap to maintain the required temperature. That would end up not much better than guessin.
other dew controllers, for example the wanderer, a Pegasus power box look a like, has these probes and an ability to set dew strap area to follow them point temperature (with a configurable offset)
|
You cannot like this item. Reason: "ANONYMOUS".
You cannot remove your like from this item.
Editing a post is only allowed within 24 hours after creating it.
You cannot Like this post because the topic is closed.
Copy the URL below to share a direct link to this post.
This post cannot be edited using the classic forums editor.
To edit this post, please enable the "New forums experience" in your settings.
Kendricks of Canada does, & has for decades, have a ambient sensor and up to two sensors that measure the dew shield temperature. It is digitally programed on the dew controller. I keep the dew shield 2 C above ambient. The Kendricks requires no computer app and is not much more in price. They do have a more expensive computer controlled unit, if you want.
I use the AstroZap heated plastic dew shield on a C9.25. The heat is applied to the corrector holder. Since the shield is plastic, I velcroed the dew shield sensor to the corrector ring. Reading John's comments, I not sure that is a good solution. I have used a aluminum shield on a C11, but they are so bulky and difficult to transport. If I understand John's comments correctly, the best solution would be to buy an aluminum AstroZap dew shield for the C9.25 with two straps and two sensors two matain the shield tempreture. That won't be cheap.
Lynn K.
|
You cannot like this item. Reason: "ANONYMOUS".
You cannot remove your like from this item.
Editing a post is only allowed within 24 hours after creating it.
You cannot Like this post because the topic is closed.
Copy the URL below to share a direct link to this post.
This post cannot be edited using the classic forums editor.
To edit this post, please enable the "New forums experience" in your settings.
Re Kendricks, it's only ambient and not dew point which some of the more expensive controllers can do. Dew point has to be calculated so the controllers need some form of computer (micro controller) built in.
|
You cannot like this item. Reason: "ANONYMOUS".
You cannot remove your like from this item.
Editing a post is only allowed within 24 hours after creating it.
You cannot Like this post because the topic is closed.
Copy the URL below to share a direct link to this post.
This post cannot be edited using the classic forums editor.
To edit this post, please enable the "New forums experience" in your settings.
I use two heaters (with a splitter) where one goes on the edge of the dew shield and the other right behind the front lens element of my refractor. This has prevented any dew formation for me. Not having it behind the glass was not working and I got frost building on it from the centre of it. Previously with my smaller 80mm refractor this wasn't an issue, but after I swapped to a 100mm refractor it became one. Also, not running enough of power to the one behind the glass also results in dew forming, so I keep mine at maximum power or close to it. The reason why I put a second one on my dew shield is simply to avoid moisture/frost building on the edge of, and inside of, the dew shield itself. That's a problem for multiple reasons.
This might not be necessary for everyone but works for me in my climate. During both moist autumn nights and very cold winter nights.
I installed a dew heater ring on my SCT which has been working well so far. On my smaller Samyang setups I put a dew heater on the lens hood above the front glass element, but then again there is no other place to put them.
|
You cannot like this item. Reason: "ANONYMOUS".
You cannot remove your like from this item.
Editing a post is only allowed within 24 hours after creating it.
You cannot Like this post because the topic is closed.
Copy the URL below to share a direct link to this post.
This post cannot be edited using the classic forums editor.
To edit this post, please enable the "New forums experience" in your settings.
Wow! I didn't realize how useful this topic is at the moment. Many, many thank yous to all of you for your comments and suggestions. You are too many to respond to individually, but I really appreciate your help and sharing of your experiences.
While I don't have anything like Jan's frost and cold environment to contend with (I'm living in a situation similar to Jacksonville, FL/San Diego, CA, or Casablanca/Alexandria Europe-side), the option of having both points covered (dew shield + OTA) is an interesting thought, although it would probably be a bit of belt-and-braces for me. Various others have suggested equipment that may make life simpler, and beat the dew problem. There's a lot there to digest, and it's going to take me some time and money to investigate. I think I will try 2x dew heaters on my larger refractor dew shields with insulation to start with, and progress from there. Over these warmer months, a single dew heater is probably sufficient, but I will check it out - a single heater has served me well up to now. I think I might end up needing more than an ASiair's 4 power ports soon! We'll see.
Lots of CS to you all,
Paul.
BTW: Having lived all my life in coastal, 32-37deg south latitude range, cities and towns, having the thought of getting out there in heavy frost and snow makes me shudder. To me, you are heroes, and I stand in awe of your dedication!!! I'm not kidding! Apologies - just chalk this up to my bit of whimsy.
|
You cannot like this item. Reason: "ANONYMOUS".
You cannot remove your like from this item.
Editing a post is only allowed within 24 hours after creating it.
You cannot Like this post because the topic is closed.
Copy the URL below to share a direct link to this post.
This post cannot be edited using the classic forums editor.
To edit this post, please enable the "New forums experience" in your settings.
Hi Paul,
I've just signed up for a trial account…so here goes…a few weeks ago when I was photographing T47 from my patio which faces east towards the beach, I noticed that all the glass balustrading etc was covered in dew. So I put the strap heater onto my Samyang 135mm lens to keep the outer element warm. I wrap it around the base of the lens hood around the outer element of the lens. I was shooting for a few hours until astronomical darkness finished. Even though the ambient was around 13 degrees C the RH must have been at 100% by then as everything was getting wet, but at least the lens stayed clear. I always use the lens hoods as I have street lights about 25 meters away from my patio (front and back). The hoods may well help keep radiative losses down which is good.
Last week I was using my 400mm lens without any hoods or heater on Omega Centauri for an hour or so without any dew problem, even though everything was very wet on the patio again, but that lens is about 6kg of metal and large outer element so I got away with it that time. The whole setup was very cold when I finished shooting though, so I left it out to warm up for a few hours in my study.
Previously I noticed when shooting over on the beach or up near the lighthouse at night, the outer elements would start to get wet very quickly, ie 30 minutes or so. This was before I started using heat pads and the heat strap etc. In winter when we tend to have clearer air (and less humidity), it can get down to a 3-4 degrees C and with a strong breeze in the open my camera body and lens was getting really cold quite quickly, hence the use of wool scarfs etc to mimimise heat loss from the camera and lens body. Im usually well rugged up in winter bushwalking gear in those conditions to stay warm for a few hours shooting.
The discussion has clarified the subject greatly - thank you….heres to clear skies and warm nights…
Steve
|
You cannot like this item. Reason: "ANONYMOUS".
You cannot remove your like from this item.
Editing a post is only allowed within 24 hours after creating it.
You cannot Like this post because the topic is closed.
Copy the URL below to share a direct link to this post.
This post cannot be edited using the classic forums editor.
To edit this post, please enable the "New forums experience" in your settings.
The interesting bit in this discussion is the reflective verses conductive info. I also found the air movement info answered another curiosity I had..
|
You cannot like this item. Reason: "ANONYMOUS".
You cannot remove your like from this item.
Editing a post is only allowed within 24 hours after creating it.
You cannot Like this post because the topic is closed.
Copy the URL below to share a direct link to this post.
This post cannot be edited using the classic forums editor.
To edit this post, please enable the "New forums experience" in your settings.


