Hey Zak definitely do not toss the data out. Dealing with CA is annoying, but there are some ways to get around this as explained above by many others.
Unfortunately I do not have pictures to post as examples, I'm no expert but here is what I use to do to get around this issue.
,I would separate the channels, run BlurX on them separately. Then use the FWHM eccentricity script to get the mean values for each channel and keep the G as that as my reference.
I would then stretch the R and B channels, and measure the mean FWHM and accordingly change my stretch for these channels to produce identical / very close mean values to that of the G channel then i would combine them together, and if necessary do a star alignment. Once done, I'd do an SPCC, this would significantly quench the CA.
Cs Very interesting Ahmed! I am going to give this a try myself on a star cluster that I imaged recently with some CA on the brighter stars. I assume that you are talking about the Median FWHM value in px in the FWHM eccentricity script? Thanks! Jim
|
You cannot like this item. Reason: "ANONYMOUS".
You cannot remove your like from this item.
Editing a post is only allowed within 24 hours after creating it.
You cannot Like this post because the topic is closed.
Copy the URL below to share a direct link to this post.
This post cannot be edited using the classic forums editor.
To edit this post, please enable the "New forums experience" in your settings.
andrea tasselli:
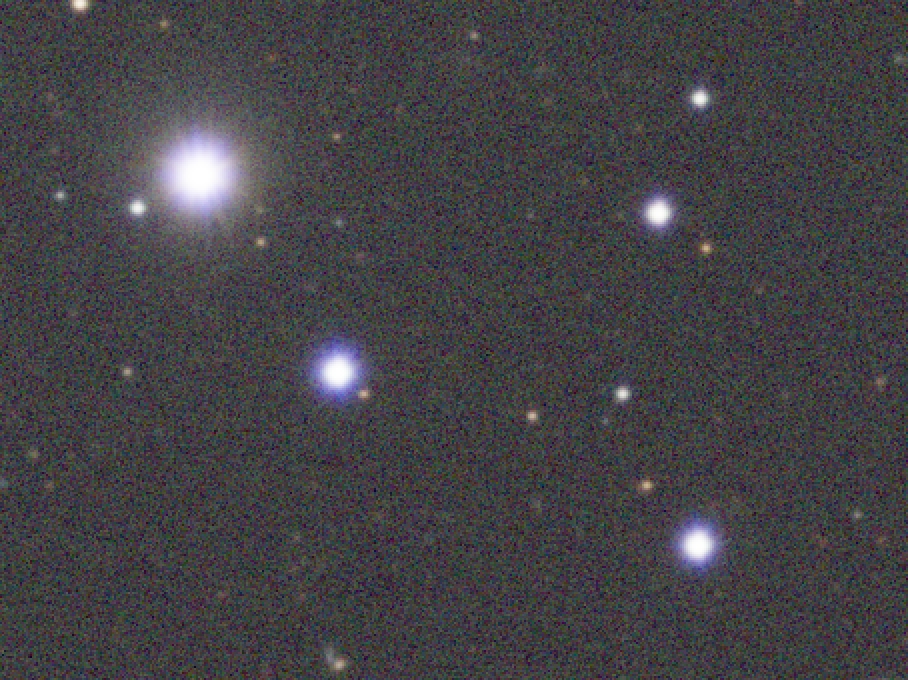
Just UV/IR filter, 100mm f/6 ED doublet:

With Baader Semi-APO filter:

So, yes, it reduces the white-ish bloating as well as the violet halo. The big bright one is Alpha UMi, Polaris, btw. Thanks for the images Andrea, really helps. That's a definite improvement! I might pull the trigger and get one so I can at least get some use out of my Radian 61 for broadband imaging. Zak  |
You cannot like this item. Reason: "ANONYMOUS".
You cannot remove your like from this item.
Editing a post is only allowed within 24 hours after creating it.
You cannot Like this post because the topic is closed.
Copy the URL below to share a direct link to this post.
This post cannot be edited using the classic forums editor.
To edit this post, please enable the "New forums experience" in your settings.
Jordan Morley:
Hey zak
Had the same issue with a sharpstar edphii. I spoke to sharpstar, sent some photos. They agreed and sent me a new objective lens and was a great improvement over the old lens Hi Jordan, Great to hear that Sharpstar helped you with the chromatic aberration issues! As I've mentioned before, I am certain that I am outside of the period where I could have received a replacement objective lens for my Radian 61, plus OPT dissipated earlier this year so that doesn't help either. I think that unfortunately I am stuck with my affected Radian 61 and will have to resort to using a filter to try and reduce the severe chromatic aberrations, but I probably won't get rid of it as I can use it for narrowband astrophotography without any issues. Zak |
You cannot like this item. Reason: "ANONYMOUS".
You cannot remove your like from this item.
Editing a post is only allowed within 24 hours after creating it.
You cannot Like this post because the topic is closed.
Copy the URL below to share a direct link to this post.
This post cannot be edited using the classic forums editor.
To edit this post, please enable the "New forums experience" in your settings.
Hey Zak definitely do not toss the data out. Dealing with CA is annoying, but there are some ways to get around this as explained above by many others.
Unfortunately I do not have pictures to post as examples, I'm no expert but here is what I use to do to get around this issue.
,I would separate the channels, run BlurX on them separately. Then use the FWHM eccentricity script to get the mean values for each channel and keep the G as that as my reference.
I would then stretch the R and B channels, and measure the mean FWHM and accordingly change my stretch for these channels to produce identical / very close mean values to that of the G channel then i would combine them together, and if necessary do a star alignment. Once done, I'd do an SPCC, this would significantly quench the CA.
Cs Hi Ahmed, Thanks for your suggestions, I will try it out when I do a next pass of my data. I've never heard of these techniques before, and I appreciate such a valuable community here on Astrobin that help each other out. That's one of the reasons I joined Astrobin in the first place is to meet like-minded people and share my images whilst looking at the vast beauty of everyone's images! Zak |
You cannot like this item. Reason: "ANONYMOUS".
You cannot remove your like from this item.
Editing a post is only allowed within 24 hours after creating it.
You cannot Like this post because the topic is closed.
Copy the URL below to share a direct link to this post.
This post cannot be edited using the classic forums editor.
To edit this post, please enable the "New forums experience" in your settings.
Hi Zak,
just to add my voice to those who say don't throw away the data, learn from it. I don't know how good your post processing skills are but 3 things to try…
Firstly if you have Photoshop or Lightroom these products contain options for eliminating chromatic aberration. They aren't perfect as they tend to turn the violet to grey.
If you have something like pixinsight seperate the stars from the nebulosity and try one or both of the following.
When applying the stretch, stretch the stars much less than you would the rest of the nebulosity, this tends to reduce halos and aberration and gives a 'reduced star' look anyway.
Another option is to split the star image into RGB channels, abandon the blue and create a new one from either the red or green channels. Might need some fiddling with 'curves' to get the colour balance right again.
Sorry can't give detailed instructions on any of this stuff, but hope that helps
|
You cannot like this item. Reason: "ANONYMOUS".
You cannot remove your like from this item.
Editing a post is only allowed within 24 hours after creating it.
You cannot Like this post because the topic is closed.
Copy the URL below to share a direct link to this post.
This post cannot be edited using the classic forums editor.
To edit this post, please enable the "New forums experience" in your settings.
Thanks so much everyone for your wonderful suggestions! I am now proud to say that I have successfully managed to process this data into something that I am very happy with! I've just put it up on my AstroBin profile if anyone's interested in seeing what I have done. https://www.astrobin.com/xb219v/ |
You cannot like this item. Reason: "ANONYMOUS".
You cannot remove your like from this item.
Editing a post is only allowed within 24 hours after creating it.
You cannot Like this post because the topic is closed.
Copy the URL below to share a direct link to this post.
This post cannot be edited using the classic forums editor.
To edit this post, please enable the "New forums experience" in your settings.
Hi everyone,
I thought I would give you guys an update.
I contacted Agena Astro yesterday and they suggested to reach out to Sharpstar which I have done just now.
I am hoping that there will be a resolution for this as I have seen that Sharpstar have been extremely supportive to the astrophotography community. If there is not a resolution, I will have to see what I can do with the suggestions you guys have provided me.
Zak 🙂
|
You cannot like this item. Reason: "ANONYMOUS".
You cannot remove your like from this item.
Editing a post is only allowed within 24 hours after creating it.
You cannot Like this post because the topic is closed.
Copy the URL below to share a direct link to this post.
This post cannot be edited using the classic forums editor.
To edit this post, please enable the "New forums experience" in your settings.
That’s great Zak.
I really hope that Sharpstar can be of help.
Please keep us posted!
Jim
|
You cannot like this item. Reason: "ANONYMOUS".
You cannot remove your like from this item.
Editing a post is only allowed within 24 hours after creating it.
You cannot Like this post because the topic is closed.
Copy the URL below to share a direct link to this post.
This post cannot be edited using the classic forums editor.
To edit this post, please enable the "New forums experience" in your settings.
Adobe Lightroom has excellent tools for mitigating chromatic aberration. The optics I regularly use don’t have CA, but I have tested LR on mediocre glass like the Canon 75-300mm kit lens.
Ultimately, I do think it’s best to go with optics that don’t have CA in the first place.
|
You cannot like this item. Reason: "ANONYMOUS".
You cannot remove your like from this item.
Editing a post is only allowed within 24 hours after creating it.
You cannot Like this post because the topic is closed.
Copy the URL below to share a direct link to this post.
This post cannot be edited using the classic forums editor.
To edit this post, please enable the "New forums experience" in your settings.
Zak Jones:
Thanks so much everyone for your wonderful suggestions!
I am now proud to say that I have successfully managed to process this data into something that I am very happy with! I've just put it up on my AstroBin profile if anyone's interested in seeing what I have done.
https://www.astrobin.com/xb219v/
That is a good improvement over the original! Congratulations. What workflow did you follow, if you don't mind to explain? Guiem.
|
You cannot like this item. Reason: "ANONYMOUS".
You cannot remove your like from this item.
Editing a post is only allowed within 24 hours after creating it.
You cannot Like this post because the topic is closed.
Copy the URL below to share a direct link to this post.
This post cannot be edited using the classic forums editor.
To edit this post, please enable the "New forums experience" in your settings.
Guiem Kimi:
Zak Jones:
Thanks so much everyone for your wonderful suggestions!
I am now proud to say that I have successfully managed to process this data into something that I am very happy with! I've just put it up on my AstroBin profile if anyone's interested in seeing what I have done.
https://www.astrobin.com/xb219v/
That is a good improvement over the original! Congratulations.
What workflow did you follow, if you don't mind to explain?
Guiem. Thanks Guiem! I did my usual routines for the beginning of the workflow, but I separated the RGB channels and applied BXT on each channel with different settings. I then stretched the green channel with GHS and measured the FWHM using FWHMEccentricity script and took note of the number. Afterwards, I stretched the R and B channels to try and match the FWHM numbers as best as I could doing the same method as described before. Finally, I stretched the RGB image and extracted the L channel once it was stretched and combined the LRGB channels using LRGBCombination using the default settings. Hope this helps! Zak |
You cannot like this item. Reason: "ANONYMOUS".
You cannot remove your like from this item.
Editing a post is only allowed within 24 hours after creating it.
You cannot Like this post because the topic is closed.
Copy the URL below to share a direct link to this post.
This post cannot be edited using the classic forums editor.
To edit this post, please enable the "New forums experience" in your settings.
Hi everyone, I have an exciting update to share with you all! I contacted Sharpstar directly a few days ago, and since then, I have managed to secure a replacement objective lens for my Radian 61. It did cost me nearly $200 AUD as I was outside of the replacement window, but it is definitely worth it! It should be here in the New Year. Sharpstar were a pleasure to deal with too. They were very professional and they acknowledged my chromatic aberration problem and apologised for the inconvenience caused. I will definitely be posting a before and after comparison once I receive the replacement lens for your reference. I may even make a YouTube video in the future describing what happened and how it took me so long to notice that I was affected by the chromatic aberrations lol. Zak  |
You cannot like this item. Reason: "ANONYMOUS".
You cannot remove your like from this item.
Editing a post is only allowed within 24 hours after creating it.
You cannot Like this post because the topic is closed.
Copy the URL below to share a direct link to this post.
This post cannot be edited using the classic forums editor.
To edit this post, please enable the "New forums experience" in your settings.
Great news!
I also found Sharpstar to be excellent to work with.
Thanks for updating us!
Jim
|
You cannot like this item. Reason: "ANONYMOUS".
You cannot remove your like from this item.
Editing a post is only allowed within 24 hours after creating it.
You cannot Like this post because the topic is closed.
Copy the URL below to share a direct link to this post.
This post cannot be edited using the classic forums editor.
To edit this post, please enable the "New forums experience" in your settings.
Jim Raskett:
Great news!
I also found Sharpstar to be excellent to work with.
Thanks for updating us!
Jim Yes absolutely! They said that it is for their Sharpstar 61EDPH I and Sharpstar 61EDPH II but I am more than confident that it will fit my Radian 61 as it's essentially a rebranding of the Sharpstar 61EDPH II. Yes, Sharpstar were very professional and I am looking forward to contacting them again in case something else comes up, but I am more than certain that it won't unless it's really bad. All good! That's why I do it for so everyone can see. I will definitely be doing a before/after comparison once I receive the replacement objective lens in the New Year. Zak |
You cannot like this item. Reason: "ANONYMOUS".
You cannot remove your like from this item.
Editing a post is only allowed within 24 hours after creating it.
You cannot Like this post because the topic is closed.
Copy the URL below to share a direct link to this post.
This post cannot be edited using the classic forums editor.
To edit this post, please enable the "New forums experience" in your settings.
Hi, I'm very glad you're on the track of getting your telescope sorted. We have a TS-Optics 115mm Triplet (also Sharpstar) at the observatory which unfortunately also schows quite some CA in the blue. Lately I managed to deal with it in post, and I'd like to share it, if it helps. - Extract the blue channel
- Remove the stars from the channel using Start
- Run only a very small number of iterations of deconvolution on the stars to get them "fixed"
- Add the stars back in
You might want to do this only after color calibration however. Here is a comparison: 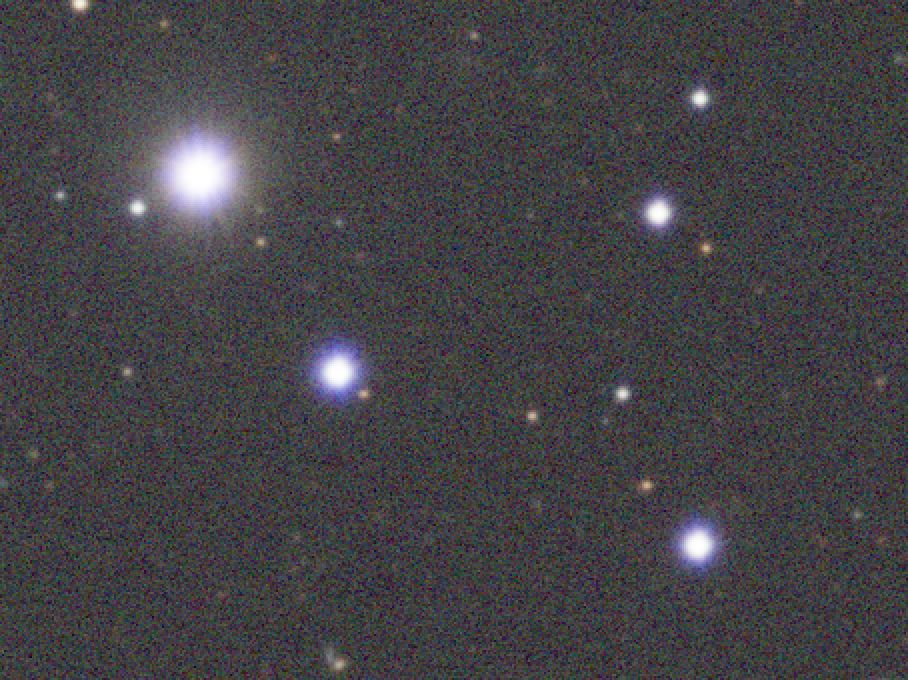  And the decon settings for this particular case: 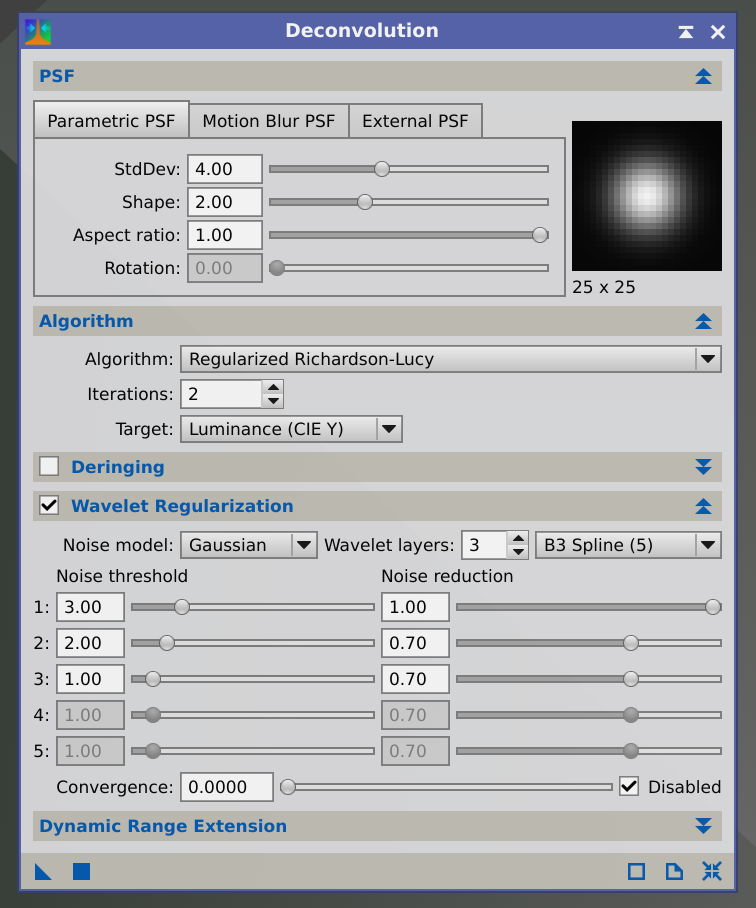 |
You cannot like this item. Reason: "ANONYMOUS".
You cannot remove your like from this item.
Editing a post is only allowed within 24 hours after creating it.
You cannot Like this post because the topic is closed.
Copy the URL below to share a direct link to this post.
This post cannot be edited using the classic forums editor.
To edit this post, please enable the "New forums experience" in your settings.
Zak Jones:
Guiem Kimi:
Zak Jones:
Thanks so much everyone for your wonderful suggestions!
I am now proud to say that I have successfully managed to process this data into something that I am very happy with! I've just put it up on my AstroBin profile if anyone's interested in seeing what I have done.
https://www.astrobin.com/xb219v/
That is a good improvement over the original! Congratulations.
What workflow did you follow, if you don't mind to explain?
Guiem.
Thanks Guiem!
I did my usual routines for the beginning of the workflow, but I separated the RGB channels and applied BXT on each channel with different settings. I then stretched the green channel with GHS and measured the FWHM using FWHMEccentricity script and took note of the number. Afterwards, I stretched the R and B channels to try and match the FWHM numbers as best as I could doing the same method as described before. Finally, I stretched the RGB image and extracted the L channel once it was stretched and combined the LRGB channels using LRGBCombination using the default settings.
Hope this helps!
Zak Thanks! I will follow that workflow with my TS Photoline 130. Congratulations. The improvement between the first and last versions you uploaded is quite big! Guiem.
|
You cannot like this item. Reason: "ANONYMOUS".
You cannot remove your like from this item.
Editing a post is only allowed within 24 hours after creating it.
You cannot Like this post because the topic is closed.
Copy the URL below to share a direct link to this post.
This post cannot be edited using the classic forums editor.
To edit this post, please enable the "New forums experience" in your settings.
Hi everyone, I've been meaning to post an update for a while now, but I have been busy with a lot of things as it's now 2024. I finally received my replacement objective lens for my Radian 61 yesterday. Installation was very easy as I remembered how to do it after watching Cuiv the Lazy Geek's video multiple times in anticipation. I do have to say compared to my Radian 61's original objective lens, the new one is much smaller and I was worried it wouldn't fit, but it still has the same threads so worrying was not necessary. Now I wait until the next clear night, which of course won't be for some time as even though there is an El Nino in effect, we have rain forecast for the next week or so lol. Feel free to advise me of what target I should shoot as unfortunately I can't shoot the Corona Australias Molecular Cloud until at least July, so I am thinking about trying it on a summer broadband object to really test how good the new objective lens is. I will definitely be posting a before and after comparison once I get a good amount of data on an object for everyone's reference. Once again, Sharpstar were awesome to deal with and I recommend people reach out to them if they have the same issue as I did. I am sure they will look after you! Zak |
You cannot like this item. Reason: "ANONYMOUS".
You cannot remove your like from this item.
Editing a post is only allowed within 24 hours after creating it.
You cannot Like this post because the topic is closed.
Copy the URL below to share a direct link to this post.
This post cannot be edited using the classic forums editor.
To edit this post, please enable the "New forums experience" in your settings.
Excellent to hear Zak!
Looking forward to a good report!
You should see a significant improvement.
Thanks for reporting back.
Jim
|
You cannot like this item. Reason: "ANONYMOUS".
You cannot remove your like from this item.
Editing a post is only allowed within 24 hours after creating it.
You cannot Like this post because the topic is closed.
Copy the URL below to share a direct link to this post.
This post cannot be edited using the classic forums editor.
To edit this post, please enable the "New forums experience" in your settings.
Zak, You may be interested in a CA correction technique I've developed that I call the synthetic blue channel method. It's trivial to implement and can easily correct even severe CA as long as you've imaged through a minus violet/fringe killer/violet reduction type filter to knock out the color bleed from defocused blue light in the green and especially the red channels. Your CA was very mild and easily corrected. Let me know if you're interested.  |
You cannot like this item. Reason: "ANONYMOUS".
You cannot remove your like from this item.
Editing a post is only allowed within 24 hours after creating it.
You cannot Like this post because the topic is closed.
Copy the URL below to share a direct link to this post.
This post cannot be edited using the classic forums editor.
To edit this post, please enable the "New forums experience" in your settings.
Jim Raskett:
Excellent to hear Zak!
Looking forward to a good report!
You should see a significant improvement.
Thanks for reporting back.
Jim It is amazing at how Sharpstar were so supportive too! I am hoping to get out and image in the next week or so to test it out. Zak |
You cannot like this item. Reason: "ANONYMOUS".
You cannot remove your like from this item.
Editing a post is only allowed within 24 hours after creating it.
You cannot Like this post because the topic is closed.
Copy the URL below to share a direct link to this post.
This post cannot be edited using the classic forums editor.
To edit this post, please enable the "New forums experience" in your settings.
Michael Owen:
Zak,
You may be interested in a CA correction technique I've developed that I call the synthetic blue channel method. It's trivial to implement and can easily correct even severe CA as long as you've imaged through a minus violet/fringe killer/violet reduction type filter to knock out the color bleed from defocused blue light in the green and especially the red channels. Your CA was very mild and easily corrected. Let me know if you're interested.
Hi Michael, That does look heaps better for sure! I am intrigued at how you have managed to do that. I'll have to go back and re-process this data again to see how much better it is compared to my original attempt. I do want to try and preserve the colours of the Corona Australis Molecular Cloud in some capacity, but I am confident that with a little tweaking in PixInsight, I will be able to do that. I did not use any fringe killer filters of any kind as I don't own any yet, but I did use my ZWO UV/IR cut filter for this image. Zak |
You cannot like this item. Reason: "ANONYMOUS".
You cannot remove your like from this item.
Editing a post is only allowed within 24 hours after creating it.
You cannot Like this post because the topic is closed.
Copy the URL below to share a direct link to this post.
This post cannot be edited using the classic forums editor.
To edit this post, please enable the "New forums experience" in your settings.
Zak, Probably because your scope is *supposed* to be an APO, and it only showed a small amount of CA under a very hard stretch, you don't have a significant amount of color bleed into the green and red channels, which is why the method worked well even without any kind of minus violet filter. The method is really intended for achromats, where the blue channel really is garbage, although it has other use cases as well. It works shockingly well, allowing full color imaging with OSC cameras and achromats with no apparent CA. Because your image contained no narrow band emission, I could use the simplest version, which replaces the blue channel with a linear combination of the green and red channels: B = 2G - R That's it. Process as normal afterward (color balance, etc.). This method sounds extreme, and it is a bit. But the effect on the luminosity is negligible; B contributes little to L and you are replacing it with a good approximation. You are also replacing the bad blue color information with a pretty good approximation. It produces decent star colors (you can experiment with the coefficients on G and R to tweak the star colors if you prefer, but I've found them to be "good enough" with 2G - R). Where it manifests really is a slight decrease in the luminosity SNR, and a changing in the quality of the color noise. Because you are throwing out the blue signal, the luminosity SNR goes down a bit, but because the blue channel contribution to L is only of order 10%, the drop in the SNR is only of order 5% (depending on how you calculate L). The quality of the color noise changes a lot, though. It goes from being RGB color noise to only two tone because the B noise becomes correlated with the green and red. But as long as you have high enough SNR and you don't pixel peep, you'll never see this. I wrote a few posts about it on Cloudy Nights, one for each of the lunar, planetary, and deep sky imaging forums, but they've generated little interest. It seems nobody seriously imaging is trying to do so in color with an achromat and an OSC camera. Shrug. The results speak for themselves, though. Lunar: https://www.cloudynights.com/topic/905904-shoot-full-color-saturated-lunar-images-with-your-achromat-the-synthetic-blue-channel-method/
Planetary: https://www.cloudynights.com/topic/905920-how-to-image-planets-in-full-color-with-an-achromat-the-synthetic-blue-channel-method/
Deep sky: https://www.cloudynights.com/topic/905943-full-color-broadband-deep-sky-imaging-with-a-osc-camera-and-an-achromat-the-synthetic-blue-channel-method/ |
You cannot like this item. Reason: "ANONYMOUS".
You cannot remove your like from this item.
Editing a post is only allowed within 24 hours after creating it.
You cannot Like this post because the topic is closed.
Copy the URL below to share a direct link to this post.
This post cannot be edited using the classic forums editor.
To edit this post, please enable the "New forums experience" in your settings.
Zak, Can you please upload an image after the change?, to see if they have really solved the problem. I also have a Raptor 61 and I don't know if it is worth spending more money on this telescope than to date, it is only valid for Narrowband.
Thank you so much
Leo
|
You cannot like this item. Reason: "ANONYMOUS".
You cannot remove your like from this item.
Editing a post is only allowed within 24 hours after creating it.
You cannot Like this post because the topic is closed.
Copy the URL below to share a direct link to this post.
This post cannot be edited using the classic forums editor.
To edit this post, please enable the "New forums experience" in your settings.
 The blue synthetic channel method works. In my case with a strong chromatic aberration, on the Raptor 61, the expression B=2*Lum-0.5*R works very well and once changed, apply blurXterminator. The result is an improvement, the entire process remains to be completed to see the final result. 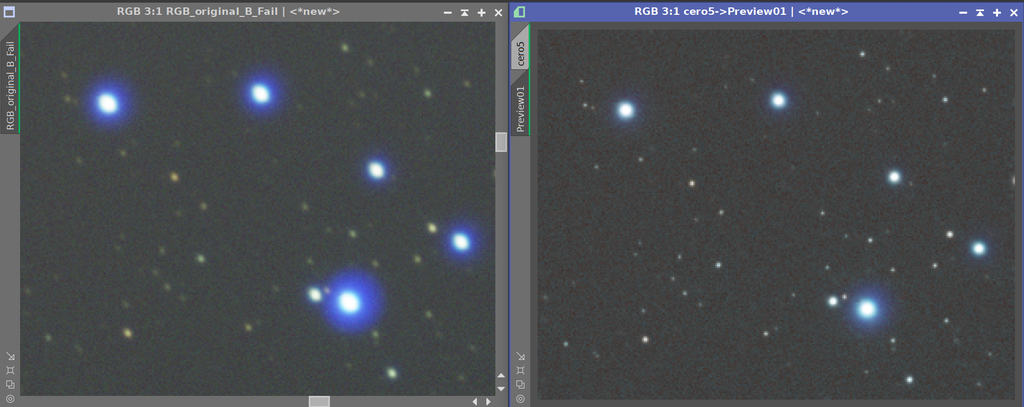 |
You cannot like this item. Reason: "ANONYMOUS".
You cannot remove your like from this item.
Editing a post is only allowed within 24 hours after creating it.
You cannot Like this post because the topic is closed.
Copy the URL below to share a direct link to this post.
This post cannot be edited using the classic forums editor.
To edit this post, please enable the "New forums experience" in your settings.