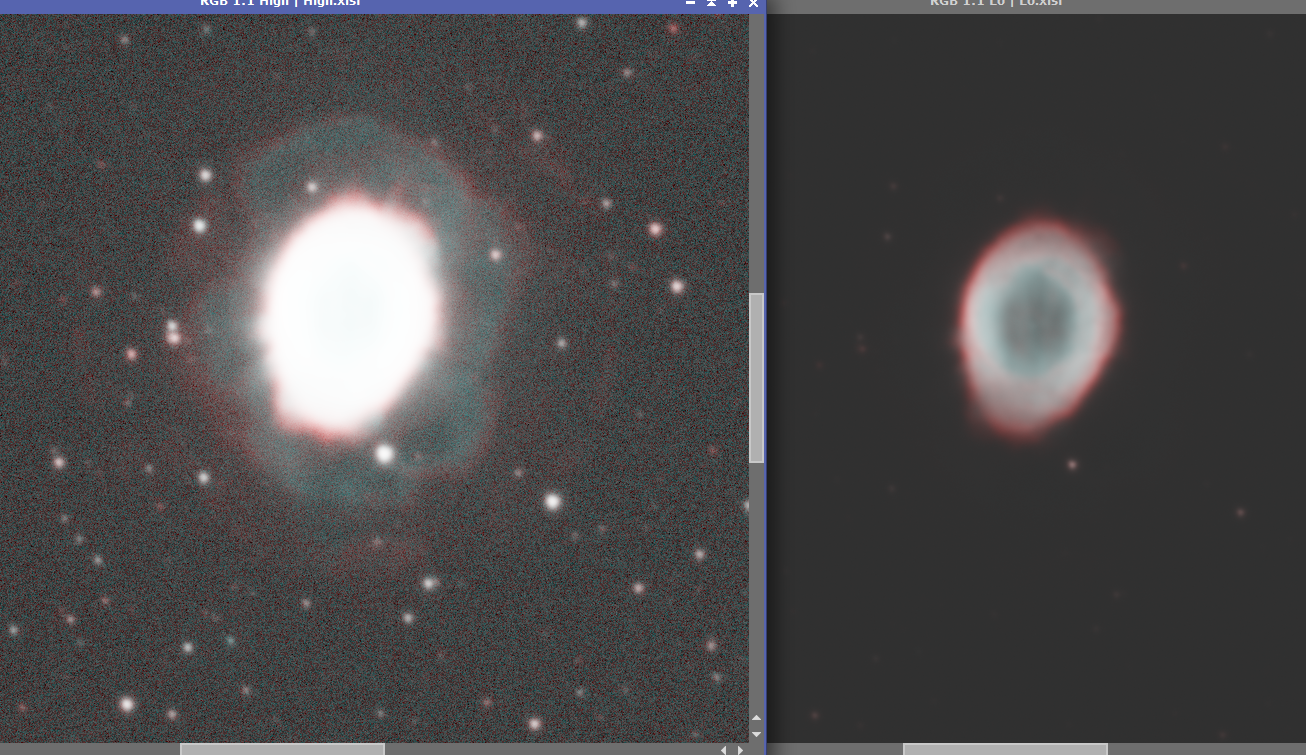
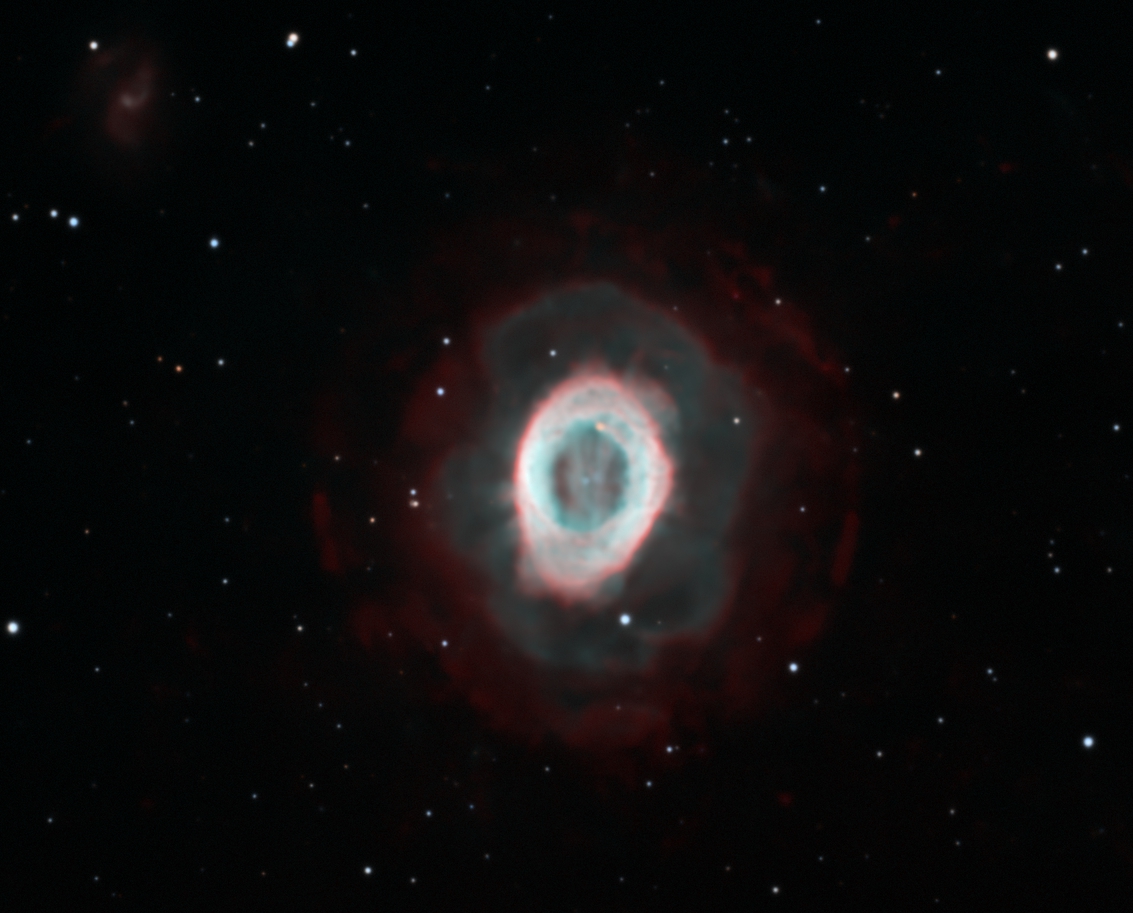
Hi everyone, I'm recently retry processing my last year data on planetary nebulas of M57, M27 and cat's eye nebula, but still cannot get the key idea of merging center region and surrounding fainter areas. This is an example of high-stretch and low-stretch for surrounding and center regions of M57, but the problem is any way merging them will produce dark circle around the right center. I also attached the H/O channel , each one actually show much details but after channel combination and STF they got so faint. I really hope to learn some more tips processing them like how to generate the masks and how to deal with edges, but there are too few tutorials to follow. So, my experienced friends, could you give me some advices for processing these small but challenging objects? CS Yingtian   |
You cannot like this item. Reason: "ANONYMOUS".
You cannot remove your like from this item.
Editing a post is only allowed within 24 hours after creating it.
You cannot Like this post because the topic is closed.
Copy the URL below to share a direct link to this post.
This post cannot be edited using the classic forums editor.
To edit this post, please enable the "New forums experience" in your settings.
I'll update a google drive link for H/O channel in case anyone is interested have a try. Thanks!
|
You cannot like this item. Reason: "ANONYMOUS".
You cannot remove your like from this item.
Editing a post is only allowed within 24 hours after creating it.
You cannot Like this post because the topic is closed.
Copy the URL below to share a direct link to this post.
This post cannot be edited using the classic forums editor.
To edit this post, please enable the "New forums experience" in your settings.
Your image scale is way too large for your seeing and the link only has the Ha channel.
|
You cannot like this item. Reason: "ANONYMOUS".
You cannot remove your like from this item.
Editing a post is only allowed within 24 hours after creating it.
You cannot Like this post because the topic is closed.
Copy the URL below to share a direct link to this post.
This post cannot be edited using the classic forums editor.
To edit this post, please enable the "New forums experience" in your settings.
If you’re using Pixinsight, GHS would probably let you stretch the inner and outer regions as you want without separating them, and/or using a mask. Otherwise, I would stretch the whole image as far as the inner area allows, then apply a binary mask (in Pixinsight, made using the Game script) that’s been heavily convolved (blurred edge) to protect the inner area while you stretch the outer area further.
Cheers,
Scott
|
You cannot like this item. Reason: "ANONYMOUS".
You cannot remove your like from this item.
Editing a post is only allowed within 24 hours after creating it.
You cannot Like this post because the topic is closed.
Copy the URL below to share a direct link to this post.
This post cannot be edited using the classic forums editor.
To edit this post, please enable the "New forums experience" in your settings.
Try light asinh stretch followed by a generalized hyperbolic stretch. I don't know what these are called in PI but I'm sure there are equivalents.
|
You cannot like this item. Reason: "ANONYMOUS".
You cannot remove your like from this item.
Editing a post is only allowed within 24 hours after creating it.
You cannot Like this post because the topic is closed.
Copy the URL below to share a direct link to this post.
This post cannot be edited using the classic forums editor.
To edit this post, please enable the "New forums experience" in your settings.
This is how I would approach processing these images:
1) Star align the Ha and OIII images with the RGB
2) Run BlurXTerminator in the correct only mode on all three images
3) On the RGB plate solve and run either PhotometricColorCalibration or SpectralphotometricCollorCalibration
4) Run BlurXTerminator on all three images, then run StarXTerminator on the Ha and OIII to remove the stars, on the RGB image generate both a stars and starless image.
5) Run NoiseXterminator on the Ha, OIII and RGB Starless images
6) Stretch the Ha, OIII and RGB Starless images so that the max white level is like 0.85 and the background levels are about the same.
7) Stretch the Stars image with ArcsinhStretch
8) Using Pixelmath using and unchecking "use single RGB/k expression"
Use the following formula in the Red channel: iif(RGB>ha,RGB,Ha) where RGB and Ha are the names you made the images
Use the following formula in the Blue and Green channels: iif(RGB>OIII,RGB,OIII) where RGB and OIII are the names you made the images
On the destination click on "generate new image"
When you execute this by clicking on the Square button it will put the greater value from either the RGB and Ha in the red and either the RGB and OIII in the Blue and green channels. Where the RGB has low signal the Ha has a higher signal it should replace those values and likewise in the blue and green. You might have to scale the images by using X*Ha for example to tune down too much Ha or increase it.
after your done you might have to adjust the colors and or backgrounds to get back to a better and more accurate image.
An alternative method would be to generate a synthetic colorized Ha and OIII images using NBColourMapper and then use HDRComposition.
There are several ways in PixInsight to increase the dynamic range of the final image and how they work will be dependant upon the quality of your data, so one way usually works better than the other, you just need to experiment.
If you post the RGB and Ha you might get more replies and better recommendations.
Good Luck
|
You cannot like this item. Reason: "ANONYMOUS".
You cannot remove your like from this item.
Editing a post is only allowed within 24 hours after creating it.
You cannot Like this post because the topic is closed.
Copy the URL below to share a direct link to this post.
This post cannot be edited using the classic forums editor.
To edit this post, please enable the "New forums experience" in your settings.
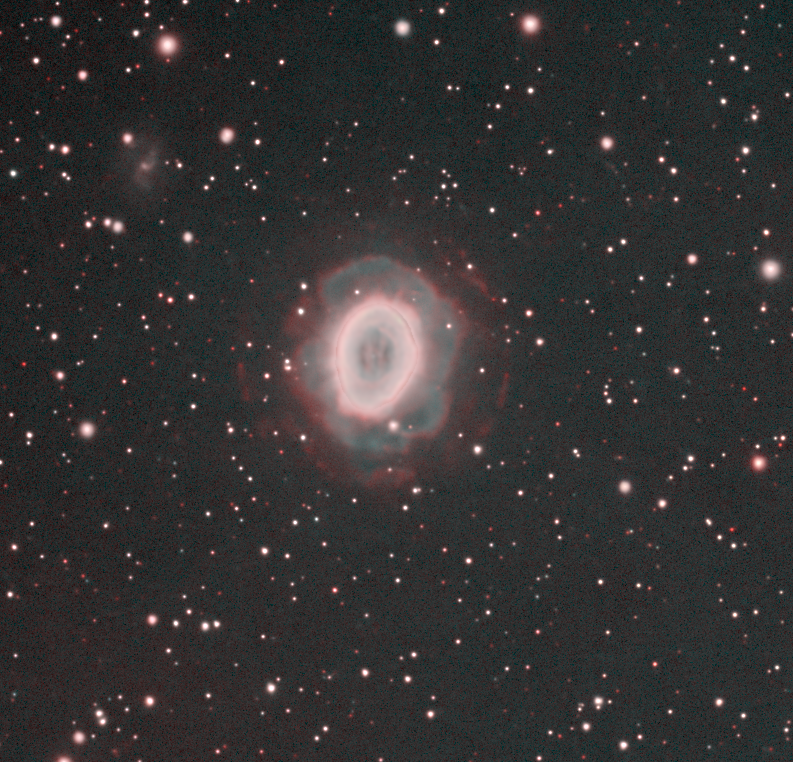
 Delinearized with MaskedStretch and HDRMT applied in the non-linear stage (with a mask only targetting the bright core).
|
You cannot like this item. Reason: "ANONYMOUS".
You cannot remove your like from this item.
Editing a post is only allowed within 24 hours after creating it.
You cannot Like this post because the topic is closed.
Copy the URL below to share a direct link to this post.
This post cannot be edited using the classic forums editor.
To edit this post, please enable the "New forums experience" in your settings.
Dominik Weinbrenner:
Delinearized with MaskedStretch and HDRMT applied in the non-linear stage (with a mask only targetting the bright core). This is a wonderful processed image! I also expected to process out something like this but never succeed, I'll try your process! Best Yingtian
|
You cannot like this item. Reason: "ANONYMOUS".
You cannot remove your like from this item.
Editing a post is only allowed within 24 hours after creating it.
You cannot Like this post because the topic is closed.
Copy the URL below to share a direct link to this post.
This post cannot be edited using the classic forums editor.
To edit this post, please enable the "New forums experience" in your settings.
Michael Maas:
This is how I would approach processing these images:
1) Star align the Ha and OIII images with the RGB
2) Run BlurXTerminator in the correct only mode on all three images
3) On the RGB plate solve and run either PhotometricColorCalibration or SpectralphotometricCollorCalibration
4) Run BlurXTerminator on all three images, then run StarXTerminator on the Ha and OIII to remove the stars, on the RGB image generate both a stars and starless image.
5) Run NoiseXterminator on the Ha, OIII and RGB Starless images
6) Stretch the Ha, OIII and RGB Starless images so that the max white level is like 0.85 and the background levels are about the same.
7) Stretch the Stars image with ArcsinhStretch
8) Using Pixelmath using and unchecking "use single RGB/k expression"
Use the following formula in the Red channel: iif(RGB>ha,RGB,Ha) where RGB and Ha are the names you made the images
Use the following formula in the Blue and Green channels: iif(RGB>OIII,RGB,OIII) where RGB and OIII are the names you made the images
On the destination click on "generate new image"
When you execute this by clicking on the Square button it will put the greater value from either the RGB and Ha in the red and either the RGB and OIII in the Blue and green channels. Where the RGB has low signal the Ha has a higher signal it should replace those values and likewise in the blue and green. You might have to scale the images by using X*Ha for example to tune down too much Ha or increase it.
after your done you might have to adjust the colors and or backgrounds to get back to a better and more accurate image.
An alternative method would be to generate a synthetic colorized Ha and OIII images using NBColourMapper and then use HDRComposition.
There are several ways in PixInsight to increase the dynamic range of the final image and how they work will be dependant upon the quality of your data, so one way usually works better than the other, you just need to experiment.
If you post the RGB and Ha you might get more replies and better recommendations.
Good Luck Thank you Michael! I didn't collect RGB image for this target but only RGB channels, but I process stars in a similar way. My problem occured at step 6, when I use HistogramTransform, usually a not overexposed center also means dark surrounding area, or do you mean using both HT and CurveTransform?
|
You cannot like this item. Reason: "ANONYMOUS".
You cannot remove your like from this item.
Editing a post is only allowed within 24 hours after creating it.
You cannot Like this post because the topic is closed.
Copy the URL below to share a direct link to this post.
This post cannot be edited using the classic forums editor.
To edit this post, please enable the "New forums experience" in your settings.
andrea tasselli:
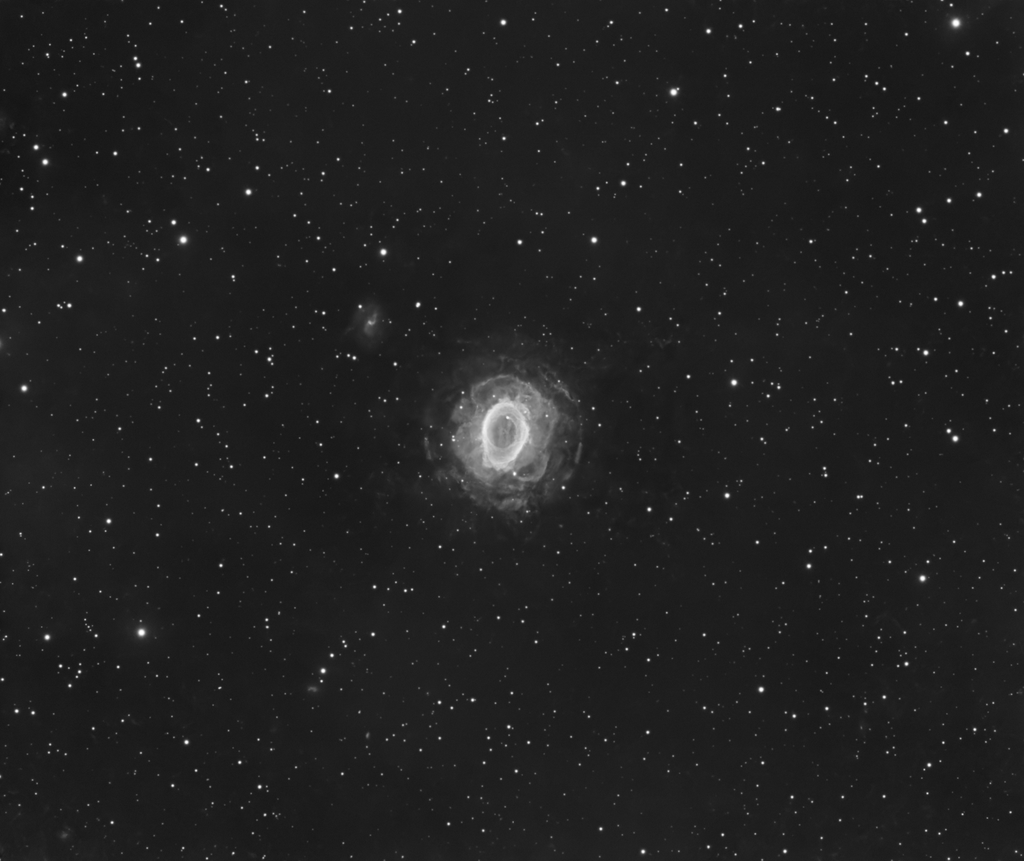
Your image scale is way too large for your seeing and the link only has the Ha channel. Thank you for your advice! I may try downsample due to my poor seeings. The O channel is here: https://drive.google.com/file/d/175dGvbhTPduJj36ttETHMh-ePst1udRZ/view?usp=sharingH channel: https://drive.google.com/file/d/1WiqaeTCqGgWXWkj67zy2aQW9SUQM7nxv/view?usp=sharing |
You cannot like this item. Reason: "ANONYMOUS".
You cannot remove your like from this item.
Editing a post is only allowed within 24 hours after creating it.
You cannot Like this post because the topic is closed.
Copy the URL below to share a direct link to this post.
This post cannot be edited using the classic forums editor.
To edit this post, please enable the "New forums experience" in your settings.
Thanks for the data, still working on it but my first attempt was no where as good as Dominik Weinbrenner attempt above. He got a lot of detail and was able to control the noise, my approach had difficulty with the noise floor and holding on to the faint detail.
|
You cannot like this item. Reason: "ANONYMOUS".
You cannot remove your like from this item.
Editing a post is only allowed within 24 hours after creating it.
You cannot Like this post because the topic is closed.
Copy the URL below to share a direct link to this post.
This post cannot be edited using the classic forums editor.
To edit this post, please enable the "New forums experience" in your settings.
Dominik Weinbrenner:
Delinearized with MaskedStretch and HDRMT applied in the non-linear stage (with a mask only targetting the bright core). Can you describe the parameters you used in MaskStretch and in HDMRT? Can you post the mask you used?
|
You cannot like this item. Reason: "ANONYMOUS".
You cannot remove your like from this item.
Editing a post is only allowed within 24 hours after creating it.
You cannot Like this post because the topic is closed.
Copy the URL below to share a direct link to this post.
This post cannot be edited using the classic forums editor.
To edit this post, please enable the "New forums experience" in your settings.
John Stone:
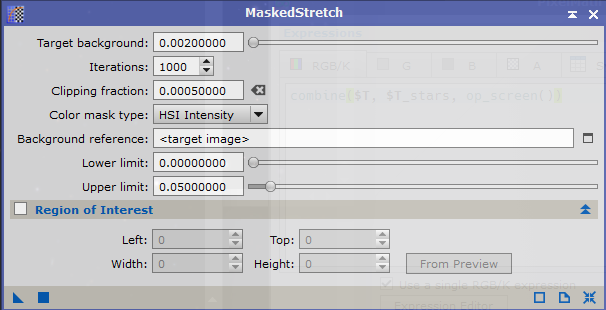
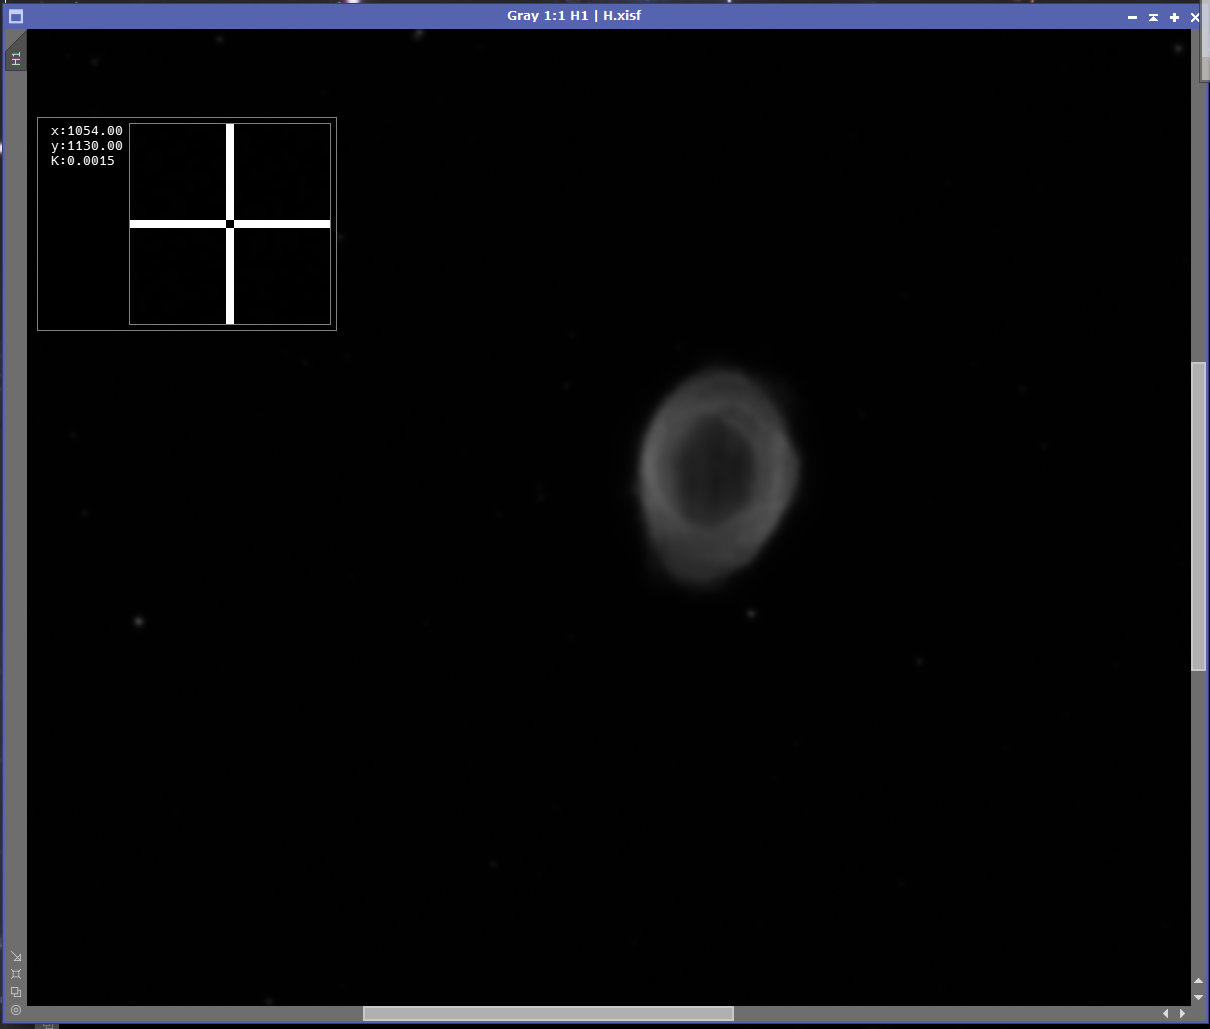
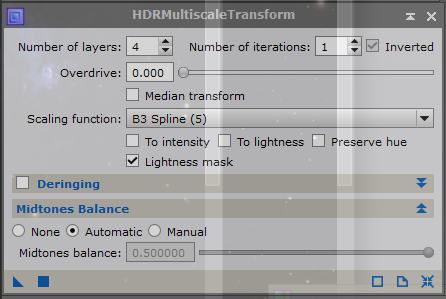
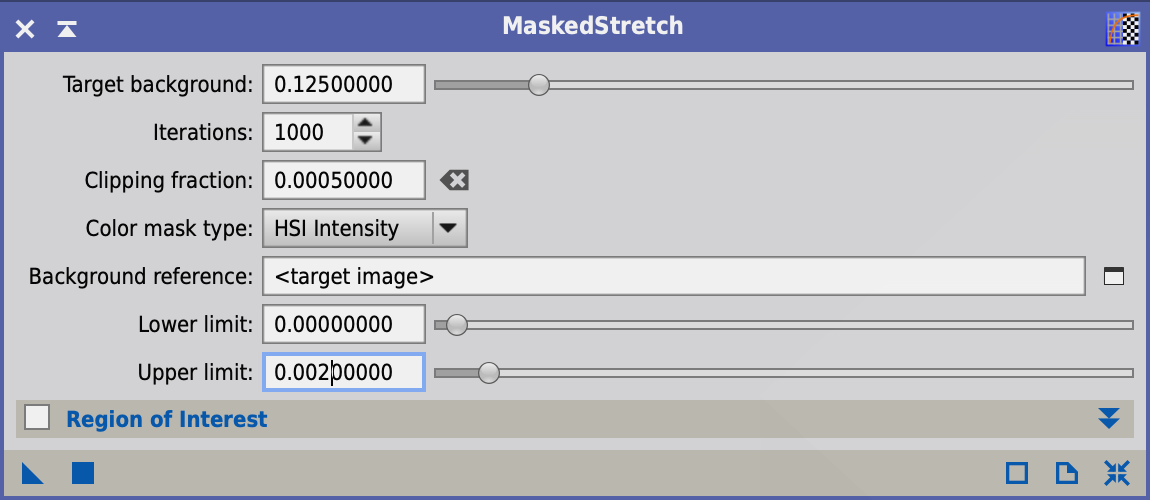
Can you describe the parameters you used in MaskStretch and in HDMRT? Can you post the mask you used? MaskedStretch: 1000 iterations (maximum) and a target background level of 0.02 if I remember correctly (it's based on the median background level in the image, you can use the readout cursor to get an idea of the value). The mask is a simple RangeSelection mask with a cutoff below a certain brightness. Use the "screen" function to see where that cutoff is and dial it in using the slider so you attack only the inner part of the ring. HDRMT: Layers 4 or 5 (I don't remember sorry), 1 iteration, B3 spline scaling, "lightness mask" checked.
|
You cannot like this item. Reason: "ANONYMOUS".
You cannot remove your like from this item.
Editing a post is only allowed within 24 hours after creating it.
You cannot Like this post because the topic is closed.
Copy the URL below to share a direct link to this post.
This post cannot be edited using the classic forums editor.
To edit this post, please enable the "New forums experience" in your settings.
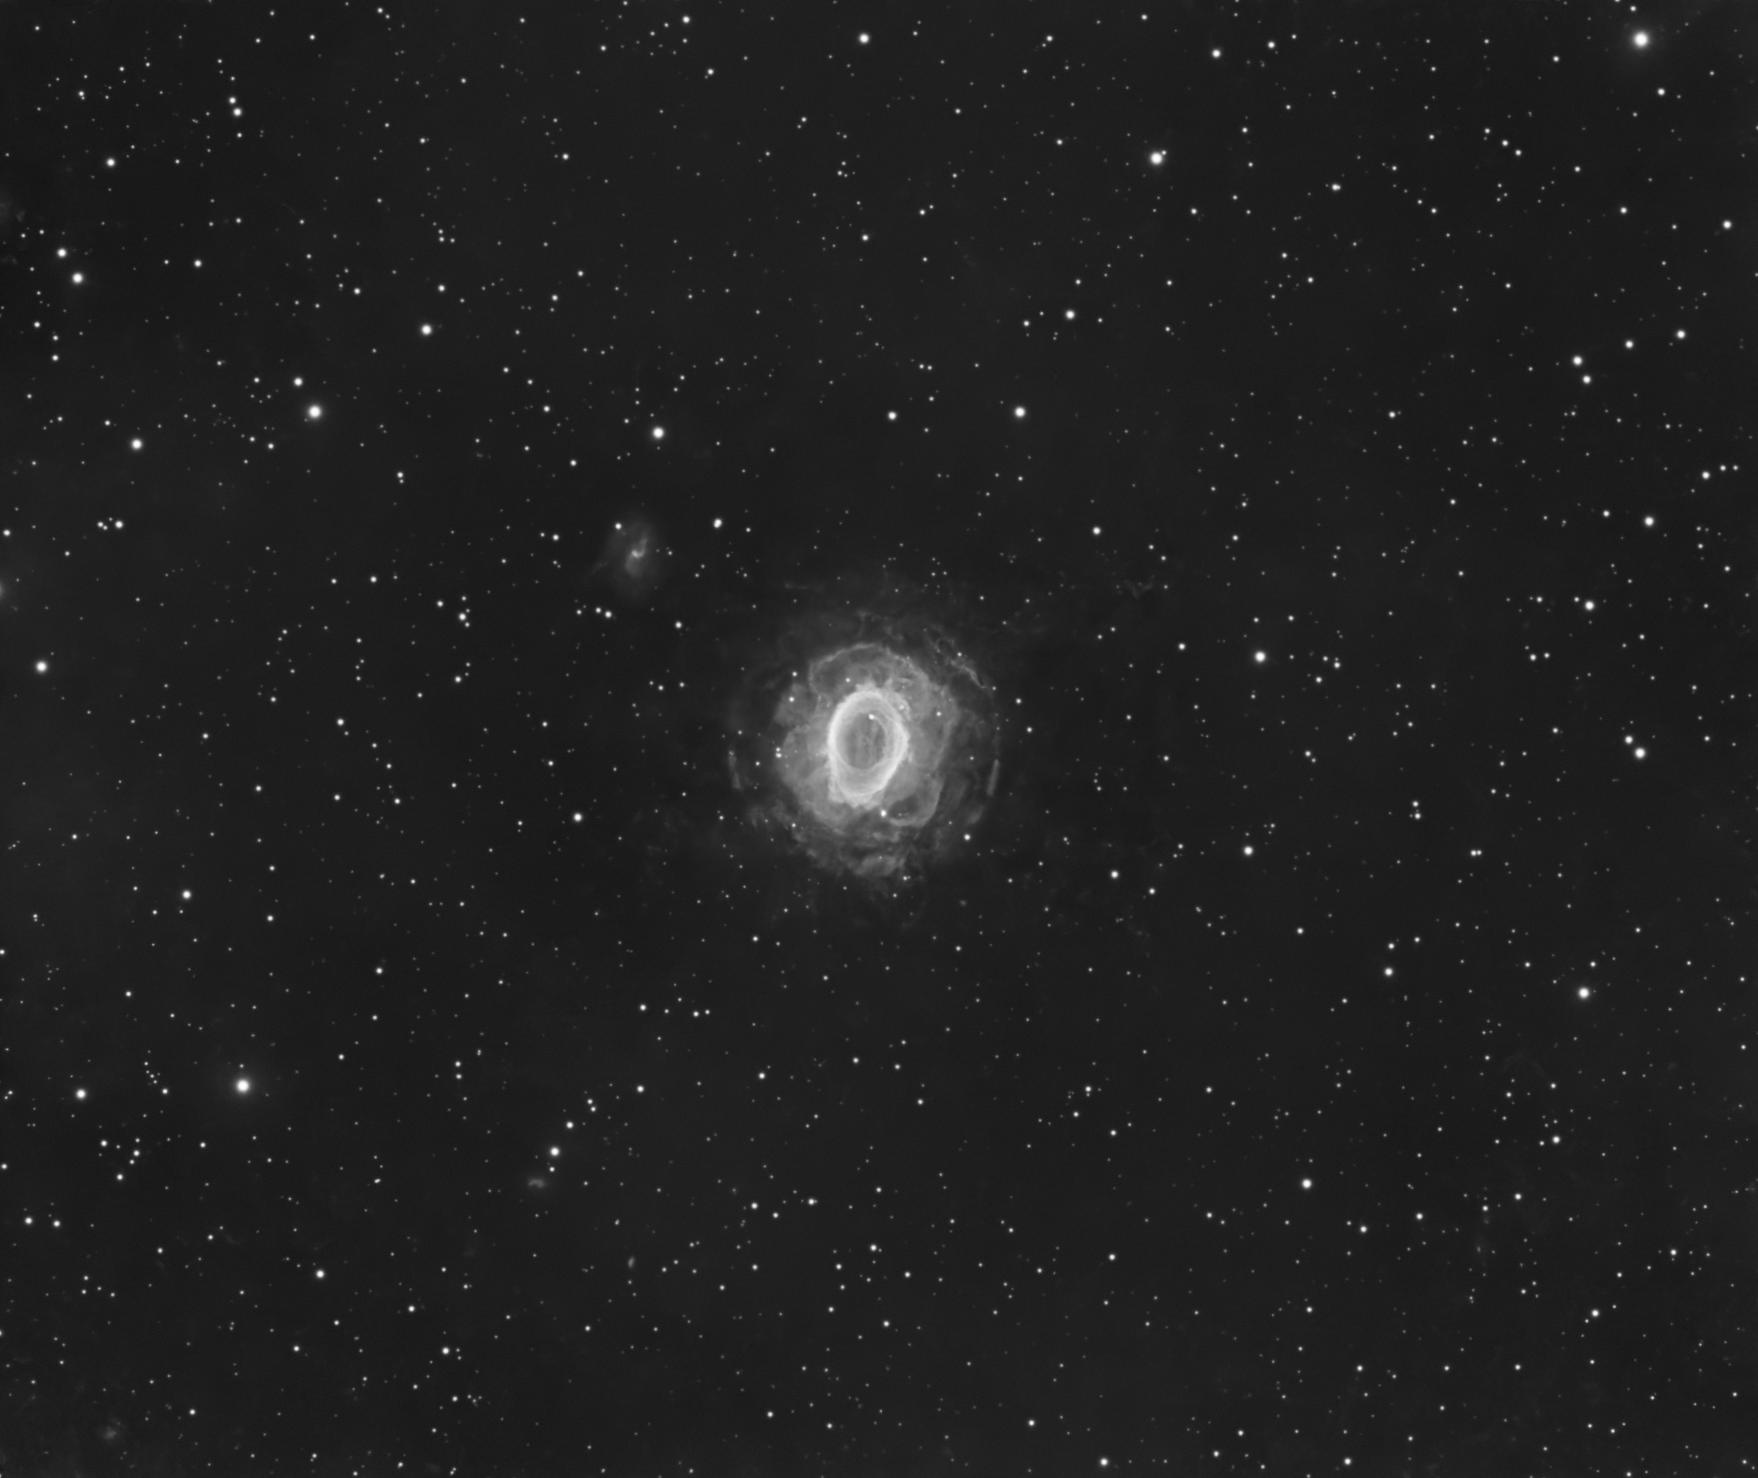
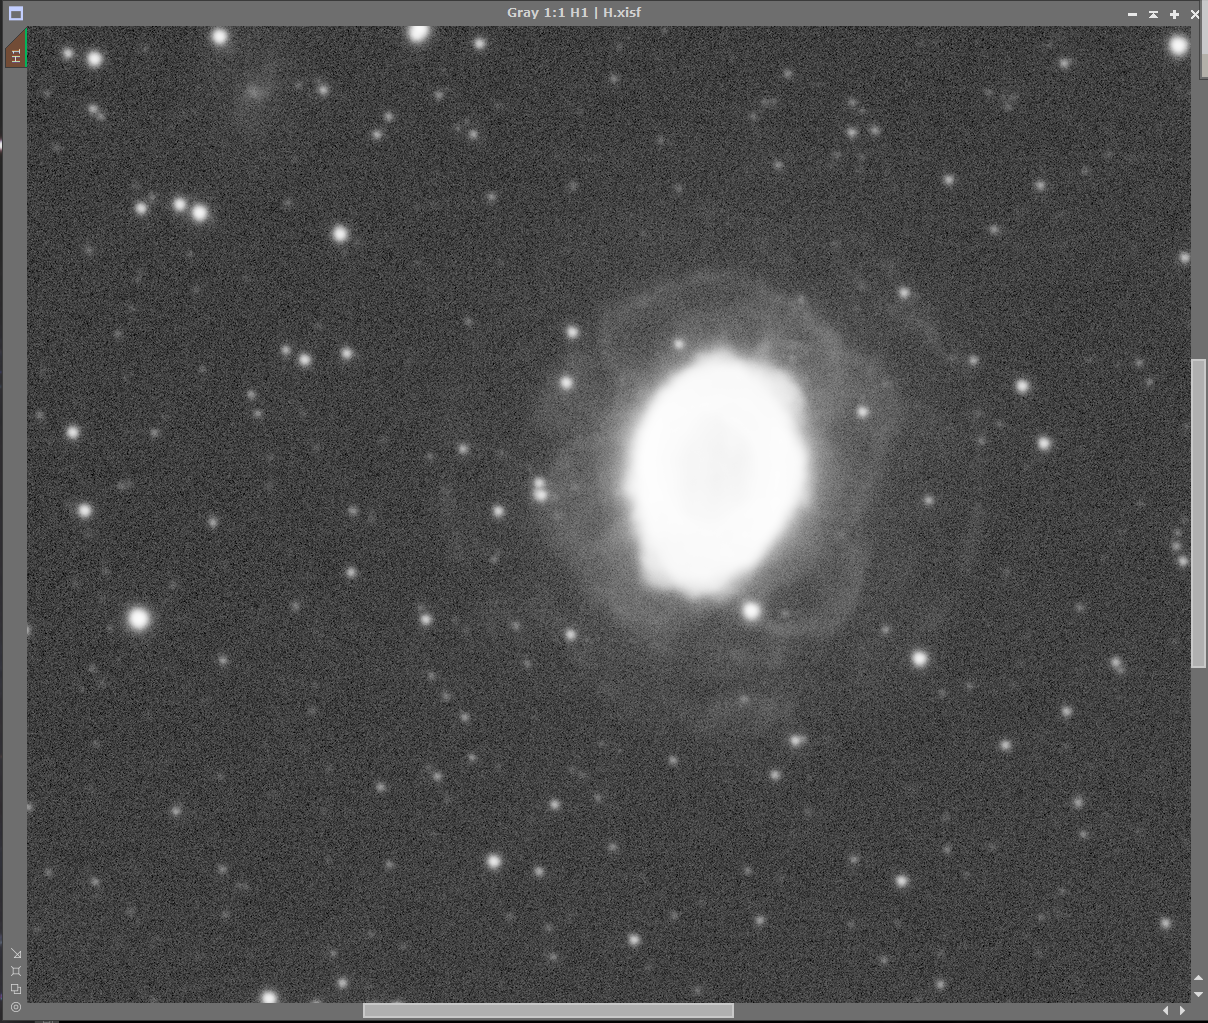
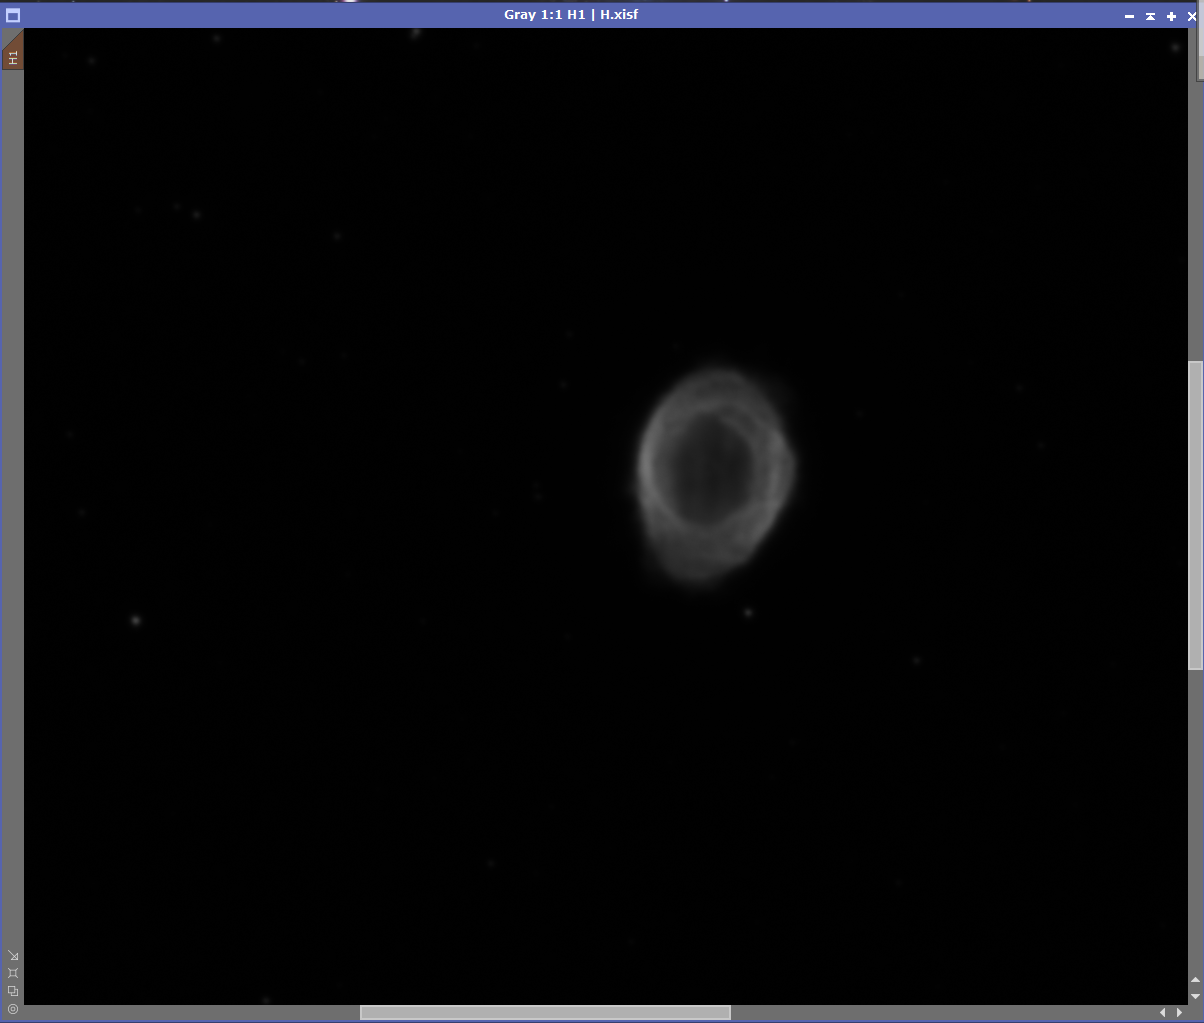
Ha image. Start with (STF):  Masked stretch  STF off: 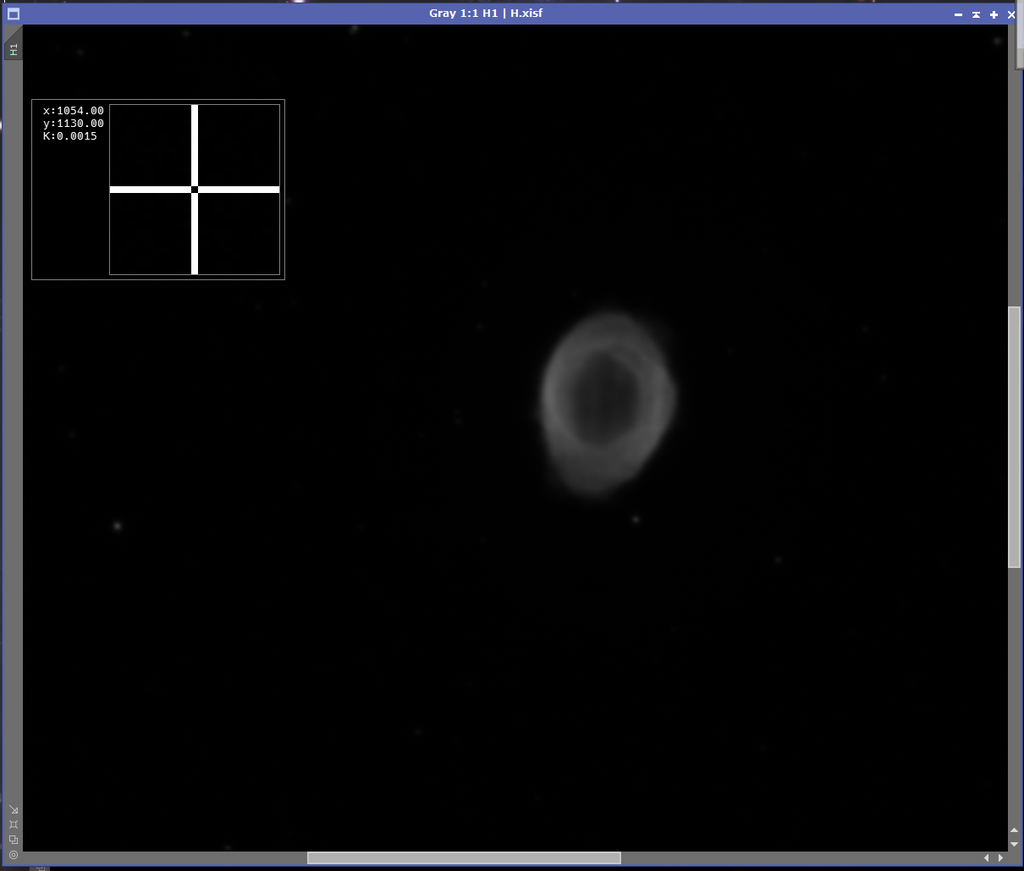 STF on: 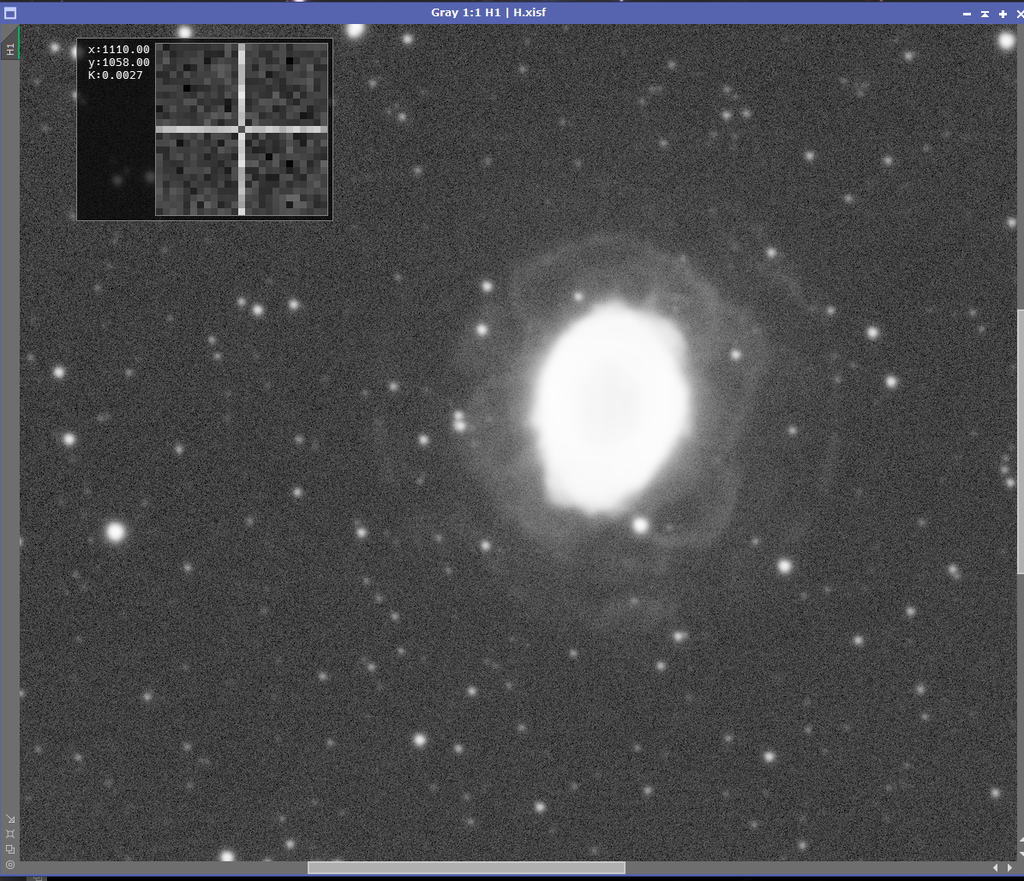 Mask: 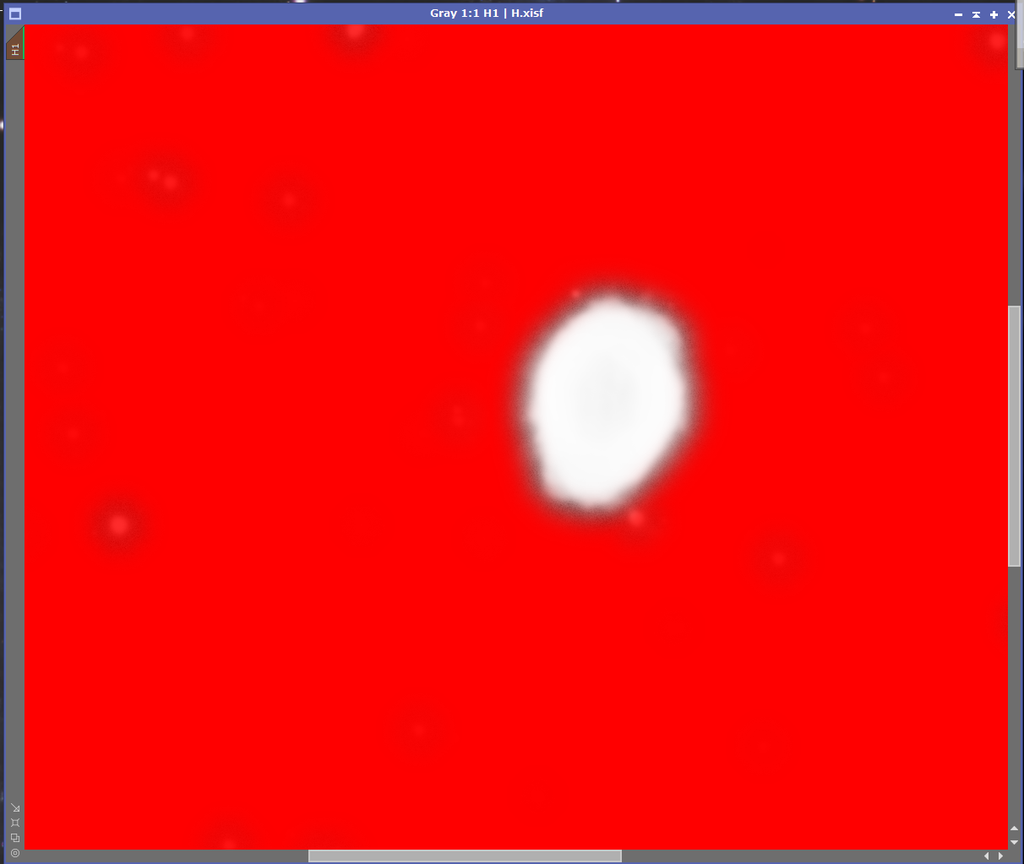 HDRMT:  STF ON:  STF OFF: 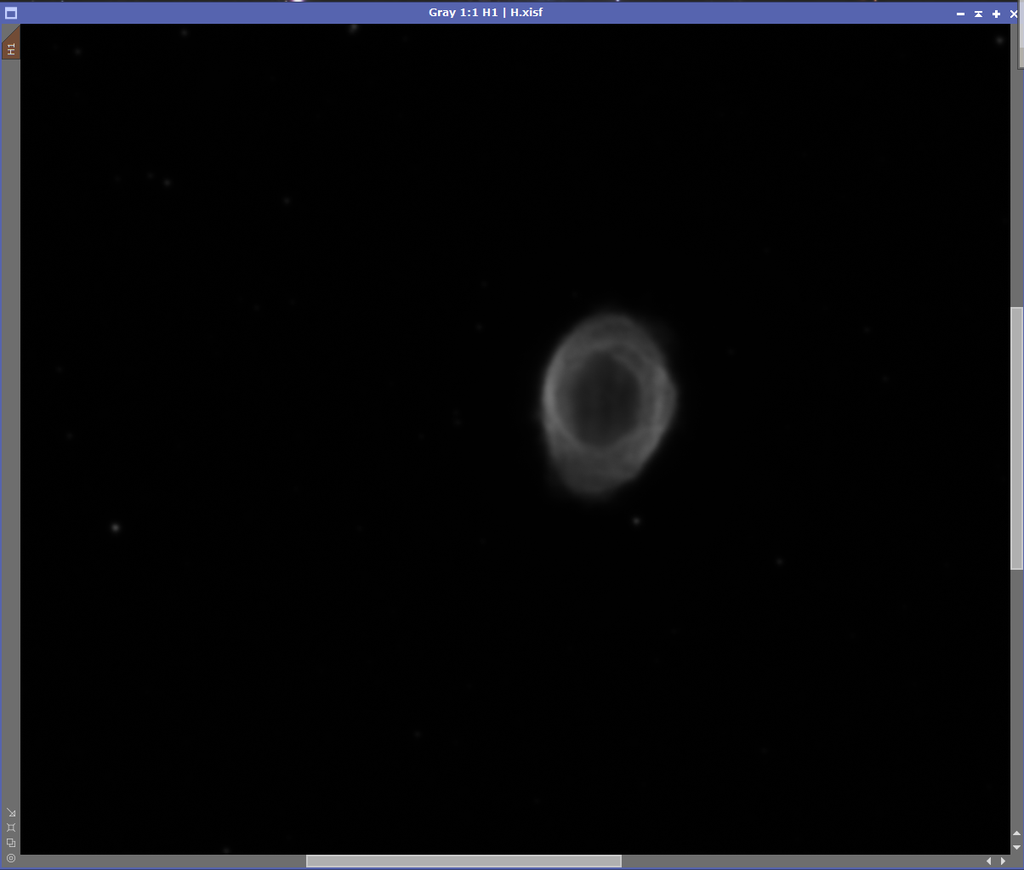 I hope you can take another look and reproduce your amazing result and then teach us how you did it. Thanks.
|
You cannot like this item. Reason: "ANONYMOUS".
You cannot remove your like from this item.
Editing a post is only allowed within 24 hours after creating it.
You cannot Like this post because the topic is closed.
Copy the URL below to share a direct link to this post.
This post cannot be edited using the classic forums editor.
To edit this post, please enable the "New forums experience" in your settings.
My bad, a mix-up of terminology caused by replying from my mobile with no PI available. In masked stretch, your target background level should be in the range of 0.125-0.2. This defines the amount of stretching that is done to the image. If you put 0.002 in there, which basically is signal in linear state, no stretching is done, which is why you still needed an STF to even see your background. What I meant was to set the upper limit of your background reference to the read out value. 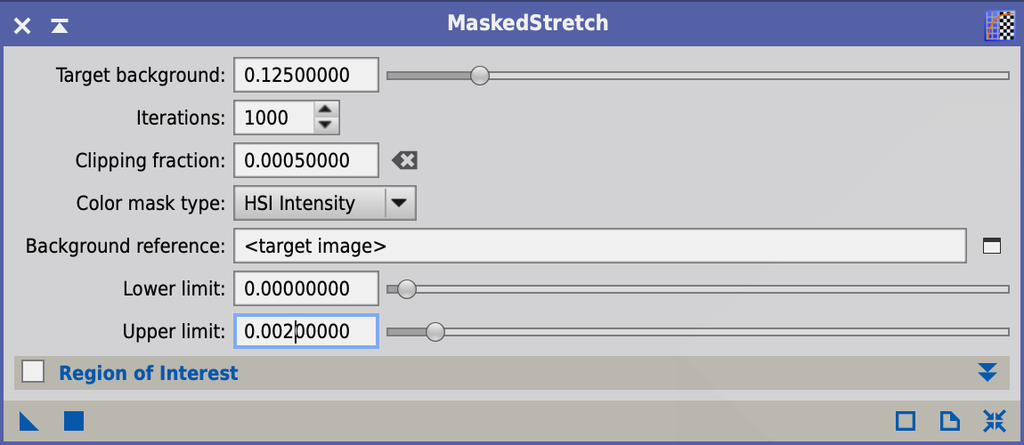 Your RangeMask looks okay, you might want to increase the cutoff a bit more, otherwise HDRMT will give you overcorrected (black) areas in the transition zone between bright core and dim shell.
|
You cannot like this item. Reason: "ANONYMOUS".
You cannot remove your like from this item.
Editing a post is only allowed within 24 hours after creating it.
You cannot Like this post because the topic is closed.
Copy the URL below to share a direct link to this post.
This post cannot be edited using the classic forums editor.
To edit this post, please enable the "New forums experience" in your settings.
This has been a very informative post, I have learn a lot from all the comments. Using the maskedStretch and then generating two clone images, one for the bright parts of the nebula and another for the dim parts . I did this for both the Ha and OIII channels. I also had a OIII and Ha image of the stars that I used to generate the star image. After I had the bright and dim images I just used pixel math to add them together with rescale option turned on. I generated the attached cropped HOO image. It took a bit to keep from generating the dark edge you discussed. 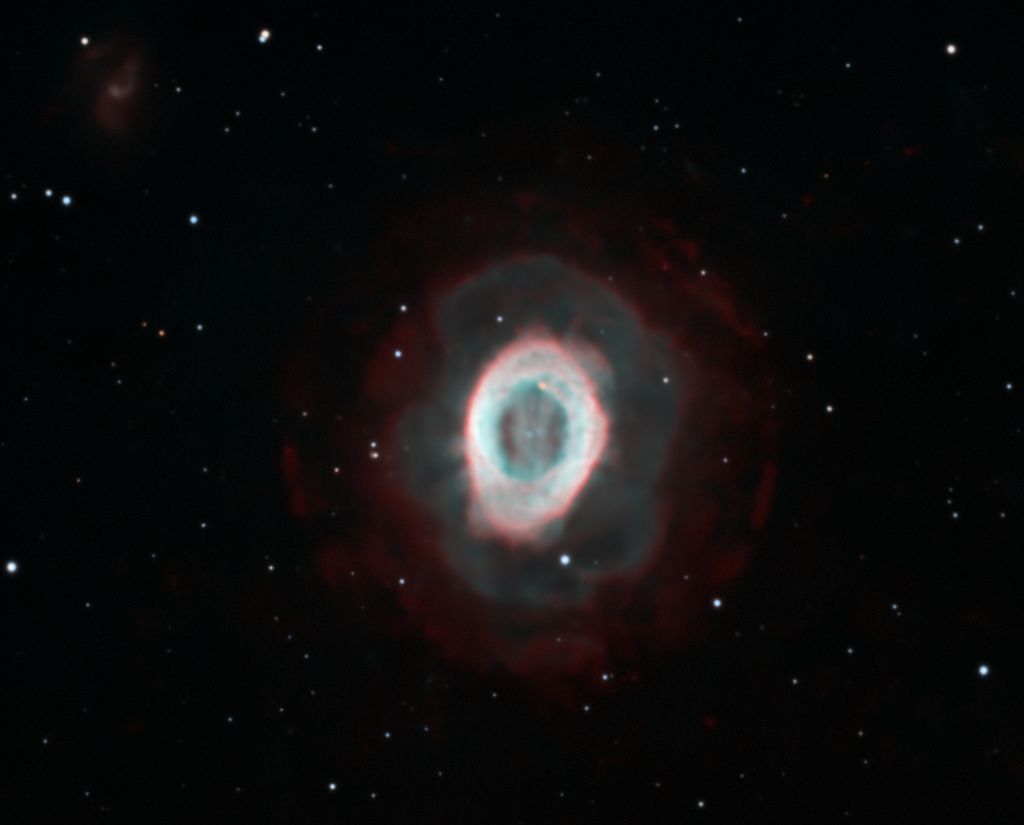 Hope this helps and it was very interesting hearing all the possible solutions Michael
|
You cannot like this item. Reason: "ANONYMOUS".
You cannot remove your like from this item.
Editing a post is only allowed within 24 hours after creating it.
You cannot Like this post because the topic is closed.
Copy the URL below to share a direct link to this post.
This post cannot be edited using the classic forums editor.
To edit this post, please enable the "New forums experience" in your settings.
 My mask still not fitting center region perfectly (maybe I should lower it a bit to cover more center), but I think I've done most part of protecting center to global lightness. Thanks to Everyone! Besides, may I include your contents if I make a tutorial? @Dominik WeinbrennerCS Yingtian
|
You cannot like this item. Reason: "ANONYMOUS".
You cannot remove your like from this item.
Editing a post is only allowed within 24 hours after creating it.
You cannot Like this post because the topic is closed.
Copy the URL below to share a direct link to this post.
This post cannot be edited using the classic forums editor.
To edit this post, please enable the "New forums experience" in your settings.
Sure, all public knowledge.
|
You cannot like this item. Reason: "ANONYMOUS".
You cannot remove your like from this item.
Editing a post is only allowed within 24 hours after creating it.
You cannot Like this post because the topic is closed.
Copy the URL below to share a direct link to this post.
This post cannot be edited using the classic forums editor.
To edit this post, please enable the "New forums experience" in your settings.