I'm experimenting trying to combine Ha with LRGB. I've listened to others, watched videos, read online, and everyone seems to have their own method to this madness.
I strongly prefer to see what's happening to the image in real time, as I am working on it. It's just my way, not right/wrong, good/bad for anyone else. That's why I don't like fiddling with numbers if I can't see the immediate real-time results. I guess you can say I am sense-oriented, at least when it comes to using my eyes & ears (I'm a composer).
Enlighten me. I'm slow…
Jerry
|
You cannot like this item. Reason: "ANONYMOUS".
You cannot remove your like from this item.
Editing a post is only allowed within 24 hours after creating it.
You cannot Like this post because the topic is closed.
Copy the URL below to share a direct link to this post.
This post cannot be edited using the classic forums editor.
To edit this post, please enable the "New forums experience" in your settings.
I use PI but for combining Ha I use a layers based programme such as PA, affinity or gimp. Use blend mode lighten to add the Ha to red channel and tweak the stretches of both images finely to get the result I want.
|
You cannot like this item. Reason: "ANONYMOUS".
You cannot remove your like from this item.
Editing a post is only allowed within 24 hours after creating it.
You cannot Like this post because the topic is closed.
Copy the URL below to share a direct link to this post.
This post cannot be edited using the classic forums editor.
To edit this post, please enable the "New forums experience" in your settings.
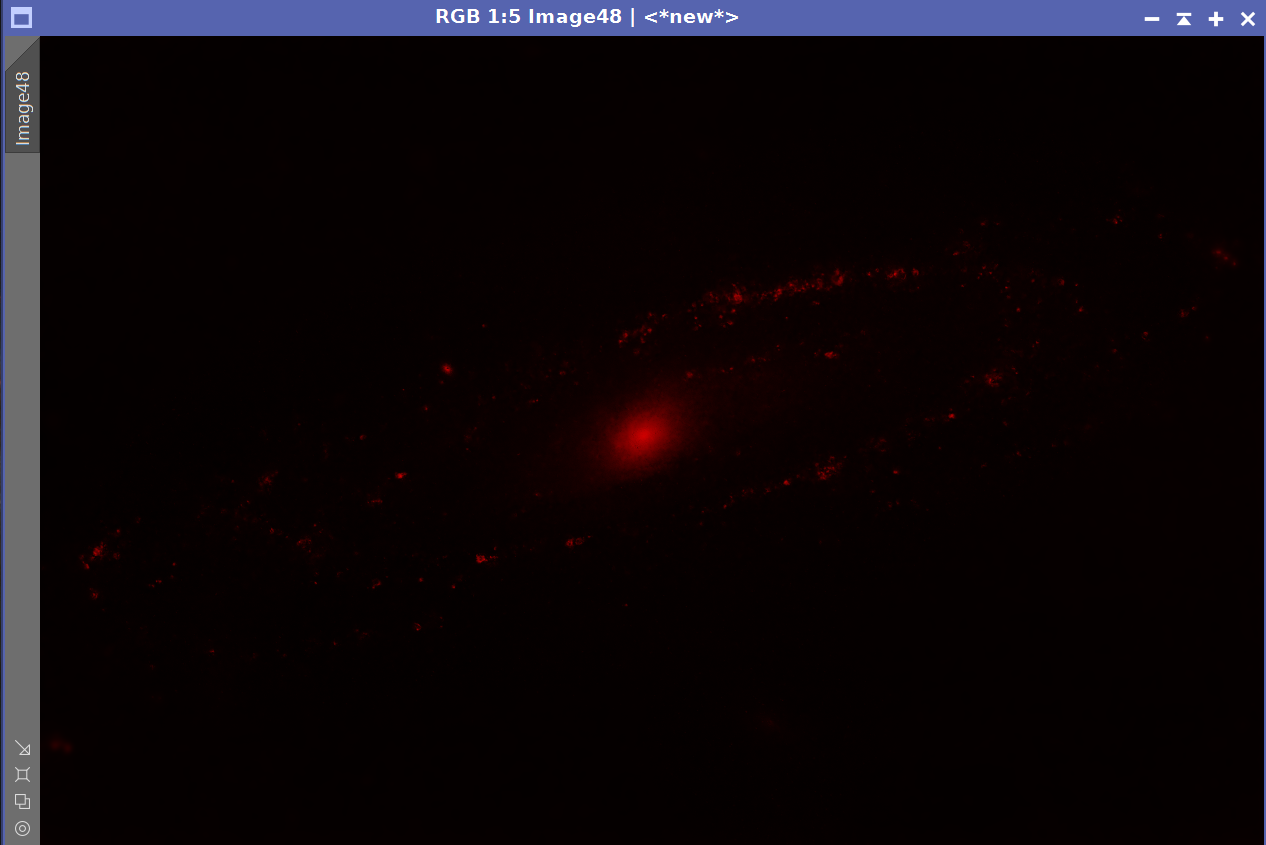
I personally use the ImageBlend script (repository link: https://www.cosmicphotons.com/pi-scripts/imageblend/). It has some tweaking available with a live preview, instead of flying blind in pure PixelMath. Basic steps are: - Make your Ha image red using whatever method you're familiar with. (I personally use pixelmath... which I know we're trying to avoid. But this is just assigning R = Ha, so not too crazy).
- Use curves to make the background of the Ha black, with the only bright spots being where you want the Ha to shine through
- Use ImageBlend
- Set your stretched LRGB image to the Base Image
- Set your red Ha image to the Blend Image
- Play around with the "Blend Mode" to find one that is close to what you're looking for. I can't remember which one I like but I think it might be Overlay? Or soft/hard light. Not sure.
- Play around with the Adjustment Parameters of the Blend Image to dial it in
Editing to add: This is what my Ha image looked like after Step 2 for this image, to give you a sense for what you should be looking for: 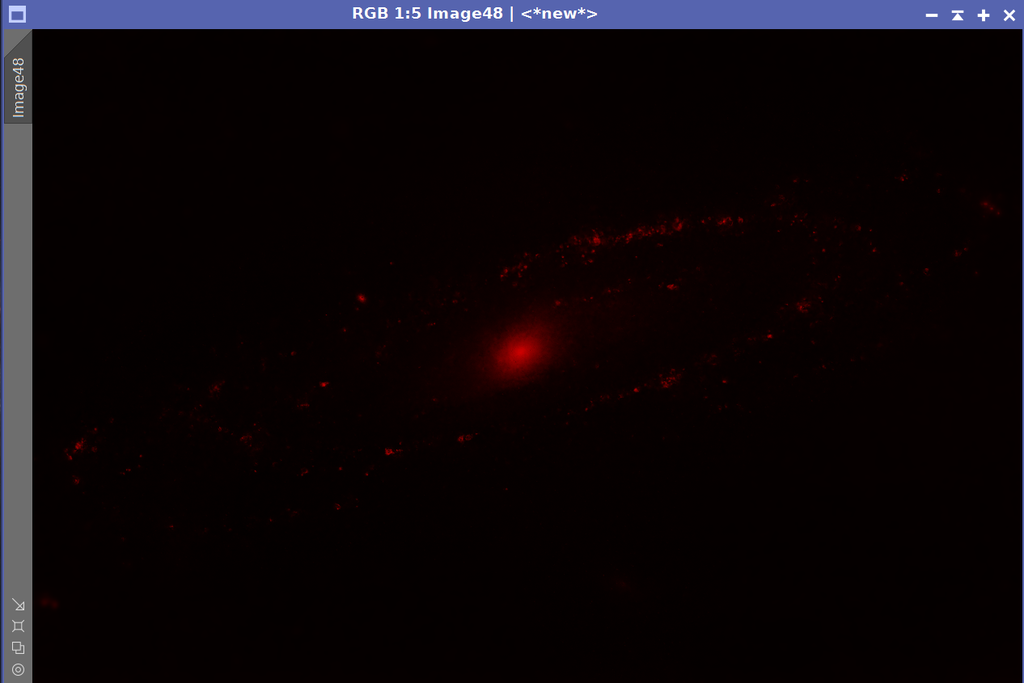 |
You cannot like this item. Reason: "ANONYMOUS".
You cannot remove your like from this item.
Editing a post is only allowed within 24 hours after creating it.
You cannot Like this post because the topic is closed.
Copy the URL below to share a direct link to this post.
This post cannot be edited using the classic forums editor.
To edit this post, please enable the "New forums experience" in your settings.
There is a script in pixinsight. --> Scripts – Utilities – NBRGBCombination But you will get much better result using a pixelmath based technique. The best I know is @Charles Hagen's. https://www.nightphotons.com/guides/advanced-narrowband-combination/CS Patrice
|
You cannot like this item. Reason: "ANONYMOUS".
You cannot remove your like from this item.
Editing a post is only allowed within 24 hours after creating it.
You cannot Like this post because the topic is closed.
Copy the URL below to share a direct link to this post.
This post cannot be edited using the classic forums editor.
To edit this post, please enable the "New forums experience" in your settings.
I use nb colour mapper to make the Ha data whatever colour I want to represent it as, then imageblend set to screen mode to add it in, adjusting blackpoint, midtones and opacity to taste. Works a treat every time. https://astrob.in/4uzdci/0/https://astrob.in/0fv885/C/ |
You cannot like this item. Reason: "ANONYMOUS".
You cannot remove your like from this item.
Editing a post is only allowed within 24 hours after creating it.
You cannot Like this post because the topic is closed.
Copy the URL below to share a direct link to this post.
This post cannot be edited using the classic forums editor.
To edit this post, please enable the "New forums experience" in your settings.
I really like the SETI PhotometricContinuumSubtraction script to remove the red continuum from the Ha image (what I used to do by hand with PixelMath and such). Then I use Photoshop to isolate the galaxy portion and remove the errant stars then add in that layer as a "screen" on red channel only after I'm done processing LRGB. Then I can tweak it how I like, changing the curves and transparency so it's not "too much" and blends nicely with the final image.
|
You cannot like this item. Reason: "ANONYMOUS".
You cannot remove your like from this item.
Editing a post is only allowed within 24 hours after creating it.
You cannot Like this post because the topic is closed.
Copy the URL below to share a direct link to this post.
This post cannot be edited using the classic forums editor.
To edit this post, please enable the "New forums experience" in your settings.
Noah Tingey:
I personally use the ImageBlend script (repository link: https://www.cosmicphotons.com/pi-scripts/imageblend/). It has some tweaking available with a live preview, instead of flying blind in pure PixelMath. Basic steps are:
- Make your Ha image red using whatever method you're familiar with. (I personally use pixelmath... which I know we're trying to avoid. But this is just assigning R = Ha, so not too crazy).
- Use curves to make the background of the Ha black, with the only bright spots being where you want the Ha to shine through
- Use ImageBlend
- Set your stretched LRGB image to the Base Image
- Set your red Ha image to the Blend Image
- Play around with the "Blend Mode" to find one that is close to what you're looking for. I can't remember which one I like but I think it might be Overlay? Or soft/hard light. Not sure.
- Play around with the Adjustment Parameters of the Blend Image to dial it in
Editing to add: This is what my Ha image looked like after Step 2 for this image, to give you a sense for what you should be looking for:
Just to be clear. Pure Ha signal (i.e.continuum subtracted) should not be added only to the red channel. Remember that the two srongest spectral lines of hydrogen contribute 80% in the red (Ha-alpha) and 20% in the blue (H-beta). That's why hydrogen emission region appear to be magenta in RGB images. John
|
You cannot like this item. Reason: "ANONYMOUS".
You cannot remove your like from this item.
Editing a post is only allowed within 24 hours after creating it.
You cannot Like this post because the topic is closed.
Copy the URL below to share a direct link to this post.
This post cannot be edited using the classic forums editor.
To edit this post, please enable the "New forums experience" in your settings.
John, how about outlining your workflow of adding Ha to RGB. Please. I've been using pixelmath as well.
Mike
|
You cannot like this item. Reason: "ANONYMOUS".
You cannot remove your like from this item.
Editing a post is only allowed within 24 hours after creating it.
You cannot Like this post because the topic is closed.
Copy the URL below to share a direct link to this post.
This post cannot be edited using the classic forums editor.
To edit this post, please enable the "New forums experience" in your settings.
John Hayes:
Just to be clear. Pure Ha signal (i.e.continuum subtracted) should not be added only to the red channel. Remember that the two srongest spectral lines of hydrogen contribute 80% in the red (Ha-alpha) and 20% in the blue (H-beta). That's why hydrogen emission region appear to be magenta in RGB images.
John Interesting. Since I already have the Ha layer in Photoshop, I can just duplicate it and assign it to blue and set the transparency to 25% of what the Red one is. I'll give it a try. Thanks!
|
You cannot like this item. Reason: "ANONYMOUS".
You cannot remove your like from this item.
Editing a post is only allowed within 24 hours after creating it.
You cannot Like this post because the topic is closed.
Copy the URL below to share a direct link to this post.
This post cannot be edited using the classic forums editor.
To edit this post, please enable the "New forums experience" in your settings.
Hi Jerry,
Short answer: try the CombineHaWithRGB script (By Juergen Terpe) in PixInsight under Scripts -> Toolbox.
Steps: Create RGB image, combine Ha with RGB, then apply luminance to HaRGB.
The documentation for this script by Juergen Terpe is excellent.
Use script Toolbox -> 'CombineHaWithRGB' to combine Ha and RGB
You can create a mask using the 'StarMask' process then apply the mask in the 'CombineHaWithRGB' UI.
**The H Alpha image should be extracted using the ContinuumSubtraction script first.
Use the 'Background' slider to reduce red in background.
Then use LRGBCombination or the ImageBlend script for combining Luminance with the Ha/RGB image.
Hope this helps
|
You cannot like this item. Reason: "ANONYMOUS".
You cannot remove your like from this item.
Editing a post is only allowed within 24 hours after creating it.
You cannot Like this post because the topic is closed.
Copy the URL below to share a direct link to this post.
This post cannot be edited using the classic forums editor.
To edit this post, please enable the "New forums experience" in your settings.
Mike H - Sky View Observatory:
John, how about outlining your workflow of adding Ha to RGB. Please. I've been using pixelmath as well.
Mike Fortunately Vicent Peris and Martin Pugh have developed a nice way to handle this issue. The basic concept is to first subtract a scaled amount of the R channel from the Ha channel in order to remove the broadband contribution. You know it works because with the proper scaling factors, unsaturated stars in the Ha data will be removed from the data. Then a fraction of the Pure_Ha data can be added to the R channel and 20% of that can be added to the blue channel in the LRGB result. You can read a nice write up about this technique by Martin Pugh here: http://www.arciereceleste.it/tutorial-pixinsight/cat-tutorial-eng/85-enhance-galaxy-ha-eng. Don't forget that when you combine the Pure_Ha data with LRGB, it's necessary to multiply it by the Lum signal as well to make sure that the scaling is correct. Once you get the scaling factors plugged in, the result nicely shows the pure Ha regions. Here's a slide from my NEIAC presentation about how to more easily remove the continuum. Remember that you must CloneStamp out any residual stars to avoid screwing up the star field. 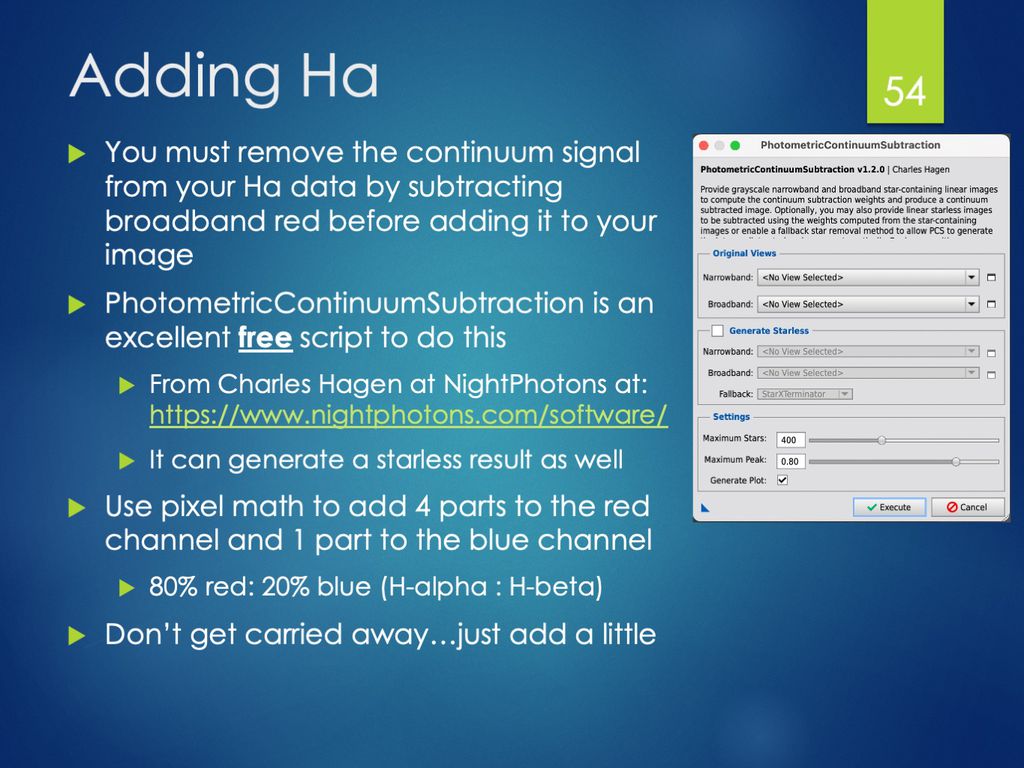 - John
|
You cannot like this item. Reason: "ANONYMOUS".
You cannot remove your like from this item.
Editing a post is only allowed within 24 hours after creating it.
You cannot Like this post because the topic is closed.
Copy the URL below to share a direct link to this post.
This post cannot be edited using the classic forums editor.
To edit this post, please enable the "New forums experience" in your settings.
John Hayes:
Then a fraction of the Pure_Ha data can be added to the R channel and 20% of that can be added to the blue channel in the LRGB result.
...
- John Shouldn't Blue be 25% of what you added to the Red channel rather than 20%? (80% red + 80%/4 blue = 100%)
|
You cannot like this item. Reason: "ANONYMOUS".
You cannot remove your like from this item.
Editing a post is only allowed within 24 hours after creating it.
You cannot Like this post because the topic is closed.
Copy the URL below to share a direct link to this post.
This post cannot be edited using the classic forums editor.
To edit this post, please enable the "New forums experience" in your settings.
Rick Krejci:
80%/4 blue Hmm... 80%/4 = 20%. You can do this in one of two ways. 1) You can add 80% of the Ha signal to the Red channel + 20% of the Ha signal to the Blue channel. 2) You can add 100% of the Ha signal to the Red channel + 25% of the Ha signal to the Blue channel. Either approach give the correct ratio of 4:1 of the Ha signal going to the red and blue channels respectively (as I said in the slide above.) John
|
You cannot like this item. Reason: "ANONYMOUS".
You cannot remove your like from this item.
Editing a post is only allowed within 24 hours after creating it.
You cannot Like this post because the topic is closed.
Copy the URL below to share a direct link to this post.
This post cannot be edited using the classic forums editor.
To edit this post, please enable the "New forums experience" in your settings.
John Hayes:
Rick Krejci:
80%/4 blue
Hmm... 80%/4 = 20%. You can do this in one of two ways.
1) You can add 80% of the Ha signal to the Red channel + 20% of the Ha signal to the blue channel.
2) You can add 100% of the Ha signal to the Red channel + 25% of the Ha signal to the Blue channel.
Either approach give the correct ratio of 4:1 of the Ha signal going to the red and blue channels respectively (as I said in the slide above.)
John Yea, the "/4" was meant to indicate 1/4 of the Red signal's 80% like I said. Sorry, I just misinterpreted your statement, " a fraction of the Pure_Ha data can be added to the R channel and 20% of that can be added to the blue". It made it sound like you would only add 20% of the red channel's contribution ("that") rather than 20% the whole. As you said, the ratio of Blue to Red is 1:4, where I got the 25% Blue/Red. Thanks much for your insights!
|
You cannot like this item. Reason: "ANONYMOUS".
You cannot remove your like from this item.
Editing a post is only allowed within 24 hours after creating it.
You cannot Like this post because the topic is closed.
Copy the URL below to share a direct link to this post.
This post cannot be edited using the classic forums editor.
To edit this post, please enable the "New forums experience" in your settings.
80/20 Red/Blue is roughly equivalent to red that has a small amount of purple in it. Closer to magenta?
In any event, it seems the most important thing is to get the Ha color accuracy as close as possible rather than what techniques & tools we use to get it. With software, it's often the case that there's multiple ways of achieving the same results.
|
You cannot like this item. Reason: "ANONYMOUS".
You cannot remove your like from this item.
Editing a post is only allowed within 24 hours after creating it.
You cannot Like this post because the topic is closed.
Copy the URL below to share a direct link to this post.
This post cannot be edited using the classic forums editor.
To edit this post, please enable the "New forums experience" in your settings.
Jerry Gerber:
I'm experimenting trying to combine Ha with LRGB. I've listened to others, watched videos, read online, and everyone seems to have their own method to this madness.
I strongly prefer to see what's happening to the image in real time, as I am working on it. It's just my way, not right/wrong, good/bad for anyone else. That's why I don't like fiddling with numbers if I can't see the immediate real-time results. I guess you can say I am sense-oriented, at least when it comes to using my eyes & ears (I'm a composer).
Enlighten me. I'm slow...
Jerry Seeing the effect in real time is just not a strong suit of PixInsight. Maybe there are tricks or even magics in PI that I haven't learned (there definitely are some, since I am not a very experienced PI user), but I just don't think PI is the right choice if this is what you want. Personally I do this in Photoshop. The layer function is perfect for adjusting and seeing the effects in real time. You can slide the opacity bar back and forth and see the effect instantly. You can turn layers on and off, give the layers different opacity, and compare the results with/without Ha, L or anything very quickly. On adding Ha to LRGB, it's the best to do in the linear space, but I suppose a slightly (nonlinearly) stretched image can also work. Basically, what I did is to use the Ha image to create a pure red image (or slightly pink, since the blue channel should contain some H-beta emission, as John mentioned above), and add it as a layer onto the LRGB image. This of course changes the overall color balance, since the Ha image does not contain nebula Ha emission, but also all other red continuum emission from stars (including galaxies) and dust reflection etc. So an additional adjustment layer above everything to tune down the red is necessary. If you are familiar with Photoshop, this is really fast and easy. And if you work on linear images, this can lead to very pleasant color. I do this to pretty much all my HaLRGB images in recent two years. Check my gallery to convince yourself that this really works. Several subtle points: 1. The Ha should be added to the result of LRGB composition. It should not be added to R before the LRGB composition. If you add Ha to RGB first (an LHaRGB composition), the nebulas in the R channel are boosted by Ha, while the nebulas in the L channel are not. This will lead to loss of color saturation in the nebulas. I did LHaRGB composition before, and I learned this lesson the hard way. Do HaLRGB, not LHaRGB. 2. When I do mobile imaging with DSLR, the above method doesn't work well. Directly adding Ha to LRGB or RGB will boost the noise in the red, since Ha is usually not very deep from mobile imaging (always with severe time constraints). I don't have a perfect answer on how to add noisy Ha to LRGB. On the other hand, if you have a remote observatory whose observing time is completely controlled by you, then you can collect lot of Ha photons under moonlight, and reserve the dark periods to broadband filters. In such cases, the Ha can be of very high S/N. Adding such Ha to LRGB has only minor (or even no) impacts to the overall quality. You may run an aggressive noise reduction on the Ha first before adding it to LRGB. 3. About re-adjusting color after a red Ha image is added to LRGB, in principle, the flattened 16 bit TIFF from Photoshop can be fed back to PI for the more accurate color balance and background neutralization tools. However, I don't feel this is necessary if one knows how to accurately control color in Photoshop. Hope these help.
|
You cannot like this item. Reason: "ANONYMOUS".
You cannot remove your like from this item.
Editing a post is only allowed within 24 hours after creating it.
You cannot Like this post because the topic is closed.
Copy the URL below to share a direct link to this post.
This post cannot be edited using the classic forums editor.
To edit this post, please enable the "New forums experience" in your settings.
John Hayes:
Just to be clear. Pure Ha signal (i.e.continuum subtracted) should not be added only to the red channel. Remember that the two srongest spectral lines of hydrogen contribute 80% in the red (Ha-alpha) and 20% in the blue (H-beta). That's why hydrogen emission region appear to be magenta in RGB images.
John I fully agree with John about H-beta. Red nebulas are never pure red. Unfortunately the reality is complicated, and there isn't a good way to deal with this if one really wants the "right" color. The thing is that the Ha/Hb ratio is not universal. The intrinsic ratio changes slightly with temperature and the hydrogen optical depth, and changes dramatically with the presence of dust in the nebula (dust absorbs Hb much more strongly than Ha). This is why red nebulas can have dramatically different redness or magenta-ness. Find a wide-field picture that contains M16, M17, M8, and M20, and you will see what I was talking about. The variation in Ha/Hb ratio is not only seen from nebula to nebula. Within the same nebula, there could be noticeable change in this ratio. So in practice, I think adding pure red to a galaxy image to boost the nebulas is acceptable. When I image individual nebulas in our Milky Way, I try to add a small portion of the Ha to the blue channel to mimic Hb. But one can never do this precisely because of the varying Ha/Hb ratio mentioned above. If one really wants to do it right, images taken with a real Hb filter, and [OIII] will be required.
|
You cannot like this item. Reason: "ANONYMOUS".
You cannot remove your like from this item.
Editing a post is only allowed within 24 hours after creating it.
You cannot Like this post because the topic is closed.
Copy the URL below to share a direct link to this post.
This post cannot be edited using the classic forums editor.
To edit this post, please enable the "New forums experience" in your settings.
Or one can shoot with an Hb filter and add THAT to the B channel. Alternatively, if you are like me a purist, shoot pure RGB (in pristine skies) and you get what that nebula looks like. For OSC users there are a couple of ways, one is to use a SII-Hb filter (two pidgeons wiith one stone) the other is to use a triple band filter with a strong performance in the shorter wavelengths (e.g., L-ENH).
P.S.: Missed Wei-Hao Wang post saying exactly the same
|
You cannot like this item. Reason: "ANONYMOUS".
You cannot remove your like from this item.
Editing a post is only allowed within 24 hours after creating it.
You cannot Like this post because the topic is closed.
Copy the URL below to share a direct link to this post.
This post cannot be edited using the classic forums editor.
To edit this post, please enable the "New forums experience" in your settings.
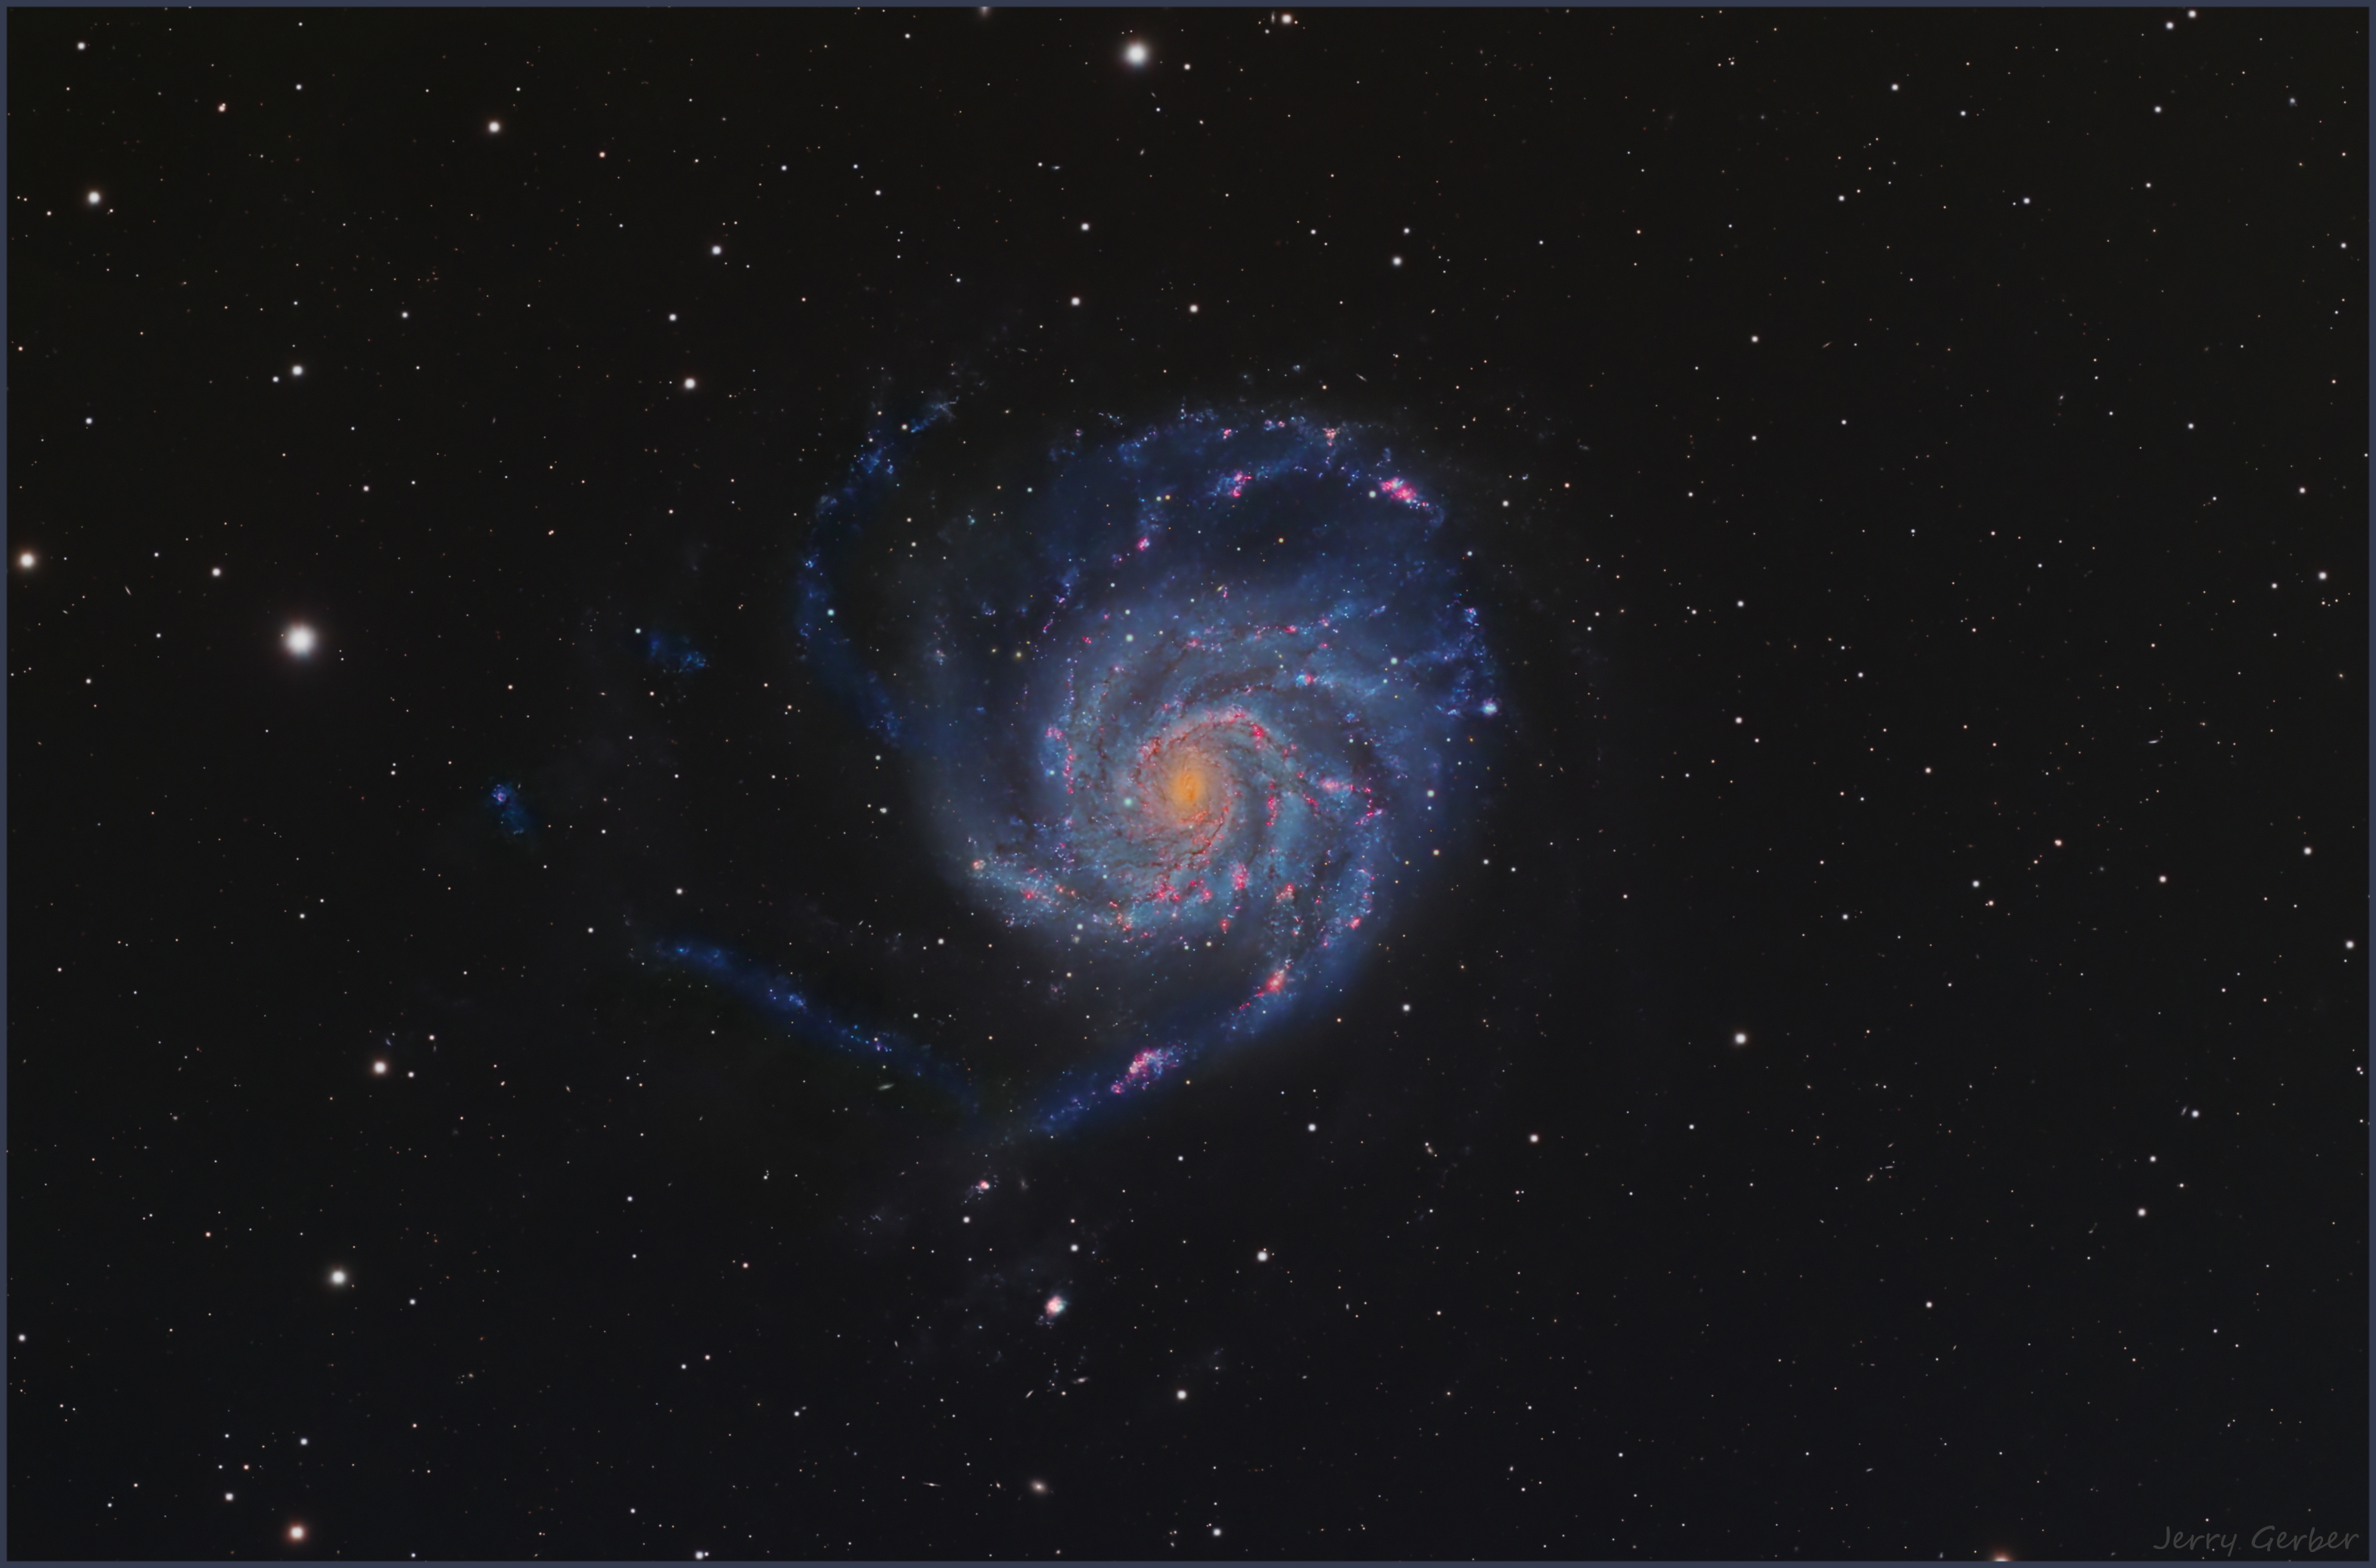
From reading all the comments here, I can only conclude that each person has their own method to the madness. With modern, sophisticated software, there are a multiple of ways to accomplish the same thing. If Ha is 80% red and 20% blue, that comes out to magenta, yes? Here's my first attempt at RGBHa. I tried LRGBHa but I think the trade-off with luminance is a bit more detail but not as much color, or perhaps I should say I had to work harder to bring out the color. Don't laugh, it's my first attempt. Actually go ahead and laugh, it's my first attempt!  |
You cannot like this item. Reason: "ANONYMOUS".
You cannot remove your like from this item.
Editing a post is only allowed within 24 hours after creating it.
You cannot Like this post because the topic is closed.
Copy the URL below to share a direct link to this post.
This post cannot be edited using the classic forums editor.
To edit this post, please enable the "New forums experience" in your settings.
De gustibus non disputandum est
|
You cannot like this item. Reason: "ANONYMOUS".
You cannot remove your like from this item.
Editing a post is only allowed within 24 hours after creating it.
You cannot Like this post because the topic is closed.
Copy the URL below to share a direct link to this post.
This post cannot be edited using the classic forums editor.
To edit this post, please enable the "New forums experience" in your settings.
Personally, I use the script "Combine Ha with RGB" and I obtain good results.
This script is in the "Toolbox" menu.
Moreover, it's easy to use according to me.
You can see some of these images in my personal gallery.
Good skies.
Jérôme Gaillard (France)
|
You cannot like this item. Reason: "ANONYMOUS".
You cannot remove your like from this item.
Editing a post is only allowed within 24 hours after creating it.
You cannot Like this post because the topic is closed.
Copy the URL below to share a direct link to this post.
This post cannot be edited using the classic forums editor.
To edit this post, please enable the "New forums experience" in your settings.
patrice_so:
There is a script in pixinsight.
--> Scripts – Utilities – NBRGBCombination
But you will get much better result using a pixelmath based technique. The best I know is @Charles Hagen's.
https://www.nightphotons.com/guides/advanced-narrowband-combination/
CS
Patrice This technique, continuum subtraction has a lot of steps but it is the easiest to control. What it does is that it uses the stacked Ha and the stacked R to create the difference, in other words what extra has Ha to offer over R. Then you do the critical step of stretching the continuum image, so that it gets black (0.0000) everywhere except the important Ha areas. If your NB filters give you any halos around bright stars, then you can use the stamp/clone tool to remove them. The final mix is done on the complete LRGB stretched image, without modifying its color balance. Just magically adds the Ha areas. One disadvantage of this algorithm is that it cannot add Ha AND Oiii well. The sequence plays role, whatever you put second dominates the first. So adding Ha and then Oiii gives different results than first Oiii and second Ha. For Oiii you use either G or B do to the subtraction. The algorithm was used here 
1001 Nebulae on M33to add Ha and Oiii.
|
You cannot like this item. Reason: "ANONYMOUS".
You cannot remove your like from this item.
Editing a post is only allowed within 24 hours after creating it.
You cannot Like this post because the topic is closed.
Copy the URL below to share a direct link to this post.
This post cannot be edited using the classic forums editor.
To edit this post, please enable the "New forums experience" in your settings.
I tried several methods too, but in the end I found the "Adam Block's way" to be the more controllable.
first, you need to subtract the continuum in some way (seti astro continuum subtraction, pixelmath, photometric continuum subtraction…)
The second step is to make the Ha the colour you want. You can use Pixelmath but the easiest way is to use NB color mapper. Do not saturate too much the Ha at this point. You will certainly do this later.
The third step is to make the background black. Use HT or curves and clip as much as you can leaving only the interesting signal.
Then use ImageBlend to do the magic. RGB image on top, HA as blend layer and "screen" blending method.
I really love to shoot HaRGB and all my pictures are made this way.
Hope you like it!
|
You cannot like this item. Reason: "ANONYMOUS".
You cannot remove your like from this item.
Editing a post is only allowed within 24 hours after creating it.
You cannot Like this post because the topic is closed.
Copy the URL below to share a direct link to this post.
This post cannot be edited using the classic forums editor.
To edit this post, please enable the "New forums experience" in your settings.