Don't use SPCC and you won't regret it. And I never use it for NB imaging. There are in fact fringe cases (with NB filters) where SPCC makes a proper hash of things. Standard CC gets you there @ 99.9% likelihood.
|
You cannot like this item. Reason: "ANONYMOUS".
You cannot remove your like from this item.
Editing a post is only allowed within 24 hours after creating it.
You cannot Like this post because the topic is closed.
Copy the URL below to share a direct link to this post.
This post cannot be edited using the classic forums editor.
To edit this post, please enable the "New forums experience" in your settings.
Even though I can select the sensor and the filter within SPCC, in the case it is certainly giving me worse results than the standard CC. I’m also finding that most of the AI gradient correction processes/scripts give worse results than DBE so I’m thinking of going back to using standard CC and DBE as standard.
|
You cannot like this item. Reason: "ANONYMOUS".
You cannot remove your like from this item.
Editing a post is only allowed within 24 hours after creating it.
You cannot Like this post because the topic is closed.
Copy the URL below to share a direct link to this post.
This post cannot be edited using the classic forums editor.
To edit this post, please enable the "New forums experience" in your settings.
Scott Horton:
Craig Dixon:
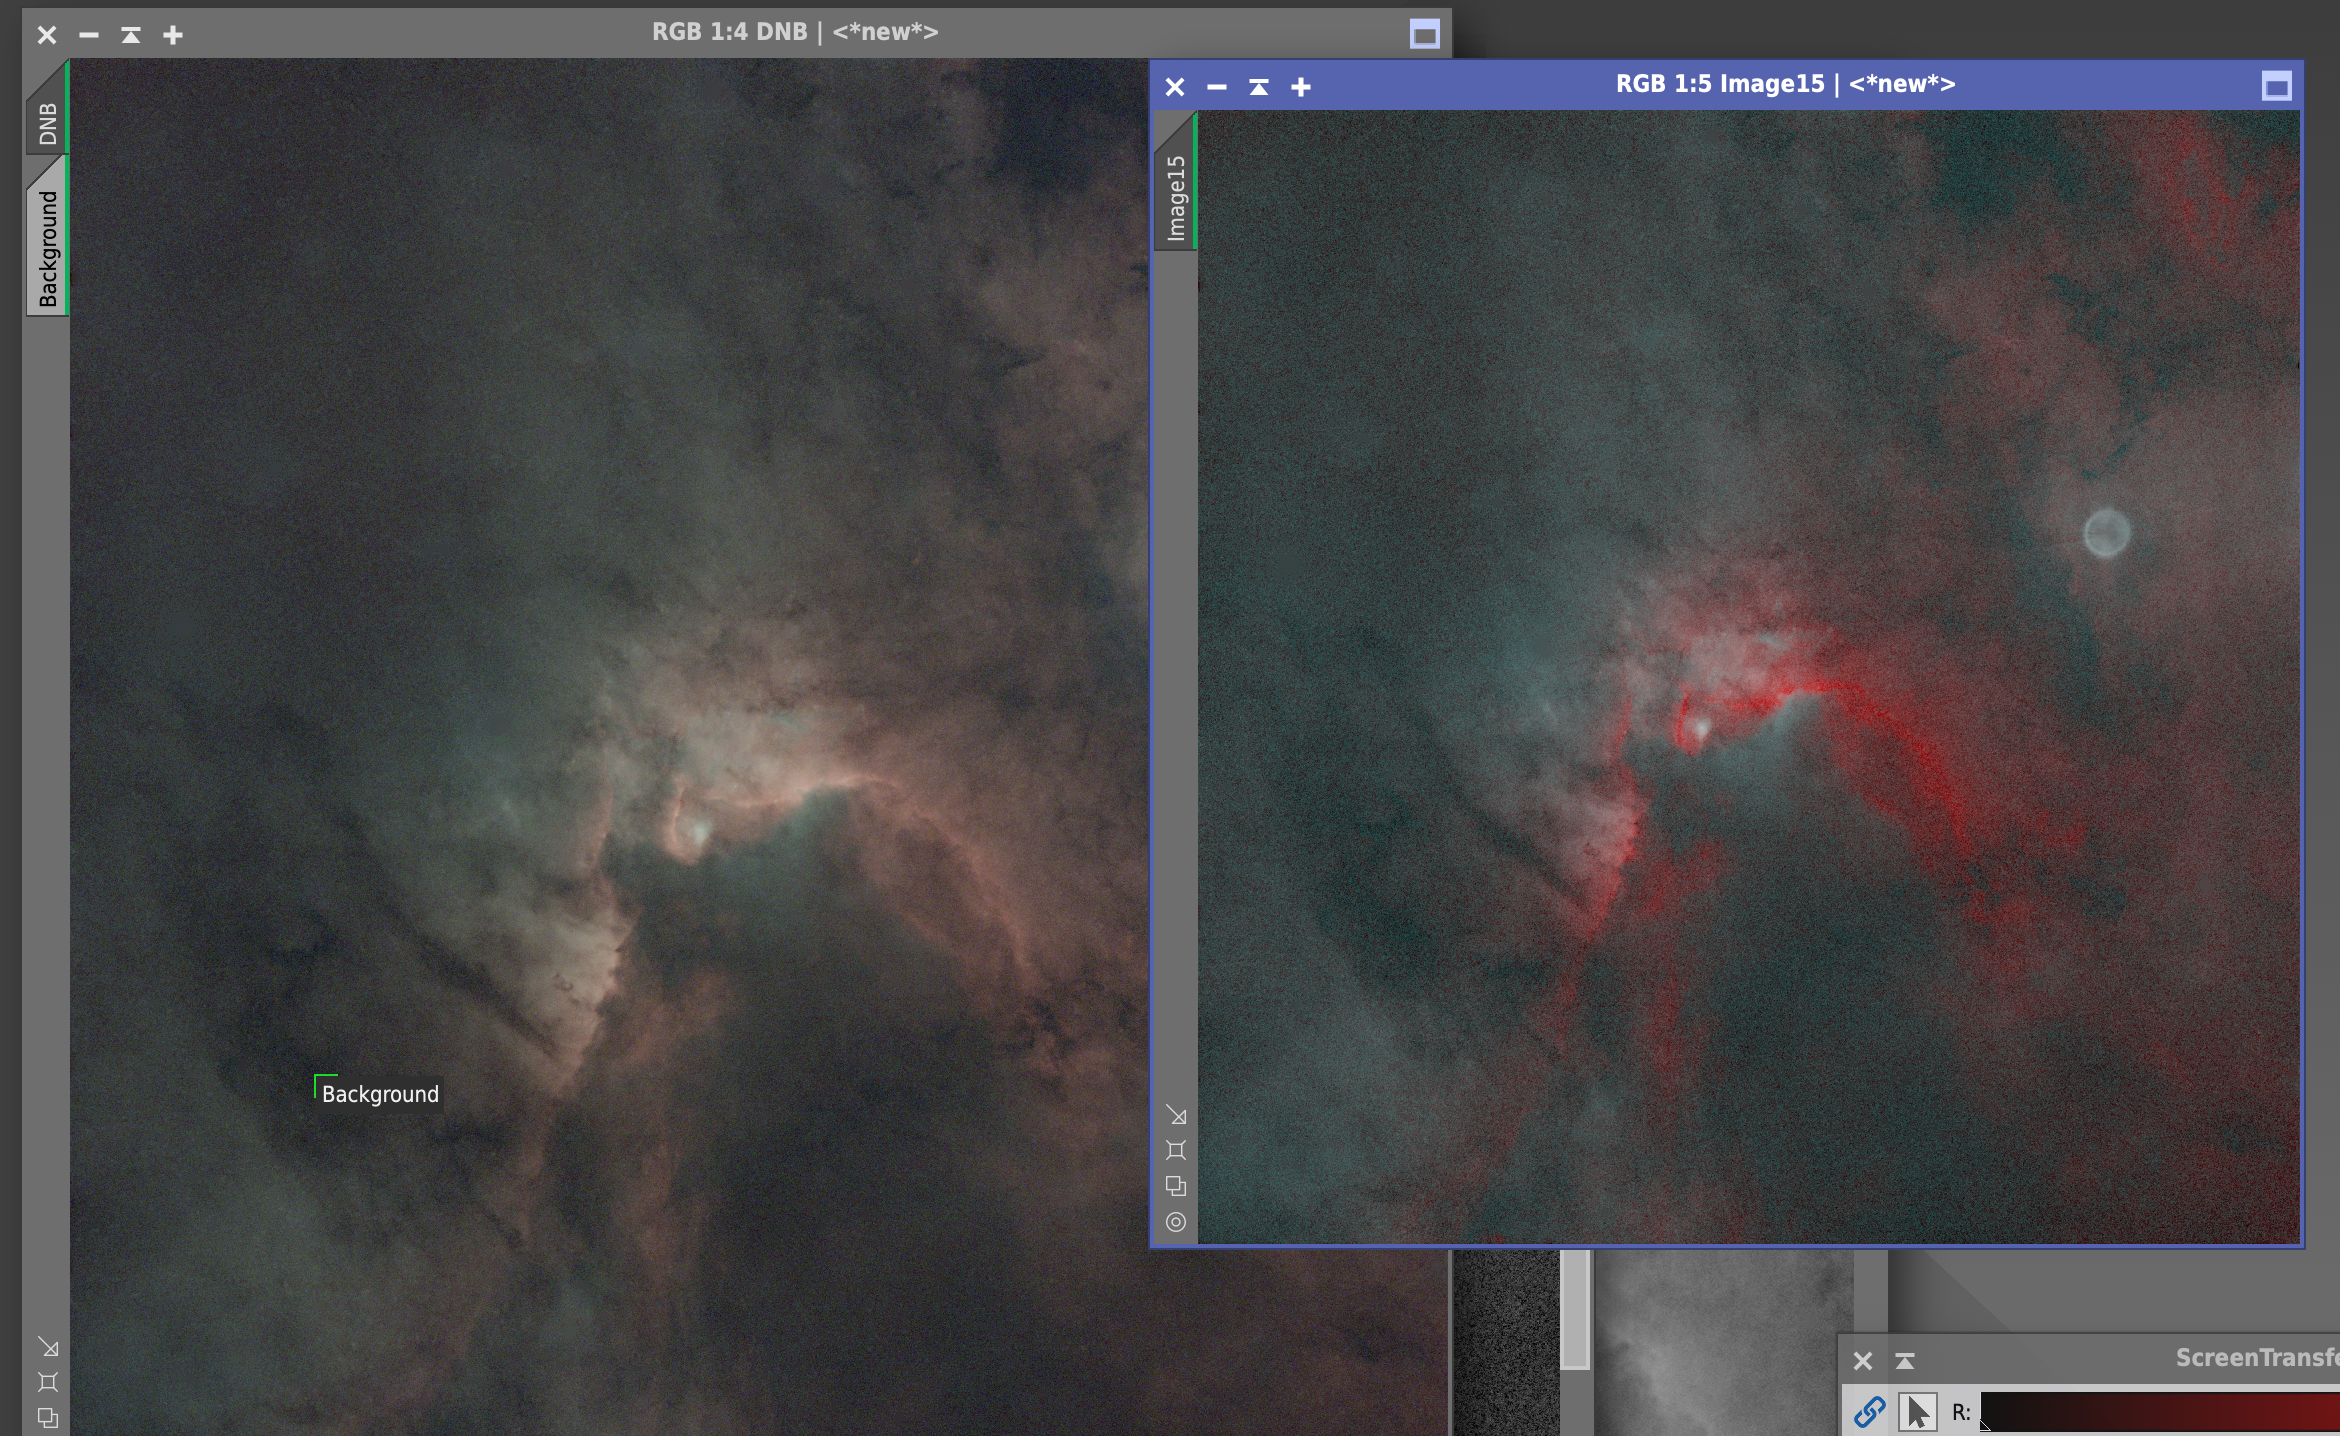
Nope, that’s RGB from the L-enhance.
background extraction
blurx
spcc
starx
ghs
curves
add stars
I think you did a really nice job on both images but this go round certainly looks better to my eye. In comparison, the first image seems a bit over nuked on the stretch and a bit flat - this all seems to be corrected on the rework - as well as the blockiness you mentioned in your first post. I think youre losing some information by running narrowband normalization after your stretch. However, you can still acheive an excellent HOO process with the LEnhance which you were going for in your first image with a little extra pixel math and re-ordering of your initial steps.
First load the toolbox script DBXtract if you dont already have it (you can do pixel math here and I can send you the formulas, but this is slicker to use). (repository here https://dbxtract.astrocitas.com/)
1. separate your stars then run correction only in BXT on them - the corrected stars will get you a better result in SPCC.
2. Run DBE on the starless image - ADBE is great tool but applies a light stretch, so you will need to recombine the stars first and then run it if you choose that tool (I still prefer DBE).
-->side note, if you use ADBE, you can go into the history explorer, find the DBE applied, pull it up and see exactly where the sample points were applied, adjust and re-run DBE if you need too.
3. If you used DBE on the starless image, now recombine the stars and run SPCC - settings, make sure you apply a sample region, select the L Enhance filter for the RGB, under signal evaluation change signal saturation threshold to 0.95
4. Now separate your stars and set them aside for stretch and final processing later.
5. Run DBXtract on your starless image so you have Ha and OIII separated out
6. Run BXT on your Ha and OIII images separately (use a reasonable PSF size, somewhere between 3.5-4, you can measure this if you want to be exact)
7. Use channel combination, put Ha in R and OIII in G,B channels (save Ha for luminace detail for later if needed)
8. NOW run Narrowband Normalization - choose HOO and turn the blend mode slider all the way left to zero (its best to do this before stretch not after as in your initial post). Leave the settings default otherwise unless you want to reduce brightness intentionally - then this should be done after GHS. The preview may look prettier post stretch with OIII boost, but I find this method gives me better results in the end.
9. Use GHS to stretch (youtube different techniques to develop your own, but in general, dont go ham in one giant stretch). Seti also has a statistical stetch that does a reasonable job for the initial stretch.
10. now use curves adjustments to finalize your contrast, saturation and color.
11. now apply NXT (its very forgiving in the newest AI model)
12. Stretch and adjust your stars
13. Combine image, reduce stars with pixel math to taste if you wish
Couple additional steps you could incorporate if you want
-You can refine WBPP to do better than preset "best" quality, I can help with that if you need.
-you can apply a bit more BXT to the Ha file that you set aside, stretch it so only the detailed parts are visible and then apply this as a luminance layer to your finished HOO (prior to stars combination) for detail - this is typically best done in the imageblend script.
-Load the toolbox script for selective color adjustment - this is a much more precise way to adjust color than color masking and curves
-you can add "detail" - really it's contrast, by applying a mild high pass filter in the image blend script.
Good luck! Thanks for taking the time to post such. detailed reply, Scott. Unfortunately, I'm getting pretty poor results on this particular data. I might try if with some data on a brighter target that's rich in Oiii.  |
You cannot like this item. Reason: "ANONYMOUS".
You cannot remove your like from this item.
Editing a post is only allowed within 24 hours after creating it.
You cannot Like this post because the topic is closed.
Copy the URL below to share a direct link to this post.
This post cannot be edited using the classic forums editor.
To edit this post, please enable the "New forums experience" in your settings.
Why don't you share your master RGB and see what folks here can come up with?
|
You cannot like this item. Reason: "ANONYMOUS".
You cannot remove your like from this item.
Editing a post is only allowed within 24 hours after creating it.
You cannot Like this post because the topic is closed.
Copy the URL below to share a direct link to this post.
This post cannot be edited using the classic forums editor.
To edit this post, please enable the "New forums experience" in your settings.
andrea tasselli:
Why don't you share your master RGB and see what folks here can come up with? That would be great if anyone wants to have a go.
|
You cannot like this item. Reason: "ANONYMOUS".
You cannot remove your like from this item.
Editing a post is only allowed within 24 hours after creating it.
You cannot Like this post because the topic is closed.
Copy the URL below to share a direct link to this post.
This post cannot be edited using the classic forums editor.
To edit this post, please enable the "New forums experience" in your settings.
No can do. Getting the "file is too big" error
|
You cannot like this item. Reason: "ANONYMOUS".
You cannot remove your like from this item.
Editing a post is only allowed within 24 hours after creating it.
You cannot Like this post because the topic is closed.
Copy the URL below to share a direct link to this post.
This post cannot be edited using the classic forums editor.
To edit this post, please enable the "New forums experience" in your settings.
You need to post in a sharing site such as Google drive or similar.
|
You cannot like this item. Reason: "ANONYMOUS".
You cannot remove your like from this item.
Editing a post is only allowed within 24 hours after creating it.
You cannot Like this post because the topic is closed.
Copy the URL below to share a direct link to this post.
This post cannot be edited using the classic forums editor.
To edit this post, please enable the "New forums experience" in your settings.
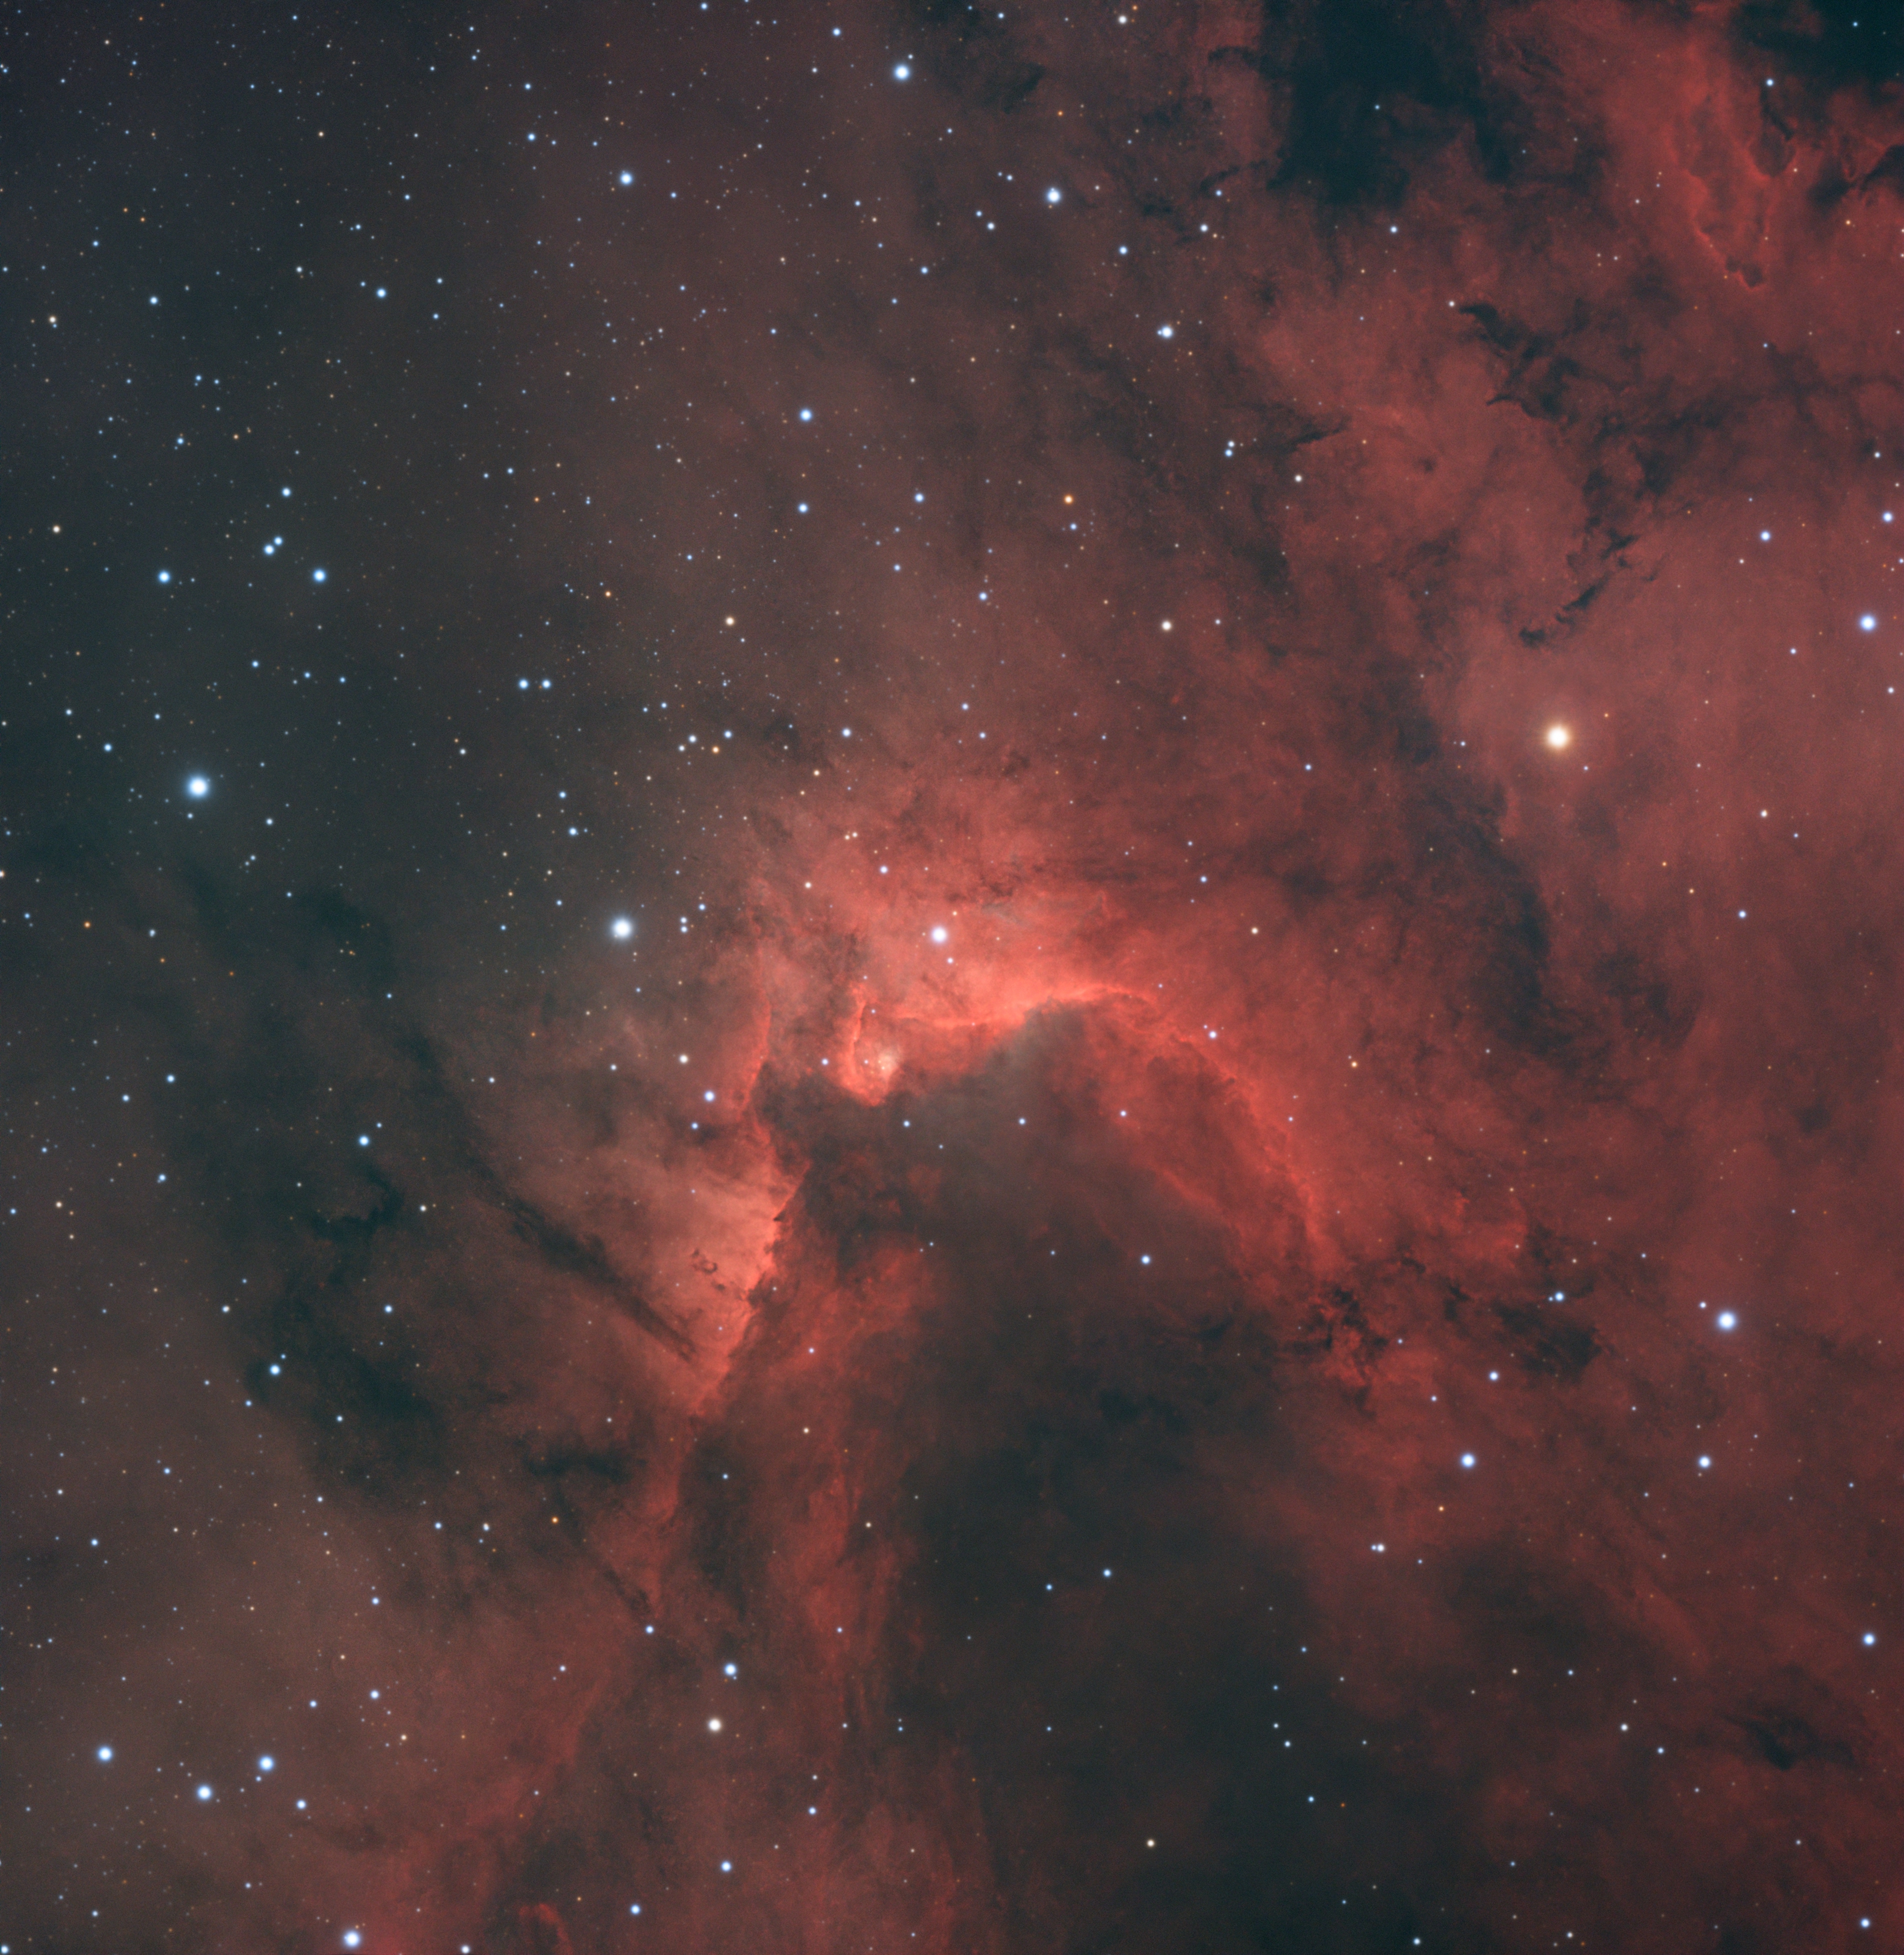
Normally I think less is more when it comes to processing. Its easy to overdo things and make them unnecessary complicated. If it was my image I would probably do it similar to this:  Taste is subjective however. I like the diffuse combined with a hint of intensity and some grain. I'm not at my processing computer at the moment, so I took this as far as I could bother considering the time it takes to run certain processes on my laptop  Workflow: BackgroundNeutralization ColorCalibration BXT correct only BXT decon SXT HT stretch (four passes) Masked curves adjustments HT adjusted individual channels slightly to taste. Masked MLT NXT Stars are stretched then applied; SCNR, CorrectMagentaStars (just a bit) then increased saturation with curves before combining them. The reason for those corrections after stretching I suspect have to do with the use of filters, I had to clean up a pretty nasty halo from that filter as well. A bit more smoothness and contrast could be added, but again this is something I would normally tweak for hours on my processing computer. This is more or less something I could be happy with. EDIT: Before you ask; Yes, I forgot to run DBE I won't re-do it though as it would take me more time than I would like to spend on it right now - but I'd add that process in right after doing star removal. Hope it helps anyway!
|
You cannot like this item. Reason: "ANONYMOUS".
You cannot remove your like from this item.
Editing a post is only allowed within 24 hours after creating it.
You cannot Like this post because the topic is closed.
Copy the URL below to share a direct link to this post.
This post cannot be edited using the classic forums editor.
To edit this post, please enable the "New forums experience" in your settings.
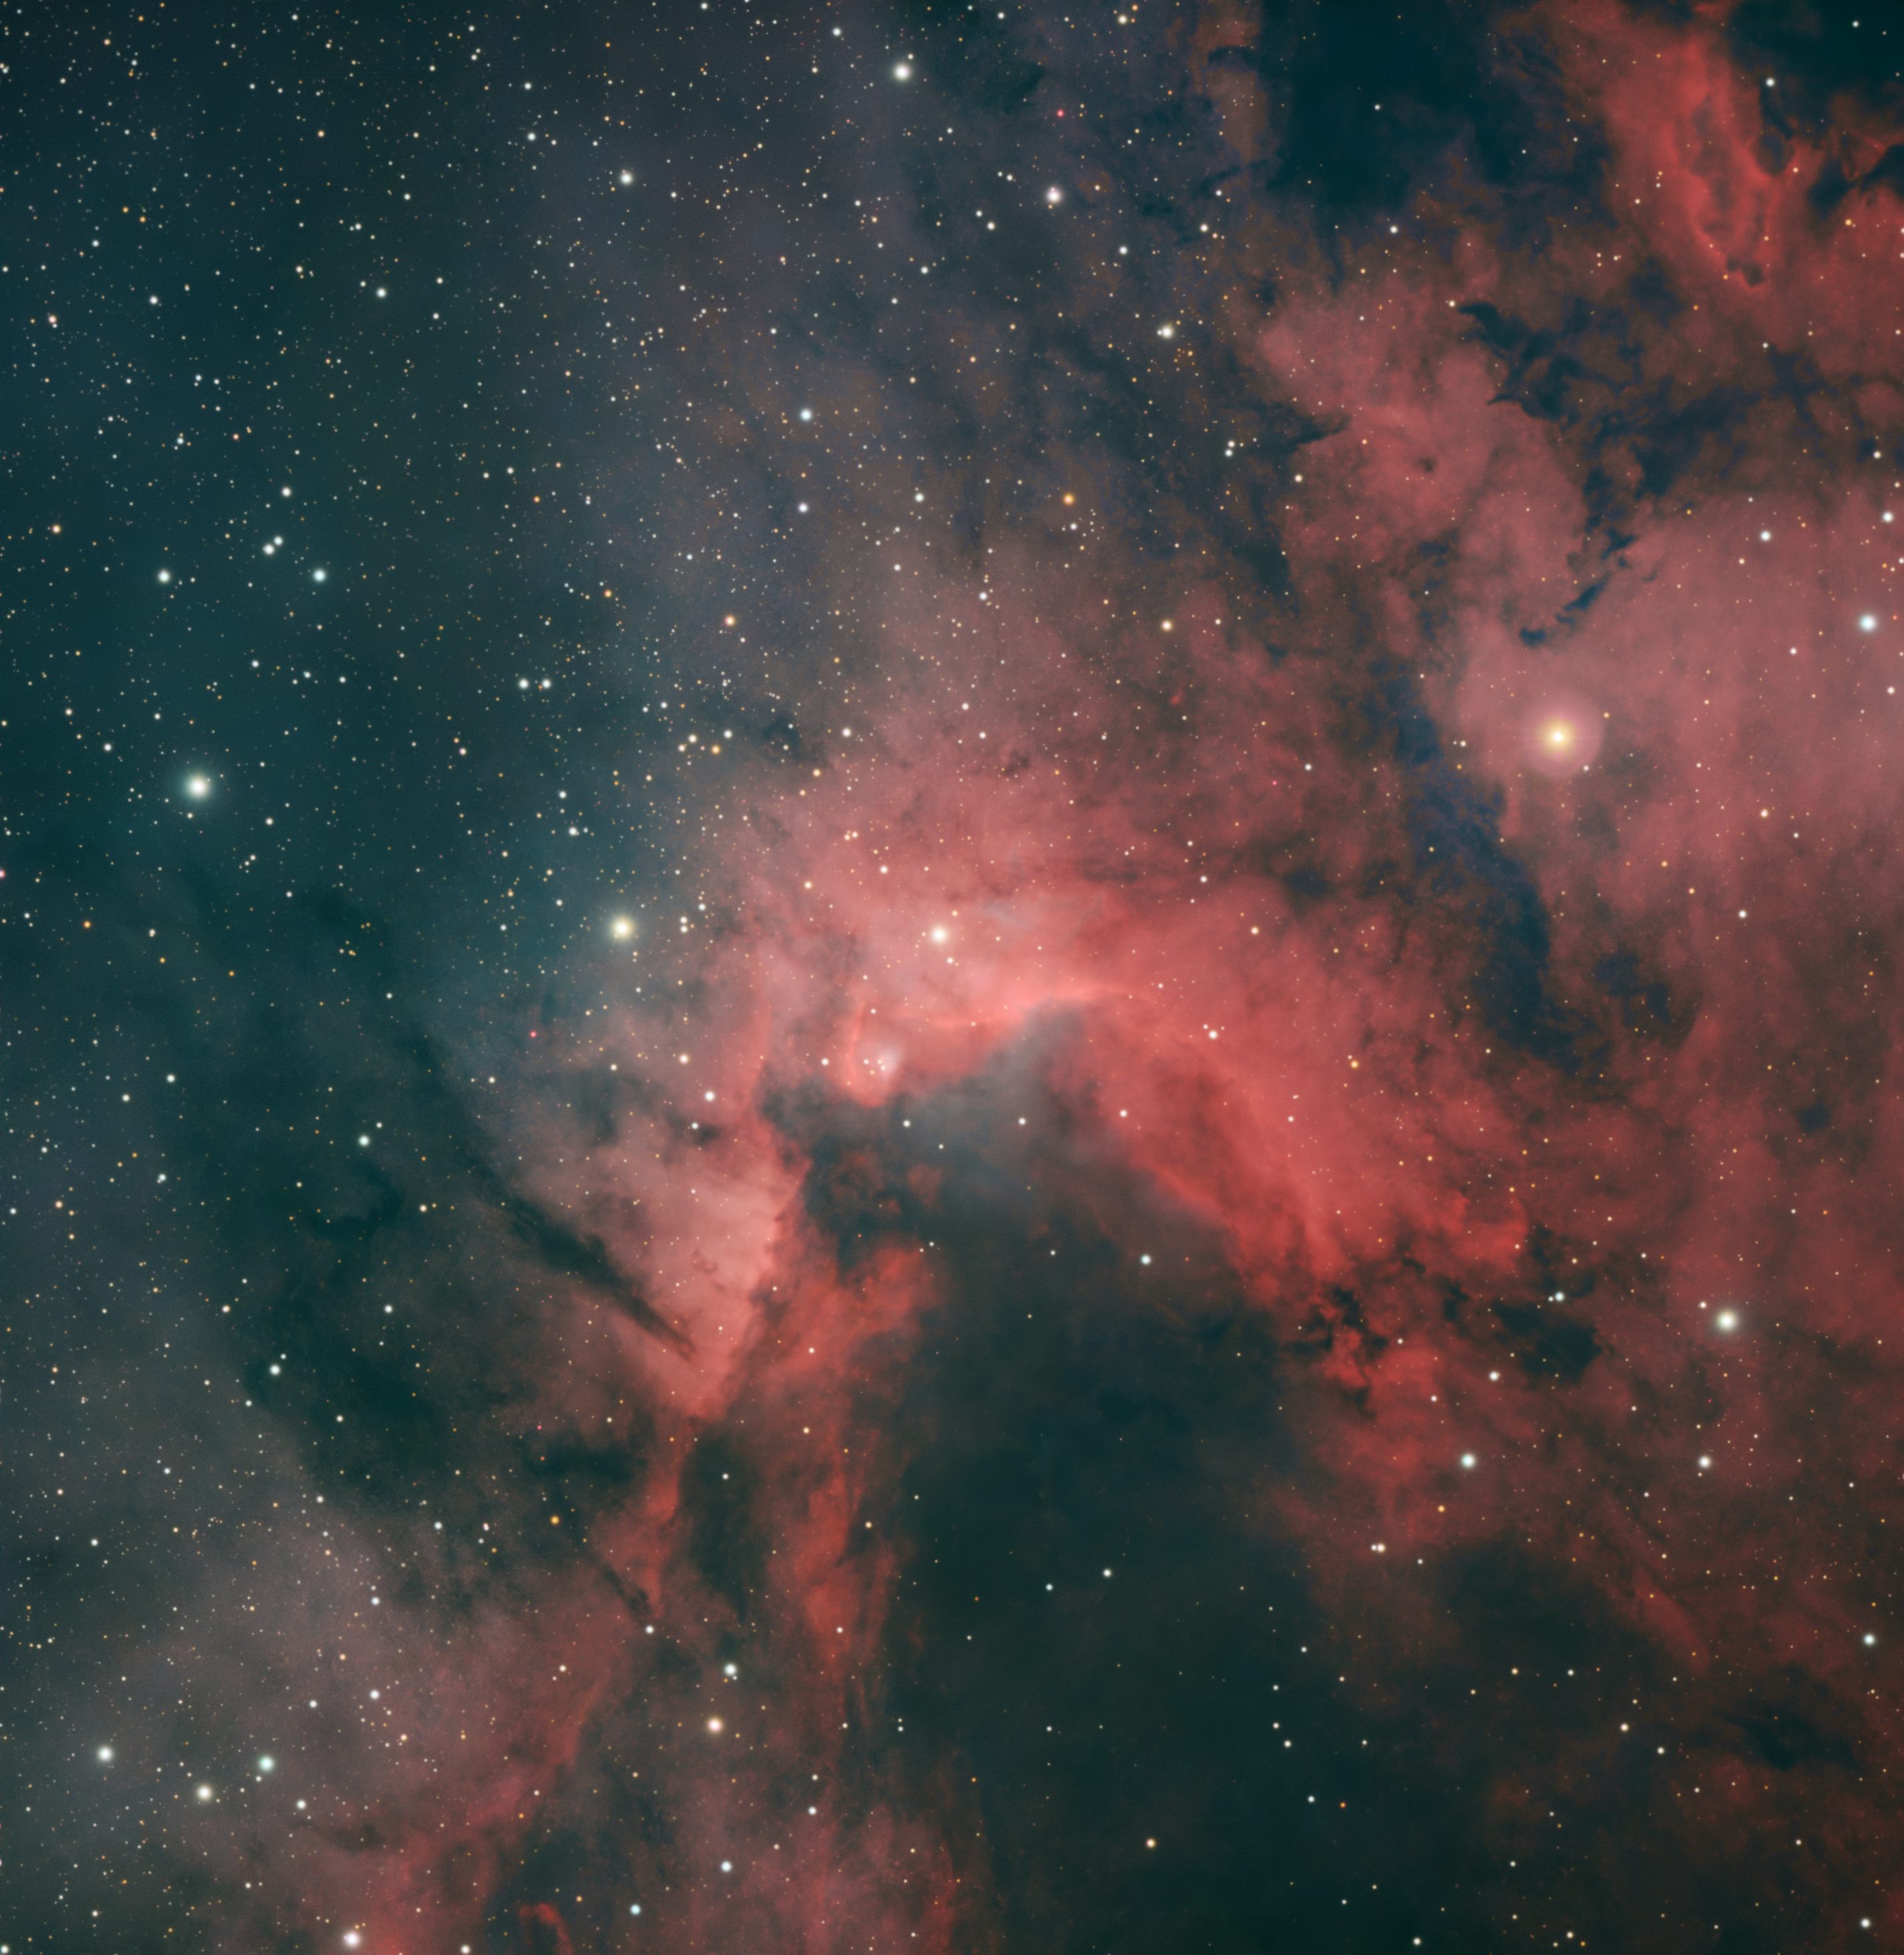
First pass processing, not entirely happy with but a starting point nonetheless. Stars are a particular sore point and I didn't spend a lot of time on them either nor getting rid of that nasty halo. No BXT applied. No DBE either. SXT and NXT, yes. MaskedStretched and ASINH applied for stretching starless image ASINH for stars only. Curves and increased B channel component with ACC. A lot of CurvesTransformation in fact and a masked stretching using them. Plus selective color correction for the stars. 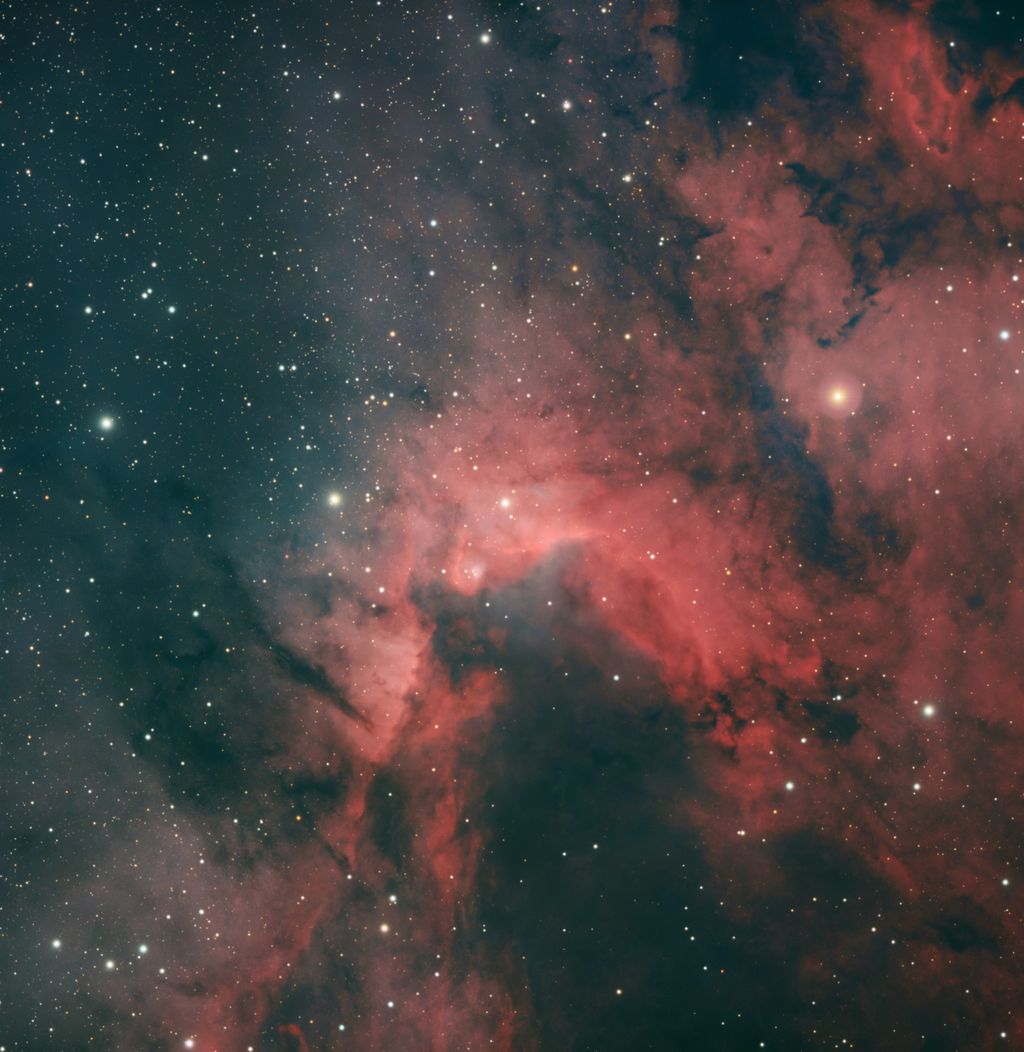 |
You cannot like this item. Reason: "ANONYMOUS".
You cannot remove your like from this item.
Editing a post is only allowed within 24 hours after creating it.
You cannot Like this post because the topic is closed.
Copy the URL below to share a direct link to this post.
This post cannot be edited using the classic forums editor.
To edit this post, please enable the "New forums experience" in your settings.
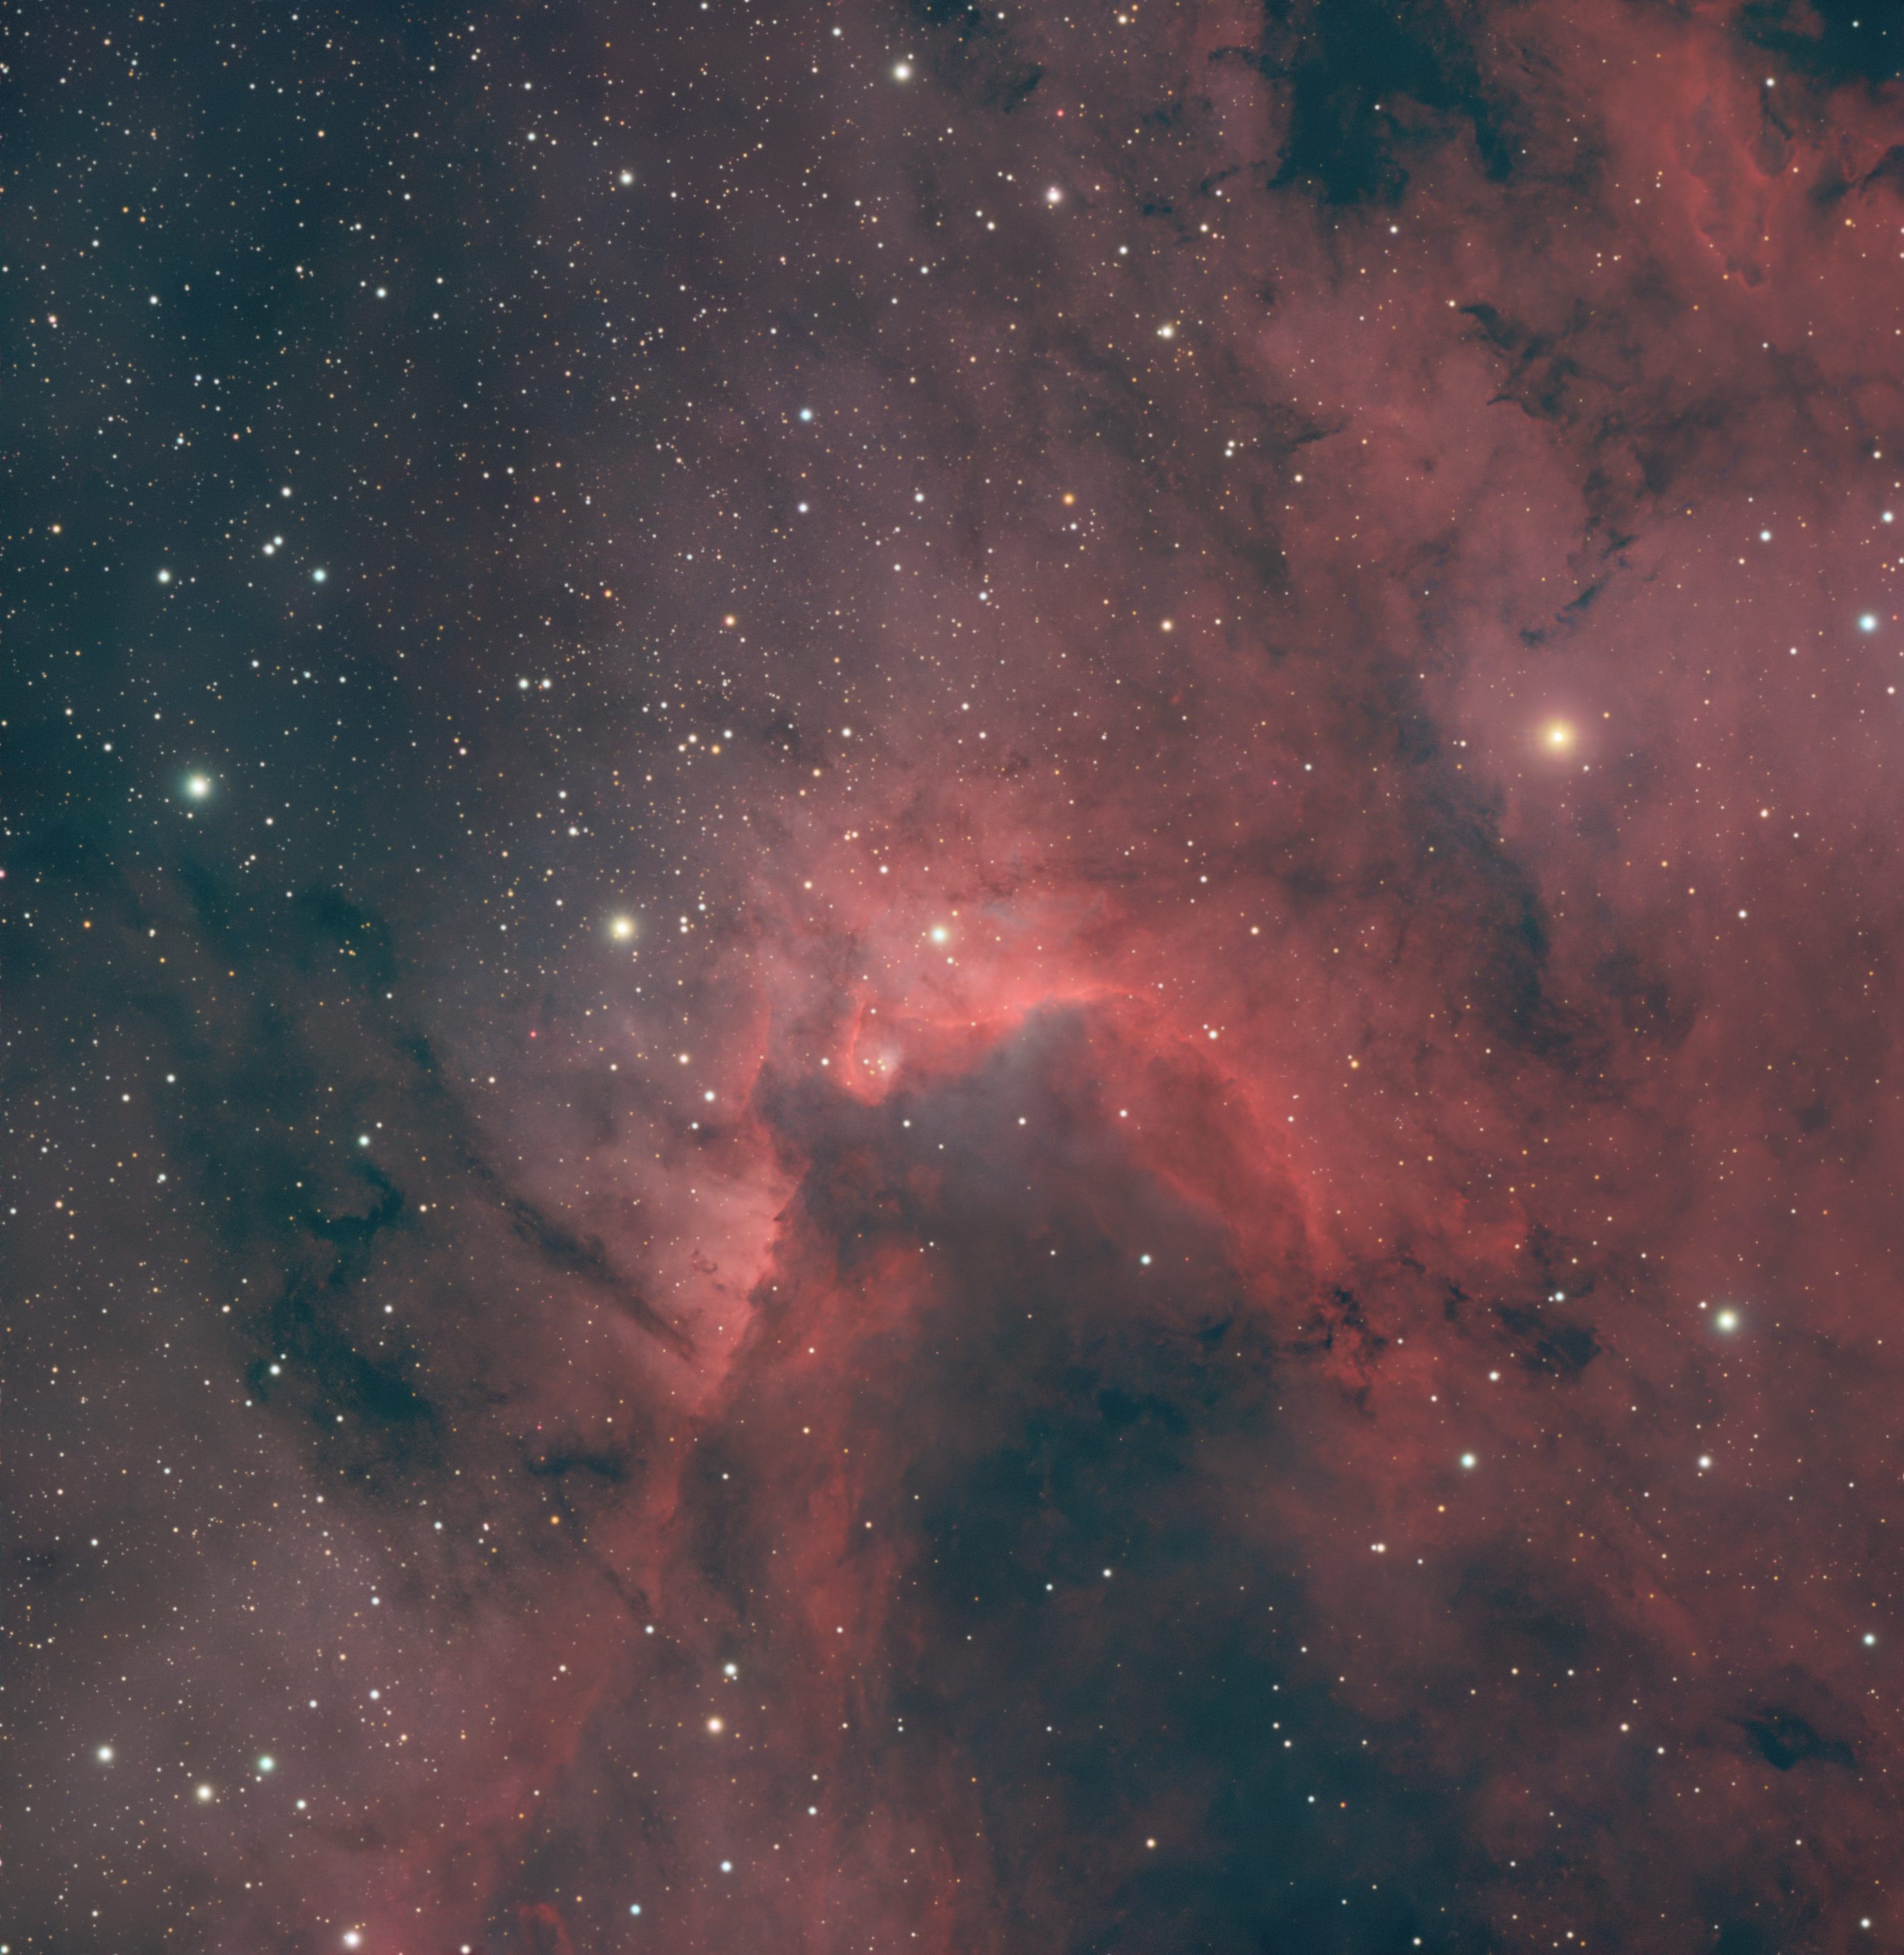
And here is the second iteration, better but maybe not final...  |
You cannot like this item. Reason: "ANONYMOUS".
You cannot remove your like from this item.
Editing a post is only allowed within 24 hours after creating it.
You cannot Like this post because the topic is closed.
Copy the URL below to share a direct link to this post.
This post cannot be edited using the classic forums editor.
To edit this post, please enable the "New forums experience" in your settings.
andrea tasselli:
First pass processing, not entirely happy with but a starting point nonetheless. Stars are a particular sore point and I didn't spend a lot of time on them either nor getting rid of that nasty halo. No BXT applied. No DBE either. SXT and NXT, yes. MaskedStretched and ASINH applied for stretching starless image ASINH for stars only. Curves and increased B channel component with ACC. A lot of CurvesTransformation in fact and a masked stretching using them. Plus selective color correction for the stars. Can you go into more detail, perhaps with some screen grabs, of the 'masked stretching' portion of this processing? How do you decide where and how much each mask should be applied? How do you create the masks to match your vision, why is masked stretching necessary when we have GHS? Thanks.
|
You cannot like this item. Reason: "ANONYMOUS".
You cannot remove your like from this item.
Editing a post is only allowed within 24 hours after creating it.
You cannot Like this post because the topic is closed.
Copy the URL below to share a direct link to this post.
This post cannot be edited using the classic forums editor.
To edit this post, please enable the "New forums experience" in your settings.
"MaskedStretch" is a PI process, this: 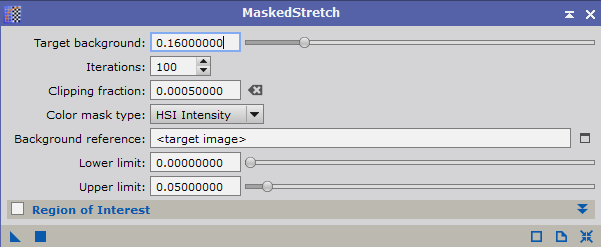 You just set how bright is the mean background level is and that is it. You then would need to further stretch the image with another tool, either CT, HT or ASINH. I use the latter. I don't know how GHS operates so I can't comment on that.
|
You cannot like this item. Reason: "ANONYMOUS".
You cannot remove your like from this item.
Editing a post is only allowed within 24 hours after creating it.
You cannot Like this post because the topic is closed.
Copy the URL below to share a direct link to this post.
This post cannot be edited using the classic forums editor.
To edit this post, please enable the "New forums experience" in your settings.
John Stone:
A lot of CurvesTransformation in fact and a masked stretching using them How do you apply a MaskedStretch using a CurvesTransformation? andrea tasselli:
Curves and increased B channel component with ACC What does the ACC acronym stand for? Thanks.
|
You cannot like this item. Reason: "ANONYMOUS".
You cannot remove your like from this item.
Editing a post is only allowed within 24 hours after creating it.
You cannot Like this post because the topic is closed.
Copy the URL below to share a direct link to this post.
This post cannot be edited using the classic forums editor.
To edit this post, please enable the "New forums experience" in your settings.
John Stone:
John Stone:
A lot of CurvesTransformation in fact and a masked stretching using them
How do you apply a MaskedStretch using a CurvesTransformation?
andrea tasselli:
Curves and increased B channel component with ACC
What does the ACC acronym stand for?
Thanks. Question 1: A: MaskedStretch and CurveTransform (or several, with mask or without), one following the other. Apologies for the confused sentence. My bad. Question 2: A: AssistedColorCalibration
|
You cannot like this item. Reason: "ANONYMOUS".
You cannot remove your like from this item.
Editing a post is only allowed within 24 hours after creating it.
You cannot Like this post because the topic is closed.
Copy the URL below to share a direct link to this post.
This post cannot be edited using the classic forums editor.
To edit this post, please enable the "New forums experience" in your settings.
This is my quick version, Pixinsight, Affinity photo, Photoshop, Pixinsight again, Capture one in that order. 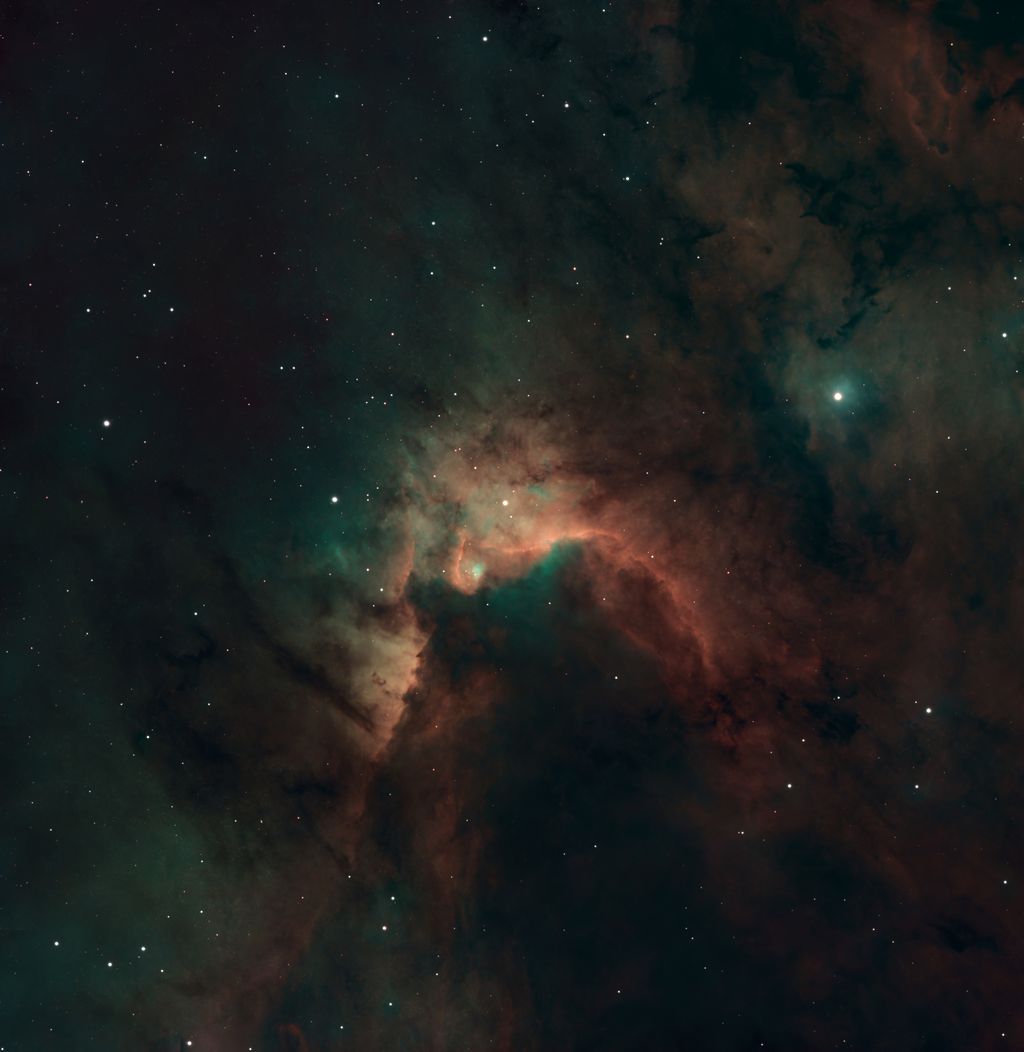 |
You cannot like this item. Reason: "ANONYMOUS".
You cannot remove your like from this item.
Editing a post is only allowed within 24 hours after creating it.
You cannot Like this post because the topic is closed.
Copy the URL below to share a direct link to this post.
This post cannot be edited using the classic forums editor.
To edit this post, please enable the "New forums experience" in your settings.
Dan Kohn:
I would certainly add 'Subframe Selector' processing right after the visual inspection with FITSview. Also, I start my stretch using Seti's 'Statistical Stretch' but with 'normalize image range' off, and a very low 'target median' (e.g. 9-12). Then I go to GHS for final stretching. Thanks for the tip. I've begun to incorporate subframe selector into my workflow I have about 30 hours of data on the little pinwheel galaxy and after applying the following in SFS (Credit to Seti Astro), my dataset is now a little over 23 hours. My takeaway from that is that I wasn't rejecting some subs that were suboptimal: FWHMSigma <= 2 && EccentricitySigma <= 2 && MedianSigma <= 2 && StarsSigma >= -1.5 A couple of questions: 1) I'm loosing quite a bit of imaging time by doing this. Is the loss of integration time worth it? 2) I have data from multiple nights, with flat files for each night. I'm adding every sub from every night into SFS but when I outputted the approved files, they need to be outputted in a new directory. How to I think match up the correct flats in WBPP? Previously I was using the filters box to group subs by data as I name my folders like this: "25-03-29 - NGC3184 - Little Pinwheel Galaxy" Within this folder, I have "light" and "flat" so if I just enter the keyword "25-03-29", my flats and lights are matched properly. By outputting everything from SFS, I don't have this option.
|
You cannot like this item. Reason: "ANONYMOUS".
You cannot remove your like from this item.
Editing a post is only allowed within 24 hours after creating it.
You cannot Like this post because the topic is closed.
Copy the URL below to share a direct link to this post.
This post cannot be edited using the classic forums editor.
To edit this post, please enable the "New forums experience" in your settings.
Craig Dixon:
2) I have data from multiple nights, with flat files for each night. I'm adding every sub from every night into SFS but when I outputted the approved files, they need to be outputted in a new directory. How to I think match up the correct flats in WBPP? Previously I was using the filters box to group subs by data as I name my folders like this: "25-03-29 - NGC3184 - Little Pinwheel Galaxy" Within this folder, I have "light" and "flat" so if I just enter the keyword "25-03-29", my flats and lights are matched properly. By outputting everything from SFS, I don't have this option. On 2, I use the same process you were previously using (lights and flats in the same directory), so when using SFS, I load one night's lights at a time and evaluate just that night, then output to that night's directory. If anyone has a better method for multi-nights & SFS, would love the tip. I have not found the reduction in suboptimal lights to reduce the image quality, typically the opposite. But obviously that would depend on the total integration time.
|
You cannot like this item. Reason: "ANONYMOUS".
You cannot remove your like from this item.
Editing a post is only allowed within 24 hours after creating it.
You cannot Like this post because the topic is closed.
Copy the URL below to share a direct link to this post.
This post cannot be edited using the classic forums editor.
To edit this post, please enable the "New forums experience" in your settings.
I feel the same way the OP does. I don't know where to go from here. I spent 24.5 hours gathering data for M106. Granted, my equipment leaves a lot to be desired. I have found that the more integration time, the less noise. Andrea if you look at my scope-camera combination, you'll probably have a heart attack  Scott Horton, that was so nice of you to type out the sequence of steps to take. So, YouTube. Good place to get your feet wet but not to advance your PI skills. I have followed many videos step by step and the results are never the same as the video outcome. The image ends up horrible and I have to start all over. So where do you go from here? Where can you learn the proper technique? https://www.astrobin.com/full/jwywmq/0/I would also love to see what a real PI person could do with my data. Would tell me if it's really any good. Mike
|
You cannot like this item. Reason: "ANONYMOUS".
You cannot remove your like from this item.
Editing a post is only allowed within 24 hours after creating it.
You cannot Like this post because the topic is closed.
Copy the URL below to share a direct link to this post.
This post cannot be edited using the classic forums editor.
To edit this post, please enable the "New forums experience" in your settings.
Mike,
All I can say is that is very very long way and you have to try and try again until it clicks in place. No amount of YT can do that. Only you. And keep it simple, as simple as possible but not any simpler. To see what other can do just share it, you can always learn from what others do with your data.
|
You cannot like this item. Reason: "ANONYMOUS".
You cannot remove your like from this item.
Editing a post is only allowed within 24 hours after creating it.
You cannot Like this post because the topic is closed.
Copy the URL below to share a direct link to this post.
This post cannot be edited using the classic forums editor.
To edit this post, please enable the "New forums experience" in your settings.
Mike H - Sky View Observatory:
I feel the same way the OP does. I don't know where to go from here. I spent 24.5 hours gathering data for M106. Granted, my equipment leaves a lot to be desired. I have found that the more integration time, the less noise. Andrea if you look at my scope-camera combination, you'll probably have a heart attack Scott Horton, that was so nice of you to type out the sequence of steps to take. So, YouTube. Good place to get your feet wet but not to advance your PI skills. I have followed many videos step by step and the results are never the same as the video outcome. The image ends up horrible and I have to start all over. So where do you go from here? Where can you learn the proper technique?
https://www.astrobin.com/full/jwywmq/0/
I would also love to see what a real PI person could do with my data. Would tell me if it's really any good.
Mike Looking at your work I think you’re doing great. I personally feel YouTube is an excellent resource for tips and tricks that you can incorporate into your own workflow but can also be quite confusing when you don’t really understand the basic principles of a particular tool, you just see it in action, like the result and think hey I’ll do that same thing to my image which can be disappointing. It can become an overwhelming sea of sliders that you don’t know what to do with - I can attest to this 100%! I would consider checking out Adam Block Studios - granted his work could be interpreted as winded and the scientific approach to each function may not be everyone’s learning style (even adam acknowledges this and is making some to the point videos), but you will Be so much more confident. Regarding my summarized workflow - that’s just what I find successful for OSC using NB filters on emission targets. I would use a different approach on a broadband target and incorporating NB data in galaxies. If you wanna go over your data and workflow together, shoot me a PM, I’d be happy to help.
|
You cannot like this item. Reason: "ANONYMOUS".
You cannot remove your like from this item.
Editing a post is only allowed within 24 hours after creating it.
You cannot Like this post because the topic is closed.
Copy the URL below to share a direct link to this post.
This post cannot be edited using the classic forums editor.
To edit this post, please enable the "New forums experience" in your settings.
Untouched stacked files M106 RGBM106 HaMike
|
You cannot like this item. Reason: "ANONYMOUS".
You cannot remove your like from this item.
Editing a post is only allowed within 24 hours after creating it.
You cannot Like this post because the topic is closed.
Copy the URL below to share a direct link to this post.
This post cannot be edited using the classic forums editor.
To edit this post, please enable the "New forums experience" in your settings.
Mike H - Sky View Observatory:
Untouched stacked files
M106 RGB
M106 Ha
Mike The images need to be properly calibrated and these aren't, isn't it?
|
You cannot like this item. Reason: "ANONYMOUS".
You cannot remove your like from this item.
Editing a post is only allowed within 24 hours after creating it.
You cannot Like this post because the topic is closed.
Copy the URL below to share a direct link to this post.
This post cannot be edited using the classic forums editor.
To edit this post, please enable the "New forums experience" in your settings.
In what way Andrea? The flats and darks were included in WBPP.
I also had restrictions on the download which I have now changed to anyone.
Mike
|
You cannot like this item. Reason: "ANONYMOUS".
You cannot remove your like from this item.
Editing a post is only allowed within 24 hours after creating it.
You cannot Like this post because the topic is closed.
Copy the URL below to share a direct link to this post.
This post cannot be edited using the classic forums editor.
To edit this post, please enable the "New forums experience" in your settings.